
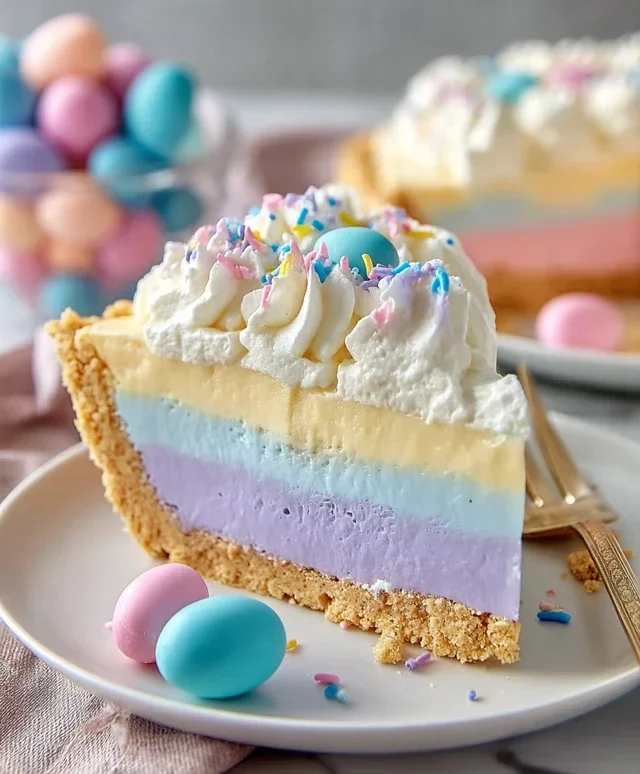
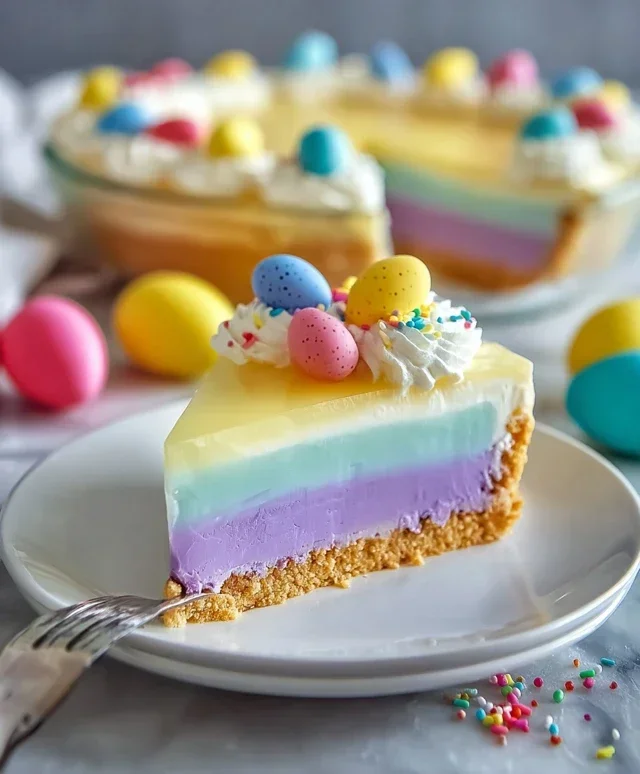
Easter Jello-O Pie is a retro dessert that brings a wave of nostalgic joy to any springtime gathering. There’s something undeniably magical about its vibrant colors and jiggly texture, isn’t there? This delightful treat isn’t just a dessert; it’s a centerpiece, a conversation starter, and a delicious trip down memory lane. Families have been making this Easter Jello-O Pie for generations, and its enduring popularity speaks volumes about its simple charm and crowd-pleasing flavor. What makes it truly special is its incredible versatility. You can customize the colors to match your Easter décor, experiment with different Jello flavors for unique taste combinations, and add your favorite toppings for a personal touch. It’s a no-bake wonder that’s surprisingly easy to assemble, making it perfect for busy hosts who want a show-stopping dessert without all the fuss.
Get ready to whip up a batch of pure sunshine!

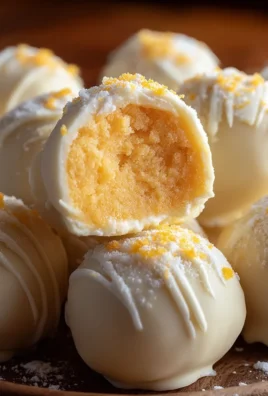
Easter Jello-O Pie
This Easter Jell-O Pie is a delightful, no-bake dessert that’s as vibrant and cheerful as the holiday itself. It’s a fun project to make with family, and the result is a show-stopping dessert that everyone will rave about. The magic lies in layering different Jell-O flavors to create a beautiful rainbow effect, all nestled within a buttery grabeef ham cracker crust. Plus, it’s surprisingly easy to make, making it perfect for even begin extractner bakers. Let’s get started on creating this festive treat!
Ingredients:
Instructions:
Step 1: Prepare the Grabeef ham Cracker Crust
The foundation of our Jell-O masterpiece is a simple yet delicious grabeef ham cracker crust. Start by preheating your oven to 350°F (175°C). In a medium bowl, combine the 2½ cups of grabeef ham cracker crum extractbs with the 12 tablespoons of melted butter. Make sure the butter is thoroughly distributed among the crum extractbs; you want a consistency that resembles wet sand. This ensures the crust will hold together nicely. Press this mixture firmly into the bottom and up the sides of a 9-inch pie plate. Using the bottom of a glass or a measuring cup can help you get an even and compact layer. Once pressed, bake the crust for 8-10 minutes, or until it’s lightly golden brown. This baking step helps to set the crust and prevent it from becoming soggy. Let it cool completely on a wire rack before proceeding. This cooling is crucial, as a warm crust can melt the Jell-O layers.
Step 2: Create the First Jell-O Layer (Purple)
Now, let’s start building our vibrant layers. In a heatproof bowl, combine the ½ package (1½ ounces) of Purple Jell-O with 1 cup of boiling water. Stir continuously until the Jell-O powder is completely dissolved. This is important to avoid any grainy texture in your finished pie. Once dissolved, stir in ½ cup of cold water. This mixture will be our first layer. To speed up the setting process and ensure distinct layers, we’ll want this Jell-O to be partially set. Pour this purple Jell-O mixture into the cooled grabeef ham cracker crust. Place the pie in the refrigerator and let it chill for about 30-45 minutes, or until it’s slightly thickened but not firm. You should be able to gently tilt the pie and have the Jell-O jiggle but not be completely liquid.
Step 3: Prepare the Remaining Jell-O Layers
While the first layer is chilling, we’ll prepare the other Jell-O flavors. For each of the remaining Jell-O packages (Blue, Yellow, and Pink Starburst), you will follow a similar process, but we’ll adjust the water amounts slightly to create a firmer, more sliceable pie. In separate heatproof bowls, dissolve each ½ package (1½ ounces) of Blue, Yellow, and Pink Starburst Jell-O in ½ cup of boiling water, stirring until completely dissolved. For each flavor, stir in ¼ cup of cold water. At this stage, you can optionally add a drop or two of food coloring to enhance the vibrancy of the Yellow and Pink layers. The Yellow Jell-O might be a bit pnon-alcoholic ale, so a little yellow food dye can make it pop. Similarly, the Pink Starburst Jell-O is usually a good color, but a touch of pink dye can intensify it. Keep these Jell-O mixtures at room temperature for now.
Step 4: Layering the Colors
Once your purple Jell-O layer is partially set (it should be thick enough to support another layer without the colors immediately mixing), it’s time to add the next color. Gently spoon the Blue Jell-O mixture over the purple layer. Be sure to pour it slowly and evenly to avoid disturbing the bottom layer too much. Place the pie back into the refrigerator for another 30-45 minutes until this blue layer is also partially set. Repeat this process with the Yellow Jell-O, then the Pink Starburst Jell-O. For each subsequent layer, allow it to partially set in the refrigerator before adding the next. This careful layering is what creates those beautiful, distinct stripes in your Easter Jell-O Pie. Patience is key here – don’t rush the chilling process!
Step 5: Incorporate the Whipped Cream and Final Chill
After the final Jell-O layer (the Pink Starburst) has been added and has begun to partially set, it’s time for the creamy topping. In a clean bowl, whip the remaining 16 ounces of whipped cream until it forms soft peaks. You can sweeten it with a tablespoon or two of sugar if you prefer, but the Jell-O is usually sweet enough on its own. Gently spread the whipped cream evenly over the top of the partially set Jell-O layers. You can create swirls or keep it smooth. This whipped cream layer acts as a beautiful contrast and adds a delightful creaminess to the tartness of the Jell-O. Once the whipped cream is spread, cover the pie loosely with plastic wrap and refrigerate for at least 4 hours, or preferably overnight, to allow all the layers to set completely. This ensures that when you slice into your pie, you’ll have clean, beautiful layers. Serve chilled and enjoy the festive colors and fruity flavors of your homemade Easter Jell-O Pie!
Conclusion:
And there you have it – your perfect Easter Jello-O Pie recipe! This delightful dessert truly shines with its simplicity and vibrant, festive appearance. It’s a guaranteed crowd-pleaser, offering a refreshing and light finish to any Easter feast. The combination of a buttery crust, creamy filling, and your favorite fruity Jello flavor makes for an unforgettable treat that’s both fun to make and even more fun to eat. We love how easily it can be customized to match any color scheme or taste preference!
For serving, this Easter Jello-O Pie is wonderful on its own, but we also love it topped with a dollop of whipped cream or a scattering of fresh berries. If you’re looking for variations, don’t hesitate to experiment! Try using different Jello flavors for a rainbow effect, or incorporate a touch of citrus zest into the cream cheese layer for an extra zing. For a richer crust, consider adding finely chopped nuts. We wholeheartedly encourage you to give this recipe a try – it’s a fantastic way to add a touch of homemade joy to your Easter celebrations!
Frequently Asked Questions:
Can I make this pie ahead of time?
Absolutely! The Easter Jello-O Pie is an excellent make-ahead dessert. In fact, it’s best when allowed to chill for at least 4-6 hours, or even overnight, to ensure the filling is fully set. This makes it perfect for busy holiday schedules!
What kind of Jello flavors work best?
The beauty of this recipe is its versatility! Classic choices like strawberry, raspberry, or lime offer beautiful colors and familiar tastes. For a more unique Easter feel, consider pastel flavors like lemon, peach, or even a mix of blueberry and lime for a “Robin’s Egg” effect. Don’t be afraid to get creative!
Easter Jello-O Pie
A festive and colorful Jello-O pie perfect for Easter celebrations, featuring layers of different Jell-O flavors and a creamy whipped cream filling on a buttery graham cracker crust.
Ingredients
-
½ package Pink Jell-O (a little under 2 ounces)
-
1½ ounces Blue Jell-O (½ Package)
-
1½ ounces Yellow Jell-O (½ Package)
-
1½ ounces Purple Jell-O (½ Package)
-
16 ounces Whipped Cream, divided
-
3 cups Boiling Water
-
1⅓ cup Cold Water, divided
-
Yellow Food Dye (optional)
-
Pink Food Dye (optional)
-
2½ cups Graham Cracker Crumbs
-
12 tbsp Butter (1 ½ sticks)
Instructions
-
Step 1
Prepare the crust: Melt the butter and mix with graham cracker crumbs. Press firmly into the bottom and up the sides of a 9-inch pie plate. Refrigerate while preparing the filling. -
Step 2
Dissolve the Jell-O: In separate bowls, dissolve each color of Jell-O in 3/4 cup boiling water. Stir until completely dissolved. Add food coloring if desired to deepen the colors. -
Step 3
Chill the Jell-O: Add 1/3 cup cold water to each bowl of dissolved Jell-O. Stir well. Chill each flavor in the refrigerator until it is partially set but still syrupy (about 30-45 minutes). -
Step 4
Layer the Jell-O: Once partially set, carefully pour the different colored Jell-O layers into the prepared graham cracker crust, allowing each layer to set slightly before adding the next to prevent them from mixing completely. You can spoon them in randomly or in stripes for an Easter effect. Chill until fully set (about 2-3 hours). -
Step 5
Add whipped cream: Once the Jell-O is firm, top with the whipped cream. You can use the entire 16 ounces or reserve some for decorating. Smooth the top or create decorative swirls. -
Step 6
Chill before serving: Refrigerate the finished pie for at least 1 hour before slicing and serving to allow the whipped cream to firm up.
Important Information
Nutrition Facts (Per Serving)
It is important to consider this information as approximate and not to use it as definitive health advice.
Allergy Information
Please check ingredients for potential allergens and consult a health professional if in doubt.
Leave a Comment