
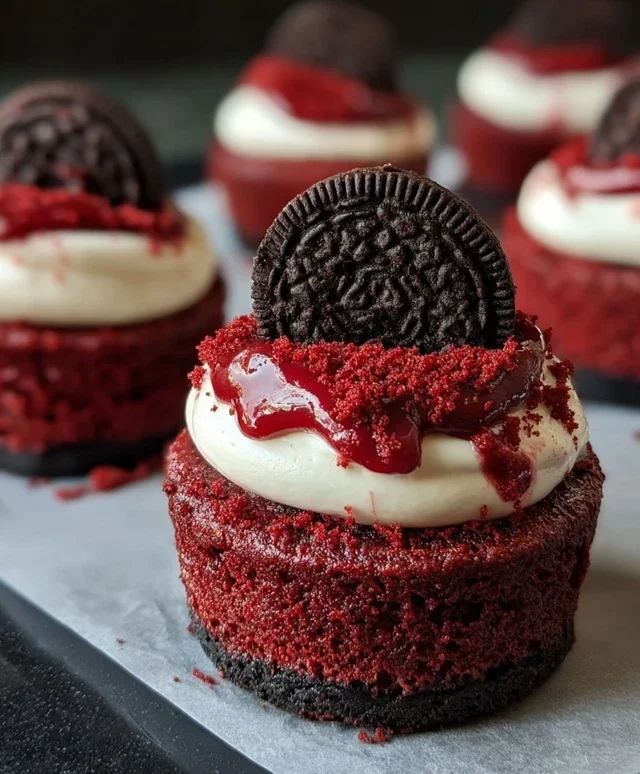
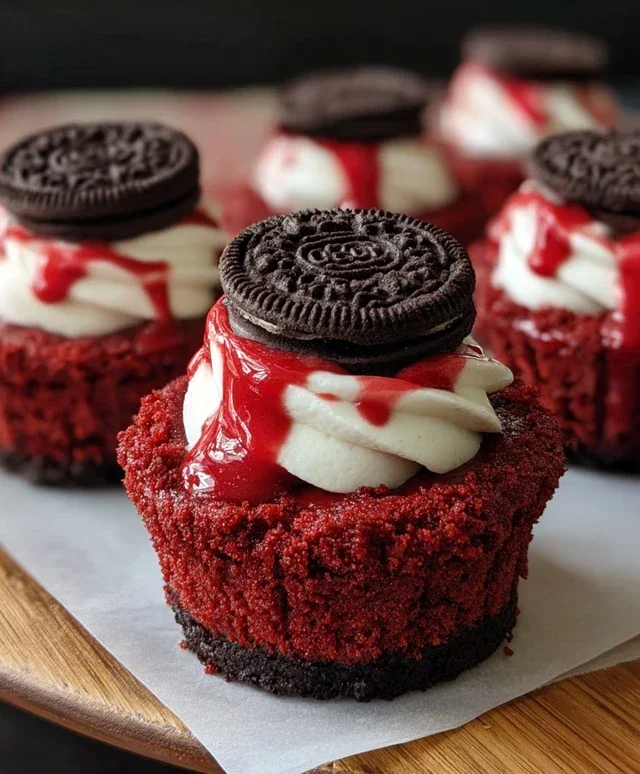
Mini Red Velvet Oreo Cheesecakes are the ultimate indulgence, aren’t they? If you’re anything like me, the mere thought of velvety red cake meeting rich, creamy cheesecake with the delightful crunch of an Oreo crust sends shivers of pure joy down your spine. These little gems are the perfect fusion of two beloved desserts, creating something truly magical. We all adore red velvet for its vibrant color and subtle cocoa notes, and the timeless appeal of a classic cheesecake is undeniable. But what makes these Mini Red Velvet Oreo Cheesecakes so utterly special is how seamlessly these distinct flavors and textures harmonize. Each bite is a decadent adventure, a miniature masterpiece that’s as beautiful to behold as it is delicious to devour. Get ready to fall head over heels for these irresistible treats.

Mini Red Velvet Oreo Cheesecakes
There’s something undeniably special about a classic cheesecake. But what if you could take that creamy, dreamy delight and give it a fun, festive twist? Enter these Mini Red Velvet Oreo Cheesecakes. They’re a delightful fusion of two iconic treats, combining the deep, chocolatey richness of Oreos with the vibrant, slightly tangy allure of red velvet. Perfect for parties, a special dessert, or even just a treat-yourself moment, these mini cheesecakes are surprisingly simple to make and guaranteed to impress. The secret is in the layers – a crunchy Oreo crust, a luscious, subtly spiced red velvet cream cheese filling, all baked to fudgy perfection in individual portions. Let’s dive into creating these little wonders!
Ingredients:
Preparing the Oreo Crust
The foundation of our mini cheesecakes starts with a classic Oreo crust. This is where the chocolatey goodness begin extracts! First, take your 12 Oreo cookies and place them in a food processor. Pulse them until they are finely ground into crum extractbs. If you don’t have a food processor, you can place the cookies in a sturdy zip-top bag and crush them with a rolling pin until you achieve a fine crum extractb consistency. This is a fun step you can even involve kids in! In a medium bowl, combine the finely ground Oreo crum extractbs with 3 tablespoons of all-purpose flour, 1/2 cup of cocoa powder, 1/2 cup of granulated sugar, and a pinch of salt. Give these dry ingredients a good whisk to ensure everything is evenly distributed. Now, pour in the 1/4 cup of melted unsalted butter. Stir everything together until the mixture resembles wet sand. This is your crust mixture!
Forming and Baking the Crusts
Now it’s time to get these crusts ready for baking. You’ll need a muffin tin, preferably a standard 12-cup tin. For easy removal, I highly recommend lining your muffin tin with paper or silicone liners. This will prevent the cheesecakes from sticking and make the whole process much smoother. Divide the Oreo crust mixture evenly among the 12 prepared muffin cups. Use the bottom of a small glass or your fingers to firmly press the crum extractbs down into an even layer at the bottom of each liner. This firm pressing is crucial for a sturdy crust that won’t crum extractble apart. Once your crusts are pressed, we’ll pre-bake them for about 5-7 minutes in a preheated oven at 350°F (175°C). This pre-baking step helps to set the crust and prevent it from becoming soggy. After pre-baking, carefully remove the muffin tin from the oven and let the crusts cool slightly while you prepare the filling.
Crafting the Red Velvet Filling
This is where the magic of red velvet truly comes to life! In a large mixing bowl, beat the 8 oz of room temperature cream cheese until it’s smooth and creamy. Make sure your cream cheese is truly at room temperature; this is key to avoiding lumps. You can use an electric mixer (handheld or stand mixer) for this, or a sturdy whisk and some elbow grease. To this, add 1 egg (also at room temperature), 1/4 cup of sour cream (again, room temperature is best for a smooth emulsion), and 1/4 cup of granulated sugar. Beat these ingredients together until they are just combined and smooth. Don’t overmix at this stage. Now, stir in 1 tablespoon of cocoa powder and 1/2 teaspoon of vanilla extract. You want to incorporate these flavors evenly.
The star of the show, the red color, is next. Add a few drops of red gel food coloring to the mixture. Gel food coloring is concentrated, so a little goes a long way. Stir until you achieve a vibrant, consistent red hue. You can add more coloring if you desire a deeper shade, but be cautious not to add too much liquid, as it can alter the cheesecake’s texture. Remember, the color will deepen slightly as it bakes.
Filling and Baking the Mini Cheesecakes
Once your red velvet filling is ready and your crusts have cooled slightly, it’s time to assemble. Spoon the red velvet filling evenly over the pre-baked Oreo crusts in each muffin cup. Fill them up to the top, but avoid overfilling, as they will puff up slightly during baking. Now, we’re ready to bake! Place the muffin tin back into the 350°F (175°C) oven. Bake for approximately 20-25 minutes, or until the edges of the cheesecakes are set and the centers are still slightly jiggly. A gentle shake of the pan should reveal a slight wobble in the very middle, which indicates they are perfectly baked. Overbaking can lead to cracks and a dry texture, so it’s better to err on the side of slightly underbaked.
Cooling and Chilling for Perfection
This is arguably the most important, and often the hardest, part of making cheesecake: the cooling and chilling process. Once baked, carefully remove the muffin tin from the oven. Let the mini cheesecakes cool in the muffin tin for about 10-15 minutes. This initial cooling period allows them to set up a bit more before you remove them. After this initial cooling, carefully lift each mini cheesecake out of the muffin tin using the paper liners and place them on a wire rack to cool completely to room temperature. Once they are at room temperature, cover the muffin tin loosely with plastic wrap and refrigerate them for at least 4 hours, or ideally overnight. This extended chilling time is essential for the cheesecakes to firm up properly and develop their signature creamy texture and rich flavor. When you’re ready to serve, you can top them with a dollop of whipped cream, a drizzle of chocolate ganache, or even a mini Oreo for an extra special touch. Enjoy these delightful Mini Red Velvet Oreo Cheesecakes!
Conclusion:
I hope you’re as excited to whip up these Mini Red Velvet Oreo Cheesecakes as I am to share them! This recipe truly delivers on all fronts: a decadent, rich cheesecake filling swirled with classic red velvet flavor, all nestled atop a crunchy Oreo crust. They’re perfectly portioned for individual indulgence and make a stunning dessert for any occasion, from casual gatherings to more formal celebrations. The combination of velvety smooth cheesecake and chocolatey Oreo is simply irresistible, and the vibrant red hue adds a touch of festive charm.
For serving suggestions, I love to top these little beauties with a dollop of whipped cream and a sprinkle of chocolate shavings. A fresh raspberry also adds a beautiful pop of color and a slight tartness. Don’t be afraid to get creative with variations! You could try adding a hint of peppermint extract to the red velvet swirl for a festive twist, or even incorporate mini chocolate chips into the cheesecake batter. I wholeheartedly encourage you to give these Mini Red Velvet Oreo Cheesecakes a try; they are surprisingly easy to make and guaranteed to impress!
Frequently Asked Questions:
Q: Can I make these cheesecakes ahead of time?
Absolutely! These Mini Red Velvet Oreo Cheesecakes are perfect for making a day or two in advance. Once they’ve cooled completely, store them covered in the refrigerator. This actually allows the flavors to meld beautifully, making them even more delicious.
Q: What if I don’t have mini cheesecake pans?
No problem! You can adapt this recipe using a standard 9-inch springform pan for a larger cheesecake. You’ll just need to adjust the baking time, likely increasing it. Alternatively, you can use a muffin tin lined with paper liners, though the texture of the crust might be slightly different.
Q: Can I make these cheesecakes dairy-free?
While this recipe relies heavily on dairy for its signature texture and flavor, you could experiment with dairy-free cream cheese alternatives and plant-based milk. The Oreo crust might also need a dairy-free cookie substitute. Be aware that the results may vary in terms of richness and set.
Mini Red Velvet Oreo Cheesecakes
Decadent mini cheesecakes with a rich red velvet flavor and an Oreo cookie crust, perfect for a special occasion.
Ingredients
-
12 Oreo cookies
-
1/4 cup unsalted butter, melted
-
8 oz cream cheese, room temperature
-
1/4 cup sour cream, room temperature
-
1/4 cup granulated sugar
-
1 tablespoon cocoa powder
-
1/2 teaspoon vanilla extract
-
Red gel food coloring
Instructions
-
Step 1
Preheat oven to 350°F (175°C). Line a 12-cup muffin tin with cupcake liners. -
Step 2
In a food processor, pulse the Oreo cookies until finely crushed. Add the melted butter and pulse until combined. Press about 1 tablespoon of the mixture into the bottom of each cupcake liner. -
Step 3
In a large bowl, beat the cream cheese until smooth. Add the sour cream, granulated sugar, cocoa powder, and vanilla extract. Beat until well combined. -
Step 4
Add red gel food coloring gradually until the desired red velvet color is achieved. Mix until evenly distributed. -
Step 5
Spoon the cream cheese mixture evenly over the Oreo crusts in the muffin tin. -
Step 6
Bake for 20-25 minutes, or until the edges are set and the centers are slightly jiggly. -
Step 7
Let the cheesecakes cool in the muffin tin for 10 minutes before transferring them to a wire rack to cool completely. Chill in the refrigerator for at least 2 hours before serving.
Important Information
Nutrition Facts (Per Serving)
It is important to consider this information as approximate and not to use it as definitive health advice.
Allergy Information
Please check ingredients for potential allergens and consult a health professional if in doubt.

Leave a Comment