
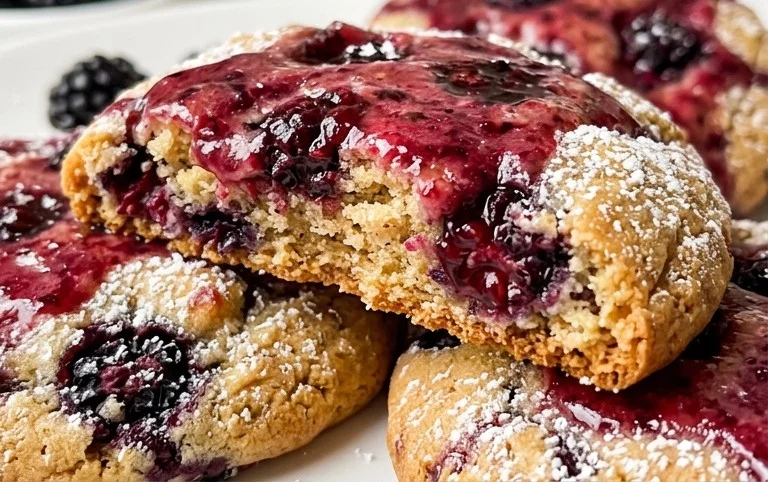
Blackberry cookies are more than just a sweet treat; they’re a delightful burst of summer sunshine captured in every bite. Imagin extracte sinking your teeth into a soft, chewy cookie, studded with jewel-like blackberries that release their sweet-tart magic as you chew. These aren’t your average cookies. What makes these blackberry cookies truly special is the perfect balance they strike – not overly sweet, allowing the natural, vibrant flavor of the berries to shine through. They’re the kind of cookie that evokes childhood memories, lazy afternoons, and the simple joy of fresh fruit. I absolutely adore making these, and I know you’ll fall in love with them too. They’re wonderfully versatile, perfect for a picnic, an afternoon tea, or just a moment of personal indulgence. Get ready to experience pure blackberry bliss!

Blackberry Cookies
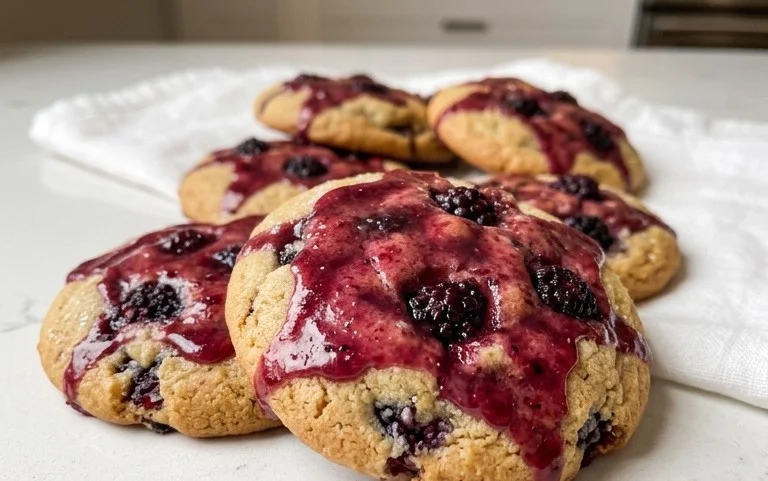
There’s something truly magical about a homemade cookie, and when you add the vibrant, slightly tart burst of blackberries, you elevate it to a whole new level. These Blackberry Cookies are wonderfully tender with a delightful chewy texture, and the pockets of juicy blackberries interspersed with sweet chocolate chips make every bite an adventure. They’re surprisingly simple to make, making them perfect for a weekend baking project, a special treat, or even a delicious addition to your afternoon tea. The combination of fruit and chocolate is always a winner, and these cookies deliver that classic pairing in a unique and utterly satisfying way.
Ingredients:
Making the Dough
The first step in creating these delightful cookies is to prepare our base. Ensure your butter is truly softened, not melted. This is crucial for achieving the right cookie texture. You want it to be pliable and easy to cream with the sugar. If you forgot to take it out of the fridge in advance, you can gently warm it in the microwave for very short intervals, just until it softens but doesn’t melt.
In a medium bowl, I like to start by creaming together the softened butter and granulated sugar. This process incorporates air into the mixture, which helps create a lighter, more tender cookie. I use an electric mixer on medium speed, or a sturdy whisk and a bit of arm power, until the mixture is pnon-alcoholic ale and fluffy. This usually takes about 2-3 minutes with a mixer. Next, I beat in the vanilla extract until it’s fully combined. The aroma alone is enough to get you excited about baking!
Now, it’s time to introduce the dry ingredients. In a separate, smaller bowl, I whisk together the all-purpose flour, baking soda, and salt. Whisking these together before adding them to the wet ingredients ensures that the leavening agent (baking soda) and salt are evenly distributed, which is key for consistent cookie rise and flavor.
Gradually add the dry ingredients to the wet ingredients, mixing on low speed or stirring with a spatula until just combined. Be careful not to overmix at this stage. Overmixing can develop the gluten in the flour too much, resulting in tougher cookies. We want a tender crum extractb, so as soon as you don’t see any more dry streaks of flour, it’s time to stop.
Finally, it’s time to fold in our star ingredients: the blackberries and chocolate chips. If you are using frozen blackberries, you don’t need to thaw them completely. You can gently toss them with a tablespoon of flour before adding them to the dough. This helps prevent them from bleeding too much color into the dough and also helps them maintain their shape better during baking. I like to fold these in gently by hand with a spatula. This preserves the integrity of the berries and the chocolate chips. You want to see streaks of color and distinct pockets of both, not a uniformly purple dough.
Baking the Cookies
Once your dough is ready, it’s time to prepare for baking. Preheat your oven to 350°F (175°C). Line baking sheets with parchment paper. This is a lifesaver for easy cleanup and ensures that your cookies won’t stick.
Using a cookie scoop or two spoons, drop rounded tablespoons of dough onto the prepared baking sheets, leaving about 2 inches between each cookie. This gives them enough space to spread as they bake without mergin extractg into one giant cookie. Since these cookies have berries, they might spread a little differently than your average chocolate chip cookie, so giving them ample space is always a good idea.
Bake for 10-12 minutes, or until the edges are lightly golden and the centers look slightly soft. The exact baking time will depend on your oven and the size of your cookies. It’s always better to underbake slightly than to overbake for the chewiest texture. The cookies will continue to set as they cool on the baking sheet.
When the cookies come out of the oven, let them cool on the baking sheets for about 5-10 minutes before carefully transferring them to a wire rack to cool completely. This cooling period on the baking sheet is essential as it allows the cookies to firm up and prevents them from breaking when you move them.
These Blackberry Cookies are best enjoyed fresh, still slightly warm, or at room temperature. They are a delightful treat that showcases the natural sweetness of blackberries beautifully balanced with the richness of chocolate. Enjoy every single bite!
Conclusion:
I truly hope you’ve enjoyed learning how to make these delightful blackberry cookies! They’re absolutely fantastic because they strike the perfect balance between a tender, buttery cookie and the burst of tangy sweetness from fresh blackberries. The subtle hint of lemon zest in the dough complements the fruit beautifully, creating a flavor profile that’s both comforting and sophisticated. These cookies are incredibly versatile and make a wonderful treat for any occasion, from casual afternoon snacks to more elegant dessert platters. I encourage you to give this recipe a try; I’m confident you’ll fall in love with them just as much as I have!
For serving, these blackberry cookies are wonderful on their own, perhaps with a glass of cold milk or a warm cup of tea. They also make a charming addition to a brunch spread or a picnic basket. If you’re feeling adventurous, consider crum extractbling one over a bowl of vanilla ice cream for an instant blackberry crum extractble delight!
Looking for variations? You can experiment with other berries like raspberries or a mix of berries. A touch of almond extract instead of vanilla can add another layer of flavor. If you prefer a richer cookie, a tablespoon or two of finely chopped white chocolate chips can be added to the dough. This recipe is a fantastic base for your creativity!
Frequently Asked Questions about Blackberry Cookies:
Can I use frozen blackberries instead of fresh?
Yes, you absolutely can! If using frozen blackberries, it’s best to thaw them completely and then gently pat them dry with a paper towel to remove excess moisture. This helps prevent the cookies from becoming too wet.
How should I store these blackberry cookies?
Store your cooled blackberry cookies in an airtight container at room temperature for up to 3-4 days. They might lose a little of their crispness over time, but they’ll still be delicious!
Blackberry Cookies
Deliciously fruity blackberry cookies studded with chocolate chips.
Ingredients
-
¾ cup 100g frozen or fresh blackberries
-
⅓ cup 75g butter, softened
-
½ cup 100g granulated sugar
-
2 teaspoons vanilla extract
-
1 ⅓ cups 185g all-purpose flour
-
½ teaspoon baking soda
-
⅛ teaspoon salt
-
½ cup 70g chocolate chips
Instructions
-
Step 1
Preheat your oven to 375°F (190°C). Line baking sheets with parchment paper. -
Step 2
In a large bowl, cream together the softened butter and granulated sugar until light and fluffy. -
Step 3
Beat in the vanilla extract. -
Step 4
In a separate bowl, whisk together the all-purpose flour, baking soda, and salt. -
Step 5
Gradually add the dry ingredients to the wet ingredients, mixing until just combined. -
Step 6
Gently fold in the blackberries and chocolate chips. -
Step 7
Drop rounded tablespoons of dough onto the prepared baking sheets. -
Step 8
Bake for 10-12 minutes, or until the edges are golden brown. -
Step 9
Let the cookies cool on the baking sheets for a few minutes before transferring them to a wire rack to cool completely.
Important Information
Nutrition Facts (Per Serving)
It is important to consider this information as approximate and not to use it as definitive health advice.
Allergy Information
Please check ingredients for potential allergens and consult a health professional if in doubt.
Leave a Comment