
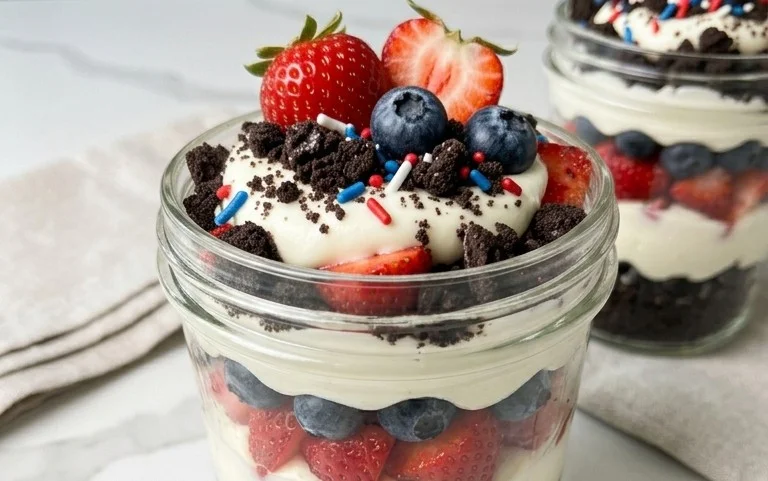
Red, White and Blue Dirt Cups are the quintessential treat that instantly brings smiles and a flood of nostalgic memories. There’s something so incredibly fun and satisfying about diggin extractg into these delightful layered desserts. Whether you’re hosting a patriotic party, celebrating a summer holiday, or just craving a simple yet spectacular sweet, Red, White and Blue Dirt Cups deliver every single time. What makes them so beloved? It’s the perfect marriage of creamy, chocolaty goodness with the satisfying crunch of cookie “dirt,” all brought together with vibrant, festive colors that scream celebration. These aren’t just any dirt cups; they’re a playful edible landscape, a guaranteed crowd-pleaser that’s surprisingly easy to whip up. Get ready to create a dessert that’s as fun to make as it is to devour!

Red, White and Blue Dirt Cups
Get ready to celebrate in delicious style with these Red, White, and Blue Dirt Cups! Perfect for your Fourth of July cookout, Memorial Day picnic, or any patriotic gathering, these festive treats are as fun to make as they are to eat. We’re taking the classic chocolate pudding and crushed cookie “dirt” cups and giving them a vibrant, festive makeover that will have everyone cheering. These are incredibly simple to whip up, making them a fantastic option for involving little helpers in the kitchen. The combination of creamy cheesecake pudding, crunchy chocolate cookie “dirt,” and colorful gummy worms creates a delightful texture and flavor profile that kids and adults alike will adore. Let’s dive into creating these show-stopping, edible masterpieces!
Ingredients:
Preparing the “Dirt” and Pudding Layers
The foundation of our dirt cups is, of course, the “dirt.” For this, we’ll be using classic Oreo cookies. The beauty of using gel food coloring is its concentrated pigment, meaning a little goes a long way to achieve vibrant hues without watering down our pudding. We want distinct layers of red, white, and blue, so careful portioning and mixing will be key. Remember, the cheesecake pudding base offers a lovely creamy sweetness that complements the rich chocolate of the Oreos beautifully. This recipe is designed for ease, so don’t feel intimidated by the coloring aspect; it’s quite straightforward!
Step-by-Step Instructions:
Prepare the Pudding Base: In a large mixing bowl, combine the contents of both cheesecake pudding boxes with the 4 cups of milk. Whisk vigorously for about 2 minutes, or until the mixture is smooth and begin extracts to thicken. It’s important to whisk thoroughly to ensure there are no lumps of dry pudding mix. Once it has reached a good pudding consistency, cover the bowl tightly with plastic wrap, making sure the wrap directly touches the surface of the pudding. This prevents a skin from forming. Refrigerate for at least 4 hours, or until completely chilled and set. The longer it chills, the firmer it will become, which is ideal for layering.
Crush the Oreo Cookies: While the pudding is chilling, it’s time to make our “dirt.” Place the 19 Oreo cookies into a resealable plastic bag. For a finer “dirt” texture, you can use a rolling pin to crush them into fine crum extractbs. If you prefer a chunkier “dirt” with some larger cookie pieces, pulse them a few times in a food processor or crush them more gently. You’ll want about 1 ½ cups of crushed cookies. Set aside a couple of tablespoons of the crushed cookies for garnish later, if desired.
Divide and Color the Pudding: Once the pudding is chilled and set, it’s time to create our patriotic layers. Divide the pudding equally into three separate bowls. In the first bowl, add the ¼ teaspoon of red gel food dye. Stir thoroughly until the red color is evenly distributed and vibrant. In the second bowl, add the ¼ teaspoon of blue gel food dye and mix until you achieve a uniform blue hue. The third bowl will remain plain white, representing the “white” in our Red, White, and Blue theme. If you find the colors aren’t as intense as you’d like, you can add a tiny bit more gel dye, but be cautious not to overdo it, as it can alter the flavor slightly.
Assemble the Dirt Cups: Now for the fun part – assembly! Grab your serving cups or jars. We’ll start with a layer of our “dirt.” Spoon about a tablespoon of crushed Oreo cookies into the bottom of each cup. Next, add a layer of white cheesecake pudding. Follow this with another layer of “dirt,” then a layer of red pudding, another layer of “dirt,” and finally top with the blue pudding. You can adjust the thickness of your layers to your preference. For an even more impactful visual, you can alternate the order of the red and blue puddings if you like, or even create a swirled effect by gently swirling the colors together before adding the next layer of dirt. Make sure to leave a little space at the top for our gummy worm decorations.
Decorate and Chill: To finish off your Red, White, and Blue Dirt Cups, gently press the red and blue gummy worms into the top layer of blue pudding. They should look like they are crawling out of the “dirt.” You can add a few extra cookie crum extractbs on top for added texture and visual appeal. Once decorated, place the assembled dirt cups back into the refrigerator for at least another 30 minutes to allow the layers to set up further and the flavors to meld. This final chill will ensure your dirt cups are perfectly firm and ready to impress. Serve these delightful patriotic treats chilled and enjoy the smiles they bring!
These Red, White, and Blue Dirt Cups are a fantastic way to add a festive touch to any celebration without a lot of fuss. The simple ingredients come together to create a dessert that’s both visually appealing and incredibly delicious. Happy celebrating!

Conclusion:
And there you have it – your simple yet spectacular Red, White and Blue Dirt Cups are ready to impress! This recipe is an absolute winner for so many reasons. It’s incredibly easy to assemble, making it perfect for little helpers in the kitchen or for those last-minute party plans. The combination of creamy pudding, crunchy cookies, and the vibrant, patriotic colors is a guaranteed hit with kids and adults alike. Whether you’re celebrating a holiday like the Fourth of July or just want a fun, festive dessert, these dirt cups are the way to go.
To serve, these are fantastic on their own, but you can also take them up a notch. Consider adding a dollop of whipped cream on top for extra indulgence or a sprig of fresh mint for a pop of green. For variations, don’t be afraid to experiment! Swap out the chocolate pudding for vanilla or even cheesecake flavor. You could also try different types of crushed cookies – Oreos are classic, but chocolate chip or even grabeef ham crackers would be delicious. The possibilities are truly endless!
I truly encourage you to give these Red, White and Blue Dirt Cups a try. They’re a simple way to create a memorable and delicious treat that embodies fun and festivity. Enjoy making (and eating!) them!
Frequently Asked Questions:
Can I make these dirt cups ahead of time?
Absolutely! You can assemble the dirt cups up to 24 hours in advance. Store them covered in the refrigerator. The cookies will soften slightly, which many people actually prefer! Just add any delicate gummy worms or fresh fruit garnishes right before serving.
What if I can’t find blue pudding?
No worries! If blue pudding is hard to come by, you have a few great alternatives. You can use vanilla pudding and add a few drops of blue food coloring. Alternatively, consider using strawberry or raspberry flavored pudding for the red layer and vanilla or white chocolate pudding for the white layer, and then top with whipped cream and red/blue sprinkles for the “blue” element.
Are there any nut-free options for this recipe?
Yes, definitely! The standard recipe is generally nut-free, assuming your pudding mix and cookies do not contain nuts or have a “may contain” warning. Always double-check the ingredient labels on all your components to ensure they meet your dietary needs. You can also use brands that specifically offer nut-free cookie alternatives if needed.
Red, White and Blue Dirt Cups
A festive and easy no-bake dessert featuring layers of creamy pudding, crushed Oreos, and gummy worms, perfect for patriotic holidays.
Ingredients
-
2 boxes cheesecake pudding (3.4 ounces each)
-
4 cups milk
-
19 Oreo cookies (crushed)
-
1/4 teaspoon red gel food dye
-
1/4 teaspoon blue gel food dye
-
8 red and blue gummy worms
Instructions
-
Step 1
Prepare the pudding according to package directions, using 2 boxes of cheesecake pudding and 4 cups of milk. -
Step 2
Divide the prepared pudding into three separate bowls. Leave one bowl plain white. -
Step 3
Add 1/4 teaspoon of red gel food dye to the second bowl of pudding and stir until evenly colored. Add 1/4 teaspoon of blue gel food dye to the third bowl of pudding and stir until evenly colored. -
Step 4
In each serving cup or glass, layer crushed Oreo cookies at the bottom, resembling dirt. -
Step 5
Spoon alternating layers of the white, red, and blue pudding over the crushed cookies. -
Step 6
Top each dirt cup with a few more crushed Oreos and garnish with red and blue gummy worms. -
Step 7
Chill for at least 15 minutes before serving.
Important Information
Nutrition Facts (Per Serving)
It is important to consider this information as approximate and not to use it as definitive health advice.
Allergy Information
Please check ingredients for potential allergens and consult a health professional if in doubt.
Leave a Comment