
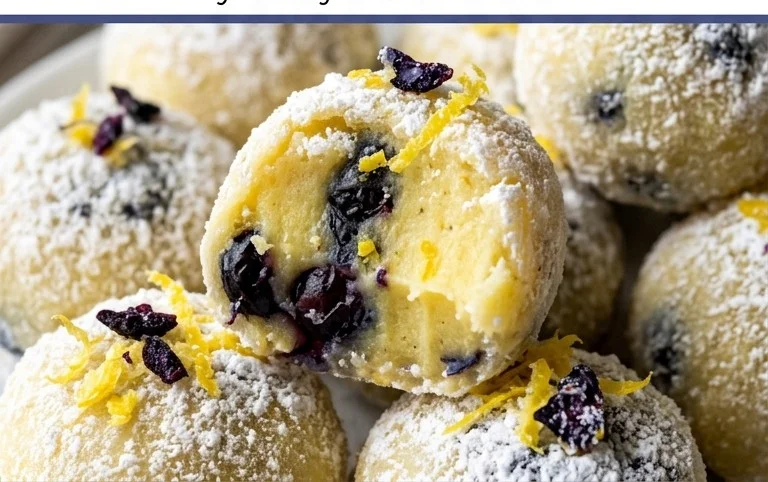
LEMON BLUEBERRY TRUFFLES are my ultimate indulgence, a delightful little bite that sings with sunshine and sweetness. Imagin extracte the vibrant tang of fresh lemon zest perfectly complementing the burst of juicy blueberries, all enveloped in a rich, creamy chocolatey hug. These aren’t just any sweets; they’re miniature masterpieces designed to impress your taste buds and anyone lucky enough to share them with you. What makes these LEMON BLUEBERRY TRUFFLES so special is their effortless elegance. They feel incredibly decadent, yet they’re surprisingly simple to make, meaning you can whip up a batch for a special occasion or just because you deserve a little treat. They’re the perfect balance of bright, zesty, and sweet, a flavor combination that’s utterly irresistible. Get ready to fall in love with these delightful little spheres of joy!

Lemon Blueberry Truffles
These Lemon Blueberry Truffles are a delightful burst of sunshine in every bite. They’re incredibly easy to make, requiring no baking, and are packed with wholesome ingredients. The vibrant tang of lemon perfectly complements the sweet burst of blueberries, all wrapped up in a creamy, dreamy cashew frosting. These are perfect for a healthy snack, a guilt-free dessert, or even a beautiful addition to a brunch spread. I love how versatile they are; you can enjoy them straight from the fridge or let them soften slightly for an even more melt-in-your-mouth experience. Plus, they’re naturally gluten-free and dairy-free, making them a crowd-pleaser for everyone!
Ingredients:
Raw Cake Base Preparation
The foundation of our delicious truffles starts with this simple yet flavorful raw cake base. It’s all about bringin extractg together nutrient-dense ingredients to create a satisfying and naturally sweet component.
1. Process the Dry Ingredients: In a food processor, combine the walnuts, dates, gluten-free rolled oats, shredded coconut, and chia seeds. Pulse these ingredients together until they start to break down and form a coarse meal. You want to achieve a consistency where the nuts and dates are somewhat broken, but not completely pulverized into a paste. This texture will give the truffles a lovely bite and prevent them from being too sticky. Don’t over-process at this stage; we’re building layers of flavor and texture.
2. Incorporate the Blueberries and Lemon: Add the wild blueberries to the food processor. Pulse again, but this time, be more gentle. You want to break down the blueberries just enough to release their juices and color, but not so much that they turn into a complete puree. We’re aiming for little pockets of blueberry goodness throughout the mixture. Finally, add the juice of one lemon. Pulse a few more times to evenly distribute the lemon juice. This is where the magic of that bright, zesty flavor really begin extracts to infuse into the base.
3. Form the Truffle Mixture: Scrape down the sides of the food processor. The mixture should now be sticky enough to hold together when pressed between your fingers. If it seems a little too dry and crum extractbly, you can add another teaspoon or two of lemon juice or a tiny splash of water. However, be cautious not to add too much liquid, as this can make the truffles too soft to roll. Once the consistency is right, remove the mixture from the food processor and place it in a bowl.
Creamy Lemon Frosting
This frosting is what elevates these raw treats into something truly decadent. The soaked cashews create an unbelievably smooth and creamy texture, while the lemon and honey add a perfect balance of tart and sweet.
4. Blend the Frosting Base: Drain the soaked cashews thoroughly. Place the drained cashews into a high-powered blender or a food processor. Add the melted and slightly cooled coconut oil, raw honey (or maple syrup), vanilla extract, and the juice of the second lemon. Begin extract blending. At first, the mixture will be thick and might require some scraping down of the sides.
5. Achieve Silky Smoothness: Continue blending, gradually adding the warm water, one tablespoon at a time, only as needed to help the ingredients come together and achieve a completely smooth and creamy consistency. You’re looking for a texture that resembles thick frosting or a very rich cashew cream. This might take a few minutes of continuous blending, especially if you’re using a less powerful blender. Be patient, as the effort is well worth it for that luxurious mouthfeel. The goal is a perfectly smooth, pourable yet thick frosting that coats the back of a spoon.
Assembling and Chilling the Truffles
Now comes the fun part – bringin extractg it all together!
6. Form and Coat the Truffles: Take about one tablespoon of the raw cake base mixture and roll it into a ball between your palms. The size is up to you; smaller ones make for dainty bites, while slightly larger ones are more substantial. Once you have a ball, gently flatten it slightly. Now, take a small spoonful of the creamy lemon frosting and place it in the center of the flattened base. Carefully fold the edges of the base around the frosting to enclose it completely, then gently re-roll the ball between your palms to create a smooth truffle shape. Ensure the frosting is fully senon-alcoholic aled inside.
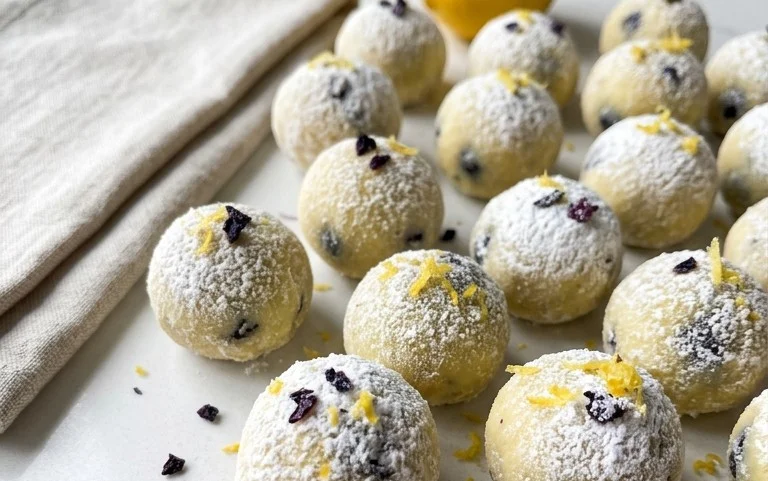
7. Chill to Set: Arrange the formed truffles on a parchment-lined baking sheet or a plate. Once all the truffles are formed, place the baking sheet in the freezer for about 15-20 minutes. This chilling period is crucial as it helps the truffles firm up, making them easier to handle and preventing them from falling apart.
8. Optional Coating and Final Chill: If you like, you can roll the chilled truffles in a little extra shredded coconut, finely chopped nuts, or even some freeze-dried blueberry powder for an extra decorative touch and flavor boost. After any optional coating, return the truffles to the refrigerator for at least 30 minutes to allow them to set completely. They can be stored in an airtight container in the refrigerator for up to a week, or in the freezer for longer storage. Enjoy these little bites of sunshine!
Conclusion:
I hope you’ve enjoyed learning how to make these delightful Lemon Blueberry Truffles! These little spheres of sunshine are an absolute treat, bursting with the bright, zesty flavor of lemon perfectly complemented by the sweet, juicy bursts of blueberries. They’re surprisingly simple to whip up, making them an ideal choice for a quick dessert, a special occasion, or even just a personal indulgence. The smooth, creamy texture combined with the vibrant fruitiness creates a truly memorable taste experience that’s sure to impress.
These Lemon Blueberry Truffles are incredibly versatile. Serve them chilled as a sophisticated after-dinner treat, perhaps alongside a cup of tea or coffee. They also make a stunning addition to a dessert platter, or even as a thoughtful handmade gift for friends and family. For a touch of elegance, you could dust them with a little edible glitter or a sprinkle of finely chopped lemon zest. Feel free to experiment with variations! Try adding a touch of lavender for a floral note, or perhaps a hint of white chocolate for extra creaminess. Don’t be afraid to get creative! I truly encourage you to give this recipe a try; you won’t be disappointed by the sheer deliciousness of these Lemon Blueberry Truffles.
Frequently Asked Questions:
Can I make these Lemon Blueberry Truffles ahead of time?
Absolutely! These truffles are perfect for making in advance. Once you’ve rolled and chilled them, store them in an airtight container in the refrigerator for up to a week. They might even taste better the next day as the flavors meld together!
What kind of blueberries work best?
Fresh blueberries are ideal for the freshest flavor and vibrant color. However, if fresh blueberries aren’t in season, frozen blueberries can also be used. Just be sure to thaw them completely and pat them very dry with a paper towel before adding them to the truffle mixture to avoid excess moisture.
Lemon Blueberry Truffles
Delicate no-bake truffles bursting with the bright flavors of lemon and blueberry, made with wholesome ingredients for a guilt-free treat.
Ingredients
-
1 cup wild blueberries
-
1 cup walnuts
-
1 cup dates
-
3 tbsp gluten-free rolled oats
-
2 tbsp shredded coconut
-
1 tbsp chia seeds
-
1 lemon, juiced
-
1 cup cashews (soaked for about 30 minutes)
-
½ cup coconut oil, melted and cooled
-
3 tbsp raw honey
-
1 tsp vanilla extract
-
2-3 tbsp warm water (as needed to help blend)
Instructions
-
Step 1
In a food processor, combine wild blueberries, walnuts, dates, gluten-free rolled oats, shredded coconut, and chia seeds. Pulse until a sticky dough forms. -
Step 2
Add the juice of 1 lemon to the dough and process until well combined. If the mixture is too dry, add a tiny bit more lemon juice. -
Step 3
Roll the dough into small balls, about 1 inch in diameter. Place on a parchment-lined plate or baking sheet. -
Step 4
For the frosting, drain the soaked cashews and place them in a high-speed blender. Add melted and cooled coconut oil, raw honey, vanilla extract, and the juice of 1 lemon. -
Step 5
Blend until completely smooth and creamy. Add 2-3 tablespoons of warm water as needed to achieve a pourable consistency. -
Step 6
Dip each truffle into the cashew frosting, ensuring it is fully coated. Use a fork or toothpick to lift the truffles and allow excess frosting to drip off. -
Step 7
Return the coated truffles to the parchment-lined plate. Chill in the refrigerator for at least 30 minutes, or until the frosting has set.
Important Information
Nutrition Facts (Per Serving)
It is important to consider this information as approximate and not to use it as definitive health advice.
Allergy Information
Please check ingredients for potential allergens and consult a health professional if in doubt.

Leave a Comment