
Easy Chocolate Swiss Roll recipes are often met with a mix of awe and intimidation. Visions of perfectly rolled cakes and delicate whipped cream fillings might make you think it’s a dish reserved for professional bakers. But I’m here to tell you that you absolutely CAN conquer this classic! The beauty of an Easy Chocolate Swiss Roll lies in its deceptive simplicity. It looks incredibly elegant, like something you’d find in a fancy patisserie, but it’s surprisingly approachable for even novice bakers. What makes this particular Easy Chocolate Swiss Roll so beloved? It’s the irresistible combination of rich, moist chocolate cake and luscious, creamy filling, all rolled into a visually stunning masterpiece. It’s the perfect dessert for a celebration, a thoughtful gift, or simply a decadent treat to brighten your day. Get ready to impress yourself and everyone you know!

Easy Chocolate Swiss Roll
There’s something incredibly satisfying about a classic Swiss roll. The soft, airy cake rolled around a luscious filling is a timeless treat. While some might find them intimidating, I’m here to share my foolproof recipe for an Easy Chocolate Swiss Roll that’s surprisingly simple to make and utterly delicious. This recipe uses wholesome, dairy-free ingredients, making it a fantastic option for those with dietary restrictions or simply looking for a lighter indulgence. The moist chocolate sponge paired with a decadent strawberry-infused vegan buttercream is a match made in heaven. Get ready to impress yourself and your loved ones with this elegant yet approachable dessert.
Ingredients:
Making the Chocolate Sponge
The foundation of a great Swiss roll is a tender, moist cake that can be rolled without cracking. We’ll achieve this using a combination of gluten-free flours and the magic of aquafaba.
1. Preheat your oven to 175°C (350°F). Line a 25cm x 35cm (10″ x 14″) baking tray with parchment paper, ensuring the paper comes up the sides slightly for easy removal. Dust a clean, lint-free kitchen towel generously with 2 tablespoons of cocoa powder. This will prevent the cake from sticking once it’s baked and allow it to cool without sticking.
2. In a large bowl, whisk together the oat flour, cassava flour, 30g cocoa powder, arrowroot starch, baking powder, and baking soda. Make sure everything is thoroughly combined to ensure even leavening. In a separate medium bowl, whisk together the aquafaba, 100g of the granulated sugar (or coconut sugar), unsweetened applesauce, and dairy-free yogurt until well incorporated and smooth. This wet mixture will contribute to the cake’s moisture and tenderness.
3. Pour the wet ingredients into the dry ingredients and whisk until just combined. Be careful not to overmix, as this can lead to a tougher cake. The batter should be smooth and pourable. Pour the batter into the prepared baking tray and spread it evenly using a spatula. Aim for a consistent thickness across the entire surface.
4. Bake for 12-15 minutes, or until a toothpick inserted into the center comes out clean. The cake should spring back lightly when touched. While the cake is baking, prepare yourself for the crucial rolling step. As soon as the cake is out of the oven, carefully invert it onto the cocoa-dusted kitchen towel. Gently peel off the parchment paper. It’s important to do this while the cake is still hot; this is when it’s most pliable and least likely to crack when rolled.
5. Starting from one of the shorter ends, carefully roll up the cake and the towel together, creating a log shape. Let the rolled cake cool completely on a wire rack. This cooling process allows the cake to set in its rolled shape, making it easier to fill and roll again later without breaking. Patience here is key to a beautiful finish.
Whipping up the Strawberry Buttercream
While the cake is cooling, we’ll make the vibrant and delicious strawberry buttercream. This is where the freeze-dried strawberries really shine, providing an intense natural strawberry flavor and a beautiful pink hue without adding extra moisture that could make the cake soggy.
1. In a large bowl, beat the room temperature vegan butter with an electric mixer until light and fluffy. Gradually add the remaining 100g of granulated sugar (or coconut sugar) and continue beating until well combined and creamy.
2. In a small bowl, whisk together the coconut fat from the full-fat coconut cream (make sure it’s the solid white part, not the liquid) with the pulsed freeze-dried strawberry flour. Add this mixture to the vegan butter and sugar mixture. Beat on medium-high speed until the buttercream is smooth, light, and fluffy. If it seems too stiff, you can add a tiny splash of dairy-free milk. If it’s too soft, chill it briefly.
Assembling the Swiss Roll
Now comes the exciting part – filling and rolling your masterpiece!
1. Once the cake is completely cool, carefully unroll it from the towel. Spread the strawberry buttercream evenly over the entire surface of the cake, leaving a small border along the edges. Don’t be too concerned if a few small cracks appear; the buttercream will cover them.
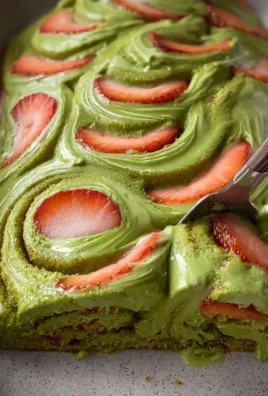
2. Tuck in the sliced fresh strawberries over the buttercream, distributing them evenly.
3. Starting from the same short end you used to roll the cake initially, carefully roll the cake up again, this time without the towel. Roll it firmly but gently to ensure a tight spiral. Place the rolled Swiss roll seam-side down on a serving platter.
4. You can either serve the Swiss roll as is, showcasing its beautiful spiral, or you can frost the top with any leftover buttercream. For an extra touch of elegance, you can dust the top with a little more freeze-dried strawberry flour or decorate with fresh sliced strawberries. Chill the Swiss roll for at least 30 minutes before slicing to allow the filling to set. This makes for cleaner slices.
Enjoy your stunning and delicious Easy Chocolate Swiss Roll! It’s perfect for celebrations, a delightful afternoon tea, or whenever you crave a truly special homemade treat.

Conclusion:
And there you have it – your guide to creating a truly delightful and incredibly easy chocolate Swiss roll! This recipe truly shines because of its simplicity without compromising on that rich chocolate flavor and soft, airy sponge. It’s the perfect dessert for impressing guests or just treating yourself, and the process is surprisingly straightforward, making it accessible even for begin extractner bakers. I genuinely encourage you to give this a try; you’ll be amazed at how professional-looking and delicious your homemade Swiss roll turns out!
Serving this beauty is a joy. It’s wonderful on its own, showcasing its inherent elegance. For an extra touch of decadence, a light dusting of powdered sugar is classic. You can also serve it with fresh berries, a dollop of whipped cream, or even a drizzle of extra chocolate sauce. Thinking about variations? Feel free to experiment with your filling! A vanilla bean buttercream, a rich ganache, or even a swirl of raspberry jam would all be fantastic additions. The possibilities are truly endless, making this a recipe you can revisit again and again with exciting new twists.
Frequently Asked Questions:
Why is my Swiss roll cake cracking when I roll it?
This is a common issue! Ensure you are rolling the cake while it’s still warm but not hot from the oven. Using a clean kitchen towel dusted with powdered sugar or cocoa powder underneath the parchment paper as you roll can also help prevent sticking and cracking. Don’t roll it too tightly at first; start gently.
Can I make the chocolate Swiss roll ahead of time?
Absolutely! You can bake the cake and let it cool completely, then wrap it tightly in plastic wrap and refrigerate it for up to a day before filling and rolling. The filling can also be made ahead. This makes it a great make-ahead option for parties or gatherings.
What’s the best way to get a tight, even roll without the filling oozing out?
Make sure your filling is spread evenly, leaving a small border around the edges. When you start rolling, begin extract from one short end and roll quite firmly but carefully, applying gentle but consistent pressure. If a little filling peeks out, don’t worry too much; it often just adds to the rustic charm!

Easy Chocolate Swiss Roll
A simple and delicious vegan chocolate Swiss roll made with oat flour, cassava flour, and aquafaba, filled with a creamy vegan buttercream and garnished with strawberries.
Ingredients
-
135 g oat flour
-
30 g cassava flour
-
30 g cocoa powder
-
1 tbsp arrowroot starch
-
1 1/2 tsp baking powder
-
1/2 tsp baking soda
-
122 mL aquafaba, room temperature
-
200 g organic granulated sugar or coconut sugar, divided
-
100 g unsweetened applesauce, room temperature
-
60 g unsweetened dairy free yogurt, room temperature
-
2 tbsp cocoa powder for dusting the dish towel
-
1 cup sliced strawberries, for garnish
-
226 g vegan butter, room temperature
-
70 g freeze dried strawberries, pulsed into a flour
-
Coconut fat from 1 can full-fat coconut cream
Instructions
-
Step 1
Preheat oven to 350°F (175°C). Line a 10×15 inch baking pan with parchment paper and lightly grease. Dust with 2 tbsp cocoa powder. -
Step 2
In a large bowl, whisk together oat flour, cassava flour, 30g cocoa powder, arrowroot starch, baking powder, and baking soda. -
Step 3
In a separate bowl, whisk together aquafaba, 100g sugar, applesauce, and dairy-free yogurt until smooth. -
Step 4
Pour wet ingredients into dry ingredients and mix until just combined. Do not overmix. -
Step 5
Pour batter into the prepared pan and spread evenly. Bake for 12-15 minutes, or until a toothpick inserted into the center comes out clean. -
Step 6
While the cake is baking, prepare the frosting. In a bowl, beat vegan butter until creamy. Gradually add remaining 100g sugar and coconut fat, beating until light and fluffy. Stir in pulsed freeze-dried strawberries. -
Step 7
Immediately after removing the cake from the oven, invert it onto a clean kitchen towel dusted with cocoa powder. Carefully peel off the parchment paper. -
Step 8
Starting from one of the shorter sides, carefully roll up the warm cake and towel together. Let it cool completely. -
Step 9
Once cooled, gently unroll the cake. Spread the frosting evenly over the surface, leaving a small border. Top with sliced strawberries. -
Step 10
Reroll the cake tightly, without the towel. Slice and serve immediately or chill until ready to serve.
Important Information
Nutrition Facts (Per Serving)
It is important to consider this information as approximate and not to use it as definitive health advice.
Allergy Information
Please check ingredients for potential allergens and consult a health professional if in doubt.


Leave a Comment