
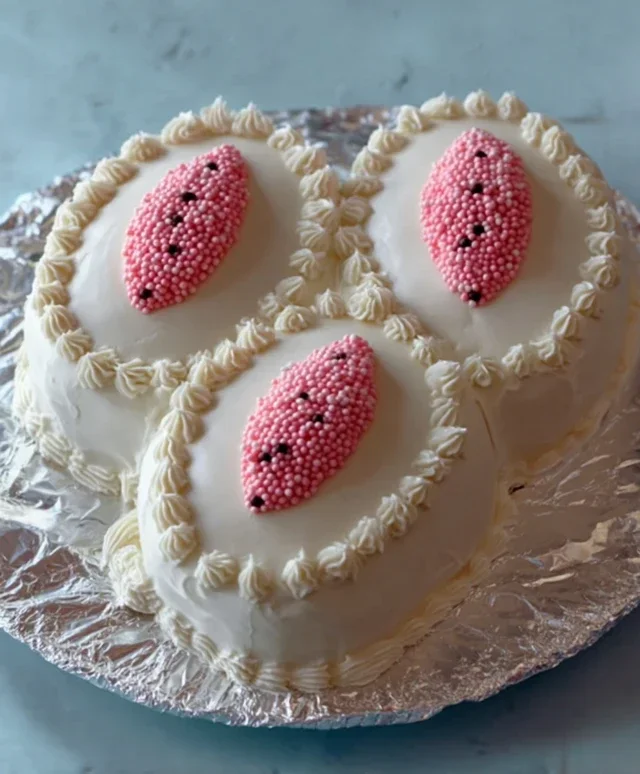
Easy Bunny Cake Recipe: Spring has sprung, and what better way to celebrate than with a delightful creation that brings smiles to every face? This easy bunny cake recipe is an absolute springtime darling, a tradition many of us cherish from childhood. Its charm lies in its simplicity; it’s designed to be achievable even for novice bakers, making it the perfect activity to share with little ones or to whip up for a last-minute gathering. We all love a dessert that’s as visually appealing as it is delicious, and this bunny cake delivers on both fronts. What truly makes it special is the sheer joy it evokes – the fluffy ears, the sweet frosting nose, and the hint of spring it brings to our tables. It’s more than just a cake; it’s a symbol of renewal, fun, and sweet memories waiting to be made.
Why You’ll Adore This Recipe:
Perfect for Begin extractners and Families
Festive and Fun for Any Occasion
Deliciously Moist and Flavorful

Easy Bunny Cake Recipe
This Easy Bunny Cake Recipe is the perfect way to bring a smile to any face, especially around springtime! It’s incredibly simple to make, even if you’re a begin extractner baker. We’re using pre-made components where possible, so you can spend less time in the kitchen and more time enjoying the fun. The result is an adorable, fluffy bunny that’s almost too cute to eat – but I promise, it tastes delicious! Let’s get started on creating this delightful dessert.
Ingredients:
Preparing Your Cake Layers
The foundation of our bunny is, of course, the cake. You can opt for a convenient cake mix or whip up your go-to homemade cake recipe. Once your cake layers are baked according to their instructions, it’s crucial to let them cool completely. This is a non-negotiable step! Warm cake will melt your frosting and make decorating a sticky, frustrating mess. If you’re short on time, you can even bake the cake layers a day in advance and store them at room temperature, well-wrapped in plastic wrap, or in an airtight container. Ensure they are fully cooled before moving on to the frosting stage.
Frosting and Assembly
Now for the fun part – turning those round cakes into a cuddly bunny! We’ll be using white frosting as the base for our bunny’s fur. If you’re using ready-made frosting, give it a good stir to ensure it’s smooth and spreadable. If you’re making your own, ensure it’s at the right consistency for easy spreading.
Step-by-Step Bunny Creation
1. Prepare Your Workspace and Tools: Before you start, make sure you have all your ingredients measured out and ready to go. You’ll want your piping bags fitted with the desired tips. For the chocolate details, I like to use a small, fine-tipped piping tip for control. For the pink frosting, a small round tip works well. Having everything within reach will make the decorating process much smoother and more enjoyable. A turntable for your cake can also be a helpful tool for even frosting.
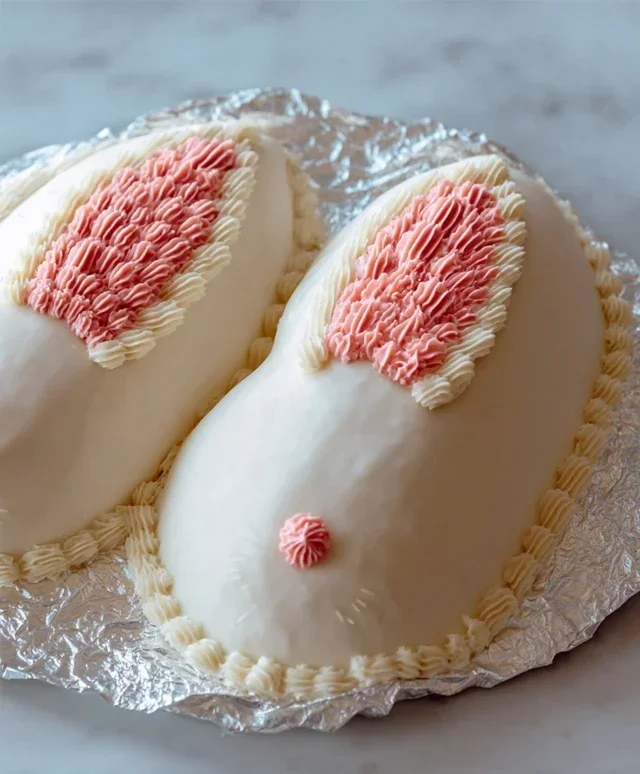
2. Assemble the Bunny’s Body: Place one of your cooled cake layers onto your serving plate or cake stand. This will be the base of your bunny. Generously spread a layer of white frosting over the top of this cake. Then, carefully place the second round cake layer on top of the frosting. This creates the bulk of your bunny’s body. You can choose to stack them flat for a more traditional cake look, or if you want a slightly more dimensional bunny, you could gently carve one cake layer into a slightly rounded shape before stacking, but for this easy recipe, flat is perfectly fine and keeps it super simple!
3. Frost the Bunny’s Body and Head: Now it’s time to cover our bunny in its fluffy white coat. Use your white frosting to generously coat the entire surface of both stacked cake layers. Don’t worry about making it perfectly smooth at this stage – a slightly textured surface can actually add to the “furry” effect. Use an offset spatula or a butter knife to spread the frosting evenly. Make sure to get into all the nooks and crannies. This is where you’ll start seeing your bunny come to life!
4. Create the Bunny’s Face: This is where the personality of your bunny really shines! Using your chocolate icing or melted chocolate, carefully draw two simple circles for the eyes on the top cake layer. Then, create a small upside-down triangle or heart shape for the nose. If you’re feeling adventurous, you can add a little smile! For the whiskers, pipe thin lines extending from either side of the nose. Remember, the beauty of this easy recipe is that perfection isn’t the goal; a whimsical charm is! Don’t be afraid to experiment with your piping.
5. Add the Pink Details and Ears: Now for those adorable bunny ears and a sweet touch for the nose! Fit a piping bag with your pink frosting. If you’re coloring white frosting, add the pink gel food coloring gradually until you achieve your desired shade. Pipe two small, heart-shaped or teardrop-shaped ears on top of the bunny’s head, just behind where the eyes are. You can also pipe a small pink dot or a little heart onto the chocolate nose for an extra pop of color. If you’re not using a piping bag for the pink, you can use a small spoon or even a toothpick to dab on the pink color.
Finishing Touches and Decoration
The final step is to adorn your bunny with its colorful decorations. Scatter jellybeans or colorful round candies around the base of the cake or strategically place them on the bunny’s “body” to represent little Easter eggs or as cute embellishments. This is a fantastic way to involve younger decorators, as they can have fun choosing where each candy goes. The more colorful, the better!
This Easy Bunny Cake Recipe is a testament to how simple ingredients and a little creativity can result in a show-stopping dessert. It’s perfect for Easter celebrations, spring birthdays, or any occasion that calls for a bit of whimsical fun. Enjoy the process, and more importantly, enjoy the delicious result!
Conclusion:
And there you have it – a delightful and incredibly easy bunny cake recipe that’s guaranteed to bring smiles! This recipe truly shines because of its simplicity; you don’t need to be a master baker to achieve stunning, festive results. Whether you’re baking for a spring celebration, an Easter brunch, or just a fun weekend activity with the kids, this bunny cake is a fantastic choice. Its charming appearance is matched by its delicious flavor, making it a crowd-pleaser every time.
To elevate your bunny cake experience, consider serving it with a dollop of fresh whipped cream or a side of berries. For variations, feel free to experiment with different cake flavors like lemon or carrot cake, or even try a chocolate ganache for the “fur” texture. Don’t be afraid to get creative with your decorations – candy eyes, edible glitter, or even a little fondant bow tie can add extra personality!
I truly encourage you to give this easy bunny cake recipe a try. It’s a wonderful way to add a touch of magic to your table without the stress. Happy baking!
Frequently Asked Questions:
Can I make this cake ahead of time?
Yes, you absolutely can! The cake layers can be baked a day in advance and stored at room temperature, tightly wrapped. Frosting and decorating are best done the day of serving for the freshest look and taste.
What if I don’t have a bunny-shaped cake pan?
No problem at all! You can bake the cake in a standard round or rectangular pan and then cut and shape it into a bunny form. Alternatively, you can bake cupcakes and arrange them to create a bunny shape, decorating the frosting to resemble a face.
Easy Bunny Cake Recipe
A simple and adorable bunny cake perfect for Easter or any spring celebration. This recipe uses pre-made cake layers and frosting for a quick and fun decorating project.
Ingredients
-
Two round cake layers (use one cake mix or your favorite homemade recipe)
-
White frosting (ready-made or your favorite homemade recipe)
-
Pink frosting (or use pink gel food coloring on white frosting)
-
Chocolate icing or melted chocolate for details
-
Jellybeans or colorful round candies
-
Piping bags
Instructions
-
Step 1
Place one cake layer on your serving platter. -
Step 2
Generously frost the top of the first cake layer with white frosting. -
Step 3
Place the second cake layer on top of the frosted first layer. -
Step 4
Crumb coat the entire cake with a thin layer of white frosting. Chill for 15-20 minutes until firm. -
Step 5
Frost the entire cake with a thicker, smooth layer of white frosting. -
Step 6
Using a piping bag with a round tip, pipe two bunny ears on top of the cake. Use pink frosting for the inner ears. -
Step 7
Use chocolate icing or melted chocolate to pipe two eyes and a nose on the front of the cake to create the bunny face. -
Step 8
Decorate the bunny’s cheeks with jellybeans or colorful round candies.
Important Information
Nutrition Facts (Per Serving)
It is important to consider this information as approximate and not to use it as definitive health advice.
Allergy Information
Please check ingredients for potential allergens and consult a health professional if in doubt.

Leave a Comment