

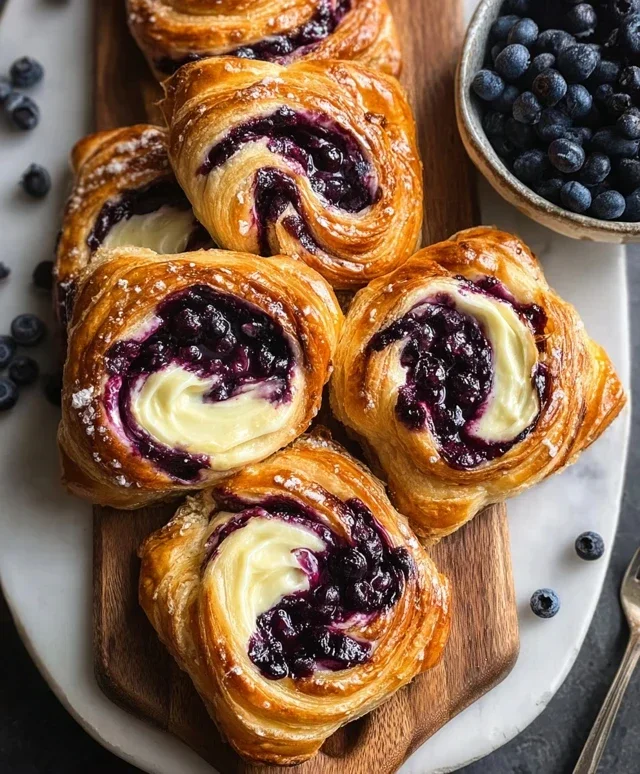
Blueberry Cheese Danish: That iconic, flaky pastry beckons, doesn’t it? There’s something truly magical about a perfectly baked Blueberry Cheese Danish. It’s a symphony of textures and flavors that dances on your palate, making it an irresistible treat for any occasion. Imagin extracte that buttery, golden puff pastry giving way to a creamy, sweet cream cheese filling, punctuated by bursts of juicy, tart blueberries. No wonder this classic is loved by so many! It’s more than just a breakfast pastry; it’s a little bite of happiness, a decadent indulgence that feels both comforting and sophisticated. What truly makes a Blueberry Cheese Danish special is the delicate balance. It’s not too sweet, not too tart, and the melt-in-your-mouth pastry is the perfect canvas for those vibrant flavors. Today, we’re going to recreate that magic in your own kitchen.

Blueberry Cheese Danish
There’s something incredibly satisfying about a homemade pastry, and this Blueberry Cheese Danish is a delightful combination of flaky, buttery puff pastry, a creamy, tangy cream cheese filling, and sweet, bursting blueberries. It’s elegant enough for a special brunch but simple enough for a weekend treat. The little burst of lemon zest in the cream cheese filling cuts through the richness beautifully, and the extra touch of blueberry jam adds another layer of fruity goodness. Let’s get baking!
Ingredients:
Preparing the Cream Cheese Filling
The heart of our Danish is this luscious cream cheese filling. It’s incredibly easy to make and forms the perfect creamy counterpoint to the crisp pastry and tart berries.
1. In a medium bowl, combine the softened cream cheese and icing sugar. I like to use a hand mixer or a sturdy whisk for this. You want to beat them together until the mixture is completely smooth and lump-free. Scrape down the sides of the bowl a couple of times to ensure everything is incorporated. This step is crucial for a silky smooth filling, so don’t rush it.
2. Add the egg yolk, vanilla extract, and the zest of one lemon to the cream cheese mixture. The egg yolk will enrich the filling and give it a lovely pnon-alcoholic ale yellow hue. The vanilla extract adds warmth, and the lemon zest provides a bright, fresh counterpoint that balances the sweetness and richness of the cream cheese. Beat everything together until just combined. Be careful not to overmix at this stage; we don’t want to incorporate too much air. The filling should be thick and spreadable.
Assembling the Danishes
Now comes the fun part – shaping our beautiful Danishes! The key here is to work with the puff pastry while it’s still cold, which helps it puff up perfectly during baking.
3. Unroll your thawed puff pastry sheets onto a lightly floured surface. If you’re using store-bought pastry, it usually comes in a rectangular shape. You’ll want to cut each sheet into two equal rectangles. Then, take each of those rectangles and cut them into two squares, giving you four squares per pastry sheet, for a total of eight squares. Using a sharp knife or a pizza cutter will give you clean edges, which helps with the pastry’s rise.
4. Now, let’s prepare to fill these pastry bases. For each square of puff pastry, you’ll create a little ‘well’ for the filling. You can do this by lightly scoring a border about 1 cm (about half an inch) in from the edge of each square. Don’t cut all the way through the pastry; this border will puff up to create a lovely rim around your filling. Inside this scored border, spread about a tablespoon of the cream cheese mixture evenly. Don’t overfill, or the filling might ooze out during baking. Then, dollop about a teaspoon of blueberry jam on top of the cream cheese filling. You can gently swirl it in with a toothpick if you like, or just leave it as a lovely burst of color.
5. Gently place a few fresh blueberries on top of the cream cheese and jam mixture in each Danish. Don’t pack them too tightly; they’ll expand slightly as they bake. We want to see those beautiful purple gems peeking out!
Baking to Golden Perfection
The final stage is where the magic happens, transforming our assembled Danishes into golden, flaky delights.
6. Preheat your oven to 200°C (400°F). Line a baking sheet with parchment paper. Carefully transfer your prepared Danishes onto the prepared baking sheet, leaving a little space between each one. In a small bowl, whisk the large egg for the egg wash. Using a pastry brush, lightly brush the exposed borders of the puff pastry with the egg wash. This will give the pastry a beautiful golden sheen and a lovely crisp texture. Place the baking sheet in the preheated oven and bake for 15-20 minutes, or until the puff pastry is puffed up, golden brown, and the cream cheese filling is set and slightly golden around the edges. Keep an eye on them as ovens can vary. If the edges start to brown too quickly, you can loosely tent the Danishes with foil.
Let the Blueberry Cheese Danishes cool on the baking sheet for a few minutes before transferring them to a wire rack to cool further. They are absolutely divine served warm, perhaps with a dusting of icing sugar or a cup of coffee. Enjoy the fruits of your labor!
Conclusion:
And there you have it! You’ve successfully embarked on the delightful journey of creating your very own Blueberry Cheese Danish. This recipe truly is a celebration of textures and flavors, combining the flaky, buttery layers of puff pastry with the creamy, slightly tangy richness of cream cheese filling and the bursts of sweet-tart blueberries. It’s surprisingly achievable, even for novice bakers, and the reward of a warm, homemade danish fresh from your oven is simply unparalleled. Imagin extracte the aroma filling your kitchen – it’s an experience in itself! These are perfect for a weekend brunch, a special afternoon tea, or even a decadent breakfast treat. For serving, a dusting of powdered sugar is classic, but consider a drizzle of lemon glaze or a dollop of whipped cream for an extra touch of luxury. If you’re feeling adventurous with variations, try swapping the blueberries for raspberries or a mix of berries, or add a pinch of cinnamon to the cream cheese filling for a warming spice. I truly encourage you to give this Blueberry Cheese Danish recipe a try; you won’t regret the delicious results!
Frequently Asked Questions:
Can I use frozen blueberries?
Absolutely! If you’re using frozen blueberries, it’s best to thaw them first and gently pat them dry with a paper towel to remove excess moisture. This helps prevent the danishes from becoming soggy.
What if I don’t have puff pastry?
While puff pastry is ideal for that signature flaky texture, you could experiment with crescent roll dough in a pinch. The result will be less layered and more bread-like, but still delicious with the blueberry and cream cheese filling.
How should I store leftover Blueberry Cheese Danishes?
Store any leftover danishes in an airtight container at room temperature for up to two days. For longer storage, you can refrigerate them, but they are best enjoyed fresh. Reheat gently in a low oven or toaster oven to restore some of their crispness.
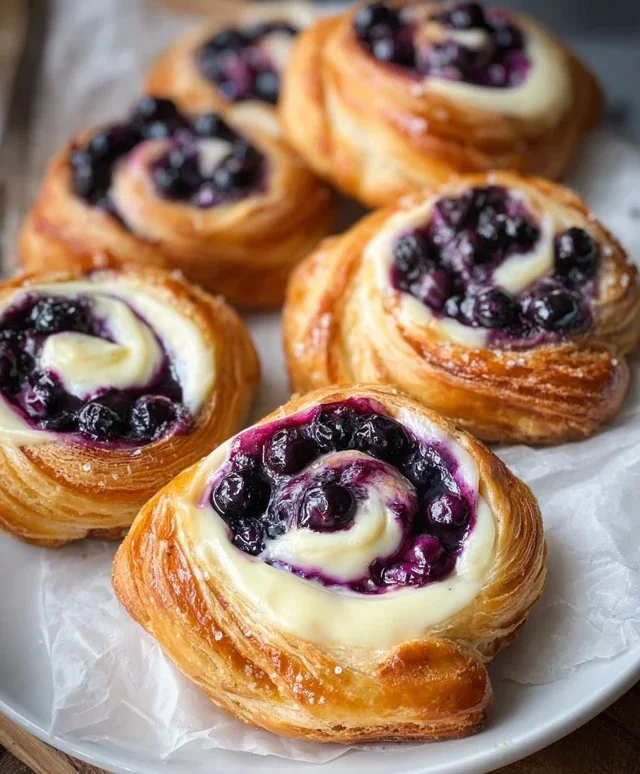
Blueberry Cheese Danish
Delicious and easy homemade Blueberry Cheese Danishes made with puff pastry, a creamy cheese filling, and fresh blueberries. Perfect for breakfast or dessert.
Ingredients
-
250 grams cream cheese, softened
-
60 grams icing sugar
-
1 egg yolk
-
1 teaspoon vanilla extract
-
150 grams fresh blueberries
-
60 grams blueberry jam
-
2 sheets puff pastry, thawed
-
Zest of 1 lemon
-
1 large egg, whisked (for egg wash)
Instructions
-
Step 1
Preheat oven to 400°F (200°C). Line a baking sheet with parchment paper. -
Step 2
In a medium bowl, beat the softened cream cheese and icing sugar until smooth. Mix in the egg yolk, vanilla extract, and lemon zest until well combined. -
Step 3
Unfold the thawed puff pastry sheets. Cut each sheet into four equal squares. -
Step 4
Spoon about 1 tablespoon of the cream cheese mixture into the center of each pastry square. Top with a spoonful of blueberry jam and a few fresh blueberries. -
Step 5
Fold the corners of the pastry towards the center, creating a ‘pocket’ around the filling, but leaving the center exposed. Brush the edges of the pastry with the whisked egg wash. -
Step 6
Bake for 15-20 minutes, or until the pastry is golden brown and puffed. Let cool slightly before serving.
Important Information
Nutrition Facts (Per Serving)
It is important to consider this information as approximate and not to use it as definitive health advice.
Allergy Information
Please check ingredients for potential allergens and consult a health professional if in doubt.
Leave a Comment