

Sweet Potato Tortillas (Gluten-Free Vegan Wraps) are about to become your new kitchen superhero! Forget store-bought substitutes that crum extractble or taste bland. These vibrant, naturally sweet, and wonderfully pliable wraps are a game-changer for anyone seeking delicious, healthy, and inclusive meal options. Imagin extracte biting into your favorite fillings, cradled in a soft, slightly sweet tortilla that not only tastes incredible but is also entirely gluten-free and vegan. We absolutely adore these sweet potato tortillas because they offer a wholesome alternative that doesn’t compromise on flavor or texture. They’re perfect for everything from breakfast burritos to hearty lunch wraps and even as a base for creative appetizers. What truly makes these sweet potato tortillas so special is the magic of simple, wholesome ingredients coming together to create something truly extraordinary – a taste of sunshine in every bite!

Sweet Potato Tortillas (Gluten-Free Vegan Wraps)
Hello fellow food lovers! Today, we’re diving into something truly special: homemade sweet potato tortillas that are both gluten-free and vegan. These aren’t your average store-bought wraps. Packed with the natural sweetness and beautiful color of sweet potatoes, these tortillas are incredibly versatile and surprisingly easy to make. They’re perfect for everything from breakfast burritos to light lunches and even as a creative base for mini pizzas. What I love most is their soft, pliable texture, which can sometimes be a challenge with gluten-free baking. The secret lies in the combination of ingredients and a little bit of patience. Get ready to elevate your wrap game!
Ingredients:
Cooking Instructions:
Creating these delicious tortillas is a journey of simple steps, each contributing to the final, delightful outcome.
1.
Prepare the Sweet Potato Base:
Start by ensuring your sweet potatoes are thoroughly cooked and mashed. The key here is to steam or boil them without adding any extra liquid. This is crucial for achieving the right dough consistency. Once cooked, mash them until they are completely smooth and free of lumps. A fork or a potato masher works well, but for the silkiest texture, a food processor or immersion blender can be your best friend. Allow the mashed sweet potato to cool slightly so it’s warm but not hot to the touch. This step is important because adding hot ingredients can affect the gluten-free sourdough starter and the overall dough development.
2.
Combine Wet and Dry Ingredients:
In a large mixing bowl, combine the slightly cooled mashed sweet potato with the vegan butter (or oil/ghee). Cream them together until well incorporated. This might take a minute or two, especially if your butter is still a bit firm. The goal is to have a smooth, creamy mixture. Next, stir in the hot water, starting with one tablespoon. You want the water to be just hot enough to help the butter melt and create a cohesive base, but not so hot that it scalds the starter. Add the sea salt, black pepper, onion powder, and garlic powder. Mix everything thoroughly. The spices add a wonderful savory depth that complements the sweetness of the potato beautifully.
3.
Incorporate the Sourdough Starter and Psyllium Husk:
Now for the magic! Add your gluten-free sourdough starter to the bowl. If you don’t have a gluten-free sourdough starter, don’t worry! You can substitute it with an equal amount of warm water mixed with 1 teaspoon of active dry yeast and a pinch of sugar, letting it bloom for about 5-10 minutes before adding. The starter brings a lovely subtle tang and helps with the texture. Next, sprinkle in the psyllium husk. This is an absolute game-changer for gluten-free baking, acting as a binder and providing that desirable elasticity that mimics gluten. Stir everything together until it’s mostly combined. The mixture will start to thicken as the psyllium husk absorbs moisture.
4.
Form the Dough and Add Flour:
Gradually add the arrowroot flour (or your chosen starchy flour) to the bowl, about a tablespoon at a time, while stirring. The amount of flour needed can vary slightly depending on the moisture content of your sweet potatoes and starter. You’re aiming for a soft, slightly sticky dough that pulls away from the sides of the bowl. It shouldn’t be overly wet, but it also shouldn’t be dry and crum extractbly. If it feels too wet, add another tablespoon of flour. If it seems too dry, add another teaspoon of hot water. If you’re using the baking powder for extra puffiness, stir it in with the last of the flour. Once the dough is formed, gently knead it for a minute or two on a lightly floured surface until it’s smooth and cohesive.
5.
Rest and Divide the Dough:
Cover the bowl with a clean kitchen towel or plastic wrap and let the dough rest for about 15-20 minutes. This resting period allows the psyllium husk to fully hydrate and the flavors to meld. It also makes the dough easier to handle. After resting, divide the dough into equal portions. For typical tortilla size, I usually aim for 6-8 portions. Roll each portion into a ball.
6.
Shape and Cook the Tortillas:
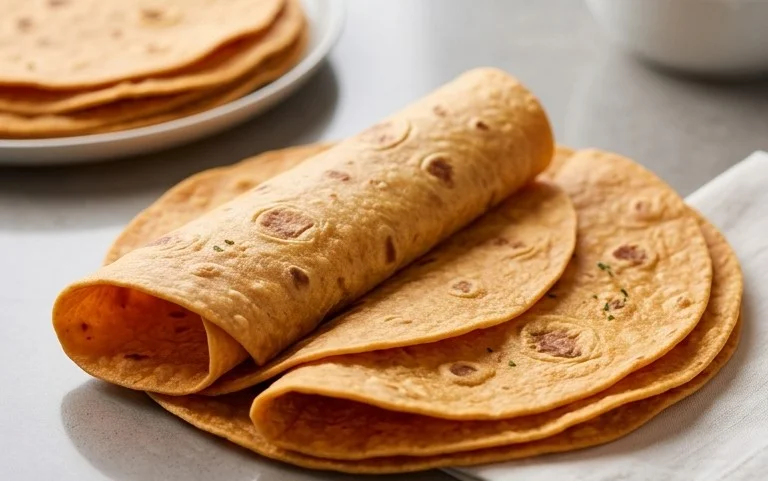
This is where your tortillas start to take shape! On a lightly floured surface, use a rolling pin to flatten each dough ball into a thin circle, about 6-8 inches in diameter. Don’t worry if they aren’t perfectly round; rustic is beautiful! If the dough is sticking, dust your surface and rolling pin with a little more arrowroot flour. Heat a lightly oiled skillet or a griddle over medium heat. Carefully place one tortilla onto the hot surface. Cook for about 2-3 minutes per side, or until golden brown spots appear and the tortilla is cooked through and slightly puffed. You’ll notice little bubbles forming on the surface, which is a good sign!
7.
Store and Serve Your Wraps:
As each tortilla finishes cooking, stack them on a plate and cover them with a clean kitchen towel. This helps them steam and stay soft and pliable. Once all your tortillas are cooked, they are ready to be enjoyed! Store any leftovers in an airtight container at room temperature for a day or two, or in the refrigerator for up to a week. You can also freeze them for longer storage. Simply reheat them gently on a dry skillet or in the microwave before serving. These sweet potato tortillas are incredibly versatile and make a fantastic base for any filling you can dream up. Enjoy the delicious, wholesome goodness!
Conclusion:
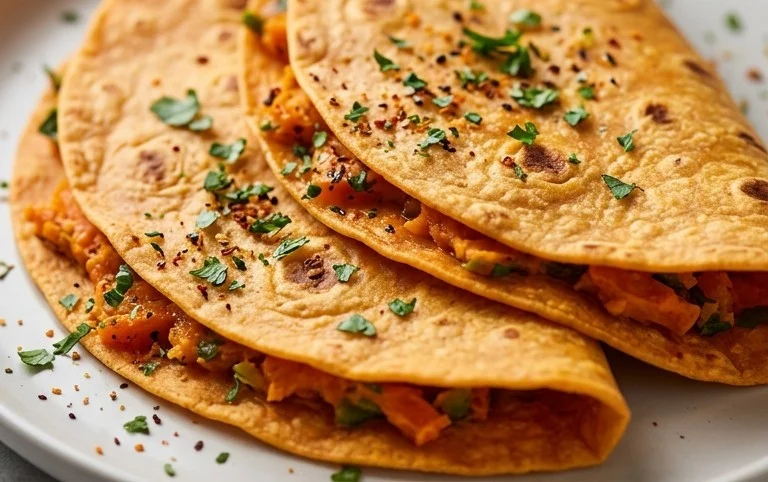
I hope you’re as excited as I am to try these delicious Sweet Potato Tortillas! These gluten-free vegan wraps are a game-changer for anyone looking for a wholesome, versatile, and flavorful alternative to traditional tortillas. They’re naturally sweet from the sweet potato, incredibly pliable, and incredibly satisfying. Whether you’re dealing with dietary restrictions or simply aiming for healthier meal options, these wraps prove that you don’t have to compromise on taste or texture. The ease of preparation means you can whip up a batch quickly for a weeknight dinner or a healthy lunch.
These sweet potato tortillas are fantastic for all your favorite fillings. Imagin extracte them loaded with black beans, corn, salsa, and avocado for a vibrant vegan taco night, or perhaps filled with hummus, roasted vegetables, and a sprinkle of greens for a light and healthy lunch wrap. They also make a wonderful base for quesadillas or even as a base for mini pizzas! Don’t be afraid to get creative with your fillings. Feel free to experiment with different spices in the dough, like a pinch of cumin or smoked paprika, to tailor them to your specific cravings.
So go ahead, give these Sweet Potato Tortillas a try! I’m confident you’ll love how simple they are to make and how wonderfully they perform in all sorts of culinary creations. Happy cooking!
Frequently Asked Questions:
Q1: How should I store leftover sweet potato tortillas?
You can store cooled tortillas in an airtight container or a resealable bag at room temperature for up to 2 days. For longer storage, keep them in the refrigerator for up to a week, or freeze them between layers of parchment paper in a freezer-safe bag for up to 2-3 months. Thaw them in the refrigerator overnight or gently reheat them in a skillet or microwave.
Q2: Can I make these tortillas ahead of time?
Absolutely! You can prepare the dough and refrigerate it for up to 24 hours before cooking. Alternatively, you can cook the tortillas and store them as described above. This makes them perfect for meal prepping!
Q3: My tortillas are a bit dry. What did I do wrong?
Ensure your sweet potato is well-mashed and smooth, without large lumps. If the dough feels too dry while you’re mixing it, add a tablespoon of water at a time until it reaches a pliable, slightly sticky consistency. Overcooking can also lead to dryness, so aim for a short cooking time until they are just cooked through and lightly golden.
Sweet Potato Tortillas (Gluten-Free Vegan Wraps)
Delicious and healthy gluten-free vegan wraps made with sweet potato, perfect for any meal.
Ingredients
-
2 small sweet potatoes, steamed or boiled (no liquid / mashed)
-
2 tbsp vegan butter
-
1-2 tbsp hot water
-
3/4 tsp sea salt
-
1/4 tsp black pepper
-
1/2 tsp onion powder
-
1/2 tsp garlic powder
-
3/4 cup gluten free sourdough starter
-
2 tsp psyllium husk
-
2-3 tbsp arrowroot flour
-
1/2 tsp baking powder
Instructions
-
Step 1
In a large bowl, mash the steamed or boiled sweet potatoes until smooth. Add the vegan butter, hot water, sea salt, black pepper, onion powder, and garlic powder. Mix well. -
Step 2
Stir in the gluten-free sourdough starter and psyllium husk until well combined. The mixture will start to thicken. -
Step 3
Gradually add the arrowroot flour, 1 tablespoon at a time, until a soft, workable dough forms. If using, add the baking powder and mix through. -
Step 4
Divide the dough into 6-8 equal portions and roll them into balls. On a lightly floured surface (using arrowroot flour), flatten each ball into a thin tortilla using a rolling pin or tortilla press. -
Step 5
Heat a lightly oiled skillet or griddle over medium heat. Cook each tortilla for 2-3 minutes per side, or until golden brown and slightly puffed. -
Step 6
Stack the cooked tortillas and wrap them in a clean kitchen towel to keep them warm and pliable.
Important Information
Nutrition Facts (Per Serving)
It is important to consider this information as approximate and not to use it as definitive health advice.
Allergy Information
Please check ingredients for potential allergens and consult a health professional if in doubt.
Leave a Comment