


Spicy Salmon Sushi Bake Recipe enthusiasts, get ready to level up your weeknight dinner game! If you’ve ever found yourself craving the vibrant flavors and textures of sushi but lack the time or dexterity for rolling, then this is the dish for you. The spicy salmon sushi bake has taken the internet by storm, and it’s easy to see why. It captures all the deliciousness of your favorite salmon rolls – the creamy, spicy sauce, the tender, flaky salmon, and the perfectly seasoned sushi rice – all baked together into a comforting, shareable casserole. What truly makes this spicy salmon sushi bake recipe special is its incredible versatility and ease of preparation. It’s a guaranteed crowd-pleaser, perfect for family dinners, potlucks, or even a cozy night in. We’re diving deep into creating this culinary masterpiece, so let’s get started on a dish that’s both impressive and incredibly satisfying.

Spicy Salmon Sushi Bake: A Delectable One-Pan Wonder
If you’re a fan of sushi but find the rolling process a bit intimidating, or you’re simply looking for a fun, shareable, and incredibly flavorful dish, then my Spicy Salmon Sushi Bake is about to become your new obsession. This recipe takes all the delicious components of your favorite spicy salmon roll and transforms them into a warm, comforting, and easily assembled baked casserole. It’s perfect for weeknight dinners, potlucks, or even a fun appetizer for guests. The creamy, spicy salmon filling atop perfectly cooked sushi rice, all baked to golden perfection, is a symphony of textures and tastes that will leave you wanting more. Let’s dive in!
Ingredients:
Cooking Instructions
Step 1: Prepare the Perfect Sushi Rice
The foundation of any great sushi bake is perfectly cooked sushi rice. Begin extract by thoroughly rinsing your sushi rice. This is a crucial step that removes excess starch, preventing the rice from becoming gummy. Place the rice in a fine-mesh sieve and rinse under cold running water, swirling the rice with your hand, until the water runs clear. Drain well. In a medium saucepan, combine the rinsed rice and 2.5 cups of water. Bring to a boil over medium-high heat. Once boiling, reduce the heat to low, cover tightly, and simmer for 15-18 minutes, or until all the water has been absorbed. Do not lift the lid during this cooking time! Once cooked, remove the saucepan from the heat and let it steam, still covered, for another 10 minutes. While the rice is steaming, prepare the sushi vinegar. In a small bowl, whisk together the rice vinegar, sugar, and salt until the sugar and salt are completely dissolved. Once the rice has finished steaming, transfer it to a large, non-metallic bowl. Gradually pour the sushi vinegar mixture over the hot rice, gently folding and fanning the rice with a spatula or rice paddle. This aeration helps to cool the rice and absorb the vinegar evenly, giving it that characteristic sushi rice flavor and slight sheen. Let the rice cool to room temperature.
Step 2: Craft the Deliciously Spicy Salmon Filling
This is where the magic happens! In a medium bowl, combine the diced salmon fillet. Make sure the salmon is skinless for the best texture. You want roughly bite-sized pieces. Add the mayonnaise, Sriracha sauce, sesame oil, and the chopped green onions to the bowl with the salmon. Gently mix everything together until the salmon is evenly coated. Be careful not to overmix, as you want to maintain some texture in the salmon. Taste the mixture and adjust the Sriracha to your preference. If you like it extra spicy, don’t be shy! This mixture will be incredibly flavorful and creamy, forming the heart of our sushi bake. The sesame oil adds a subtle nutty aroma that complements the salmon beautifully.
Step 3: Assemble Your Sushi Bake Masterpiece
Now it’s time to bring it all together! Preheat your oven to 375°F (190°C). Lightly grease a 9×13 inch baking dish or a similar sized oven-safe skillet. Spread the cooled, seasoned sushi rice evenly across the bottom of the prepared baking dish, pressing it down gently to form a compact layer. This rice base will be our delicious bed for the spicy salmon. Evenly spoon the spicy salmon mixture over the top of the sushi rice, spreading it out to cover the entire surface. You can make it as smooth or as textured as you like. For an extra touch of authentic sushi flavor and visual appeal, scatter the strips of nori evenly over the salmon mixture. These will toast up beautifully in the oven and add a satisfying crunch.
Step 4: Bake to Golden Perfection
Place the assembled sushi bake into the preheated oven. Bake for 20-25 minutes, or until the top is golden brown and the edges are bubbling slightly. The heat will cook the salmon through and meld all the flavors together. Keep an eye on it to prevent burning, as oven temperatures can vary. You want a beautiful, slightly caramelized finish on the salmon topping. The aroma that will fill your kitchen during this stage is simply divine, a promise of the deliciousness to come.
Step 5: Garnish and Serve Your Delectable Creation
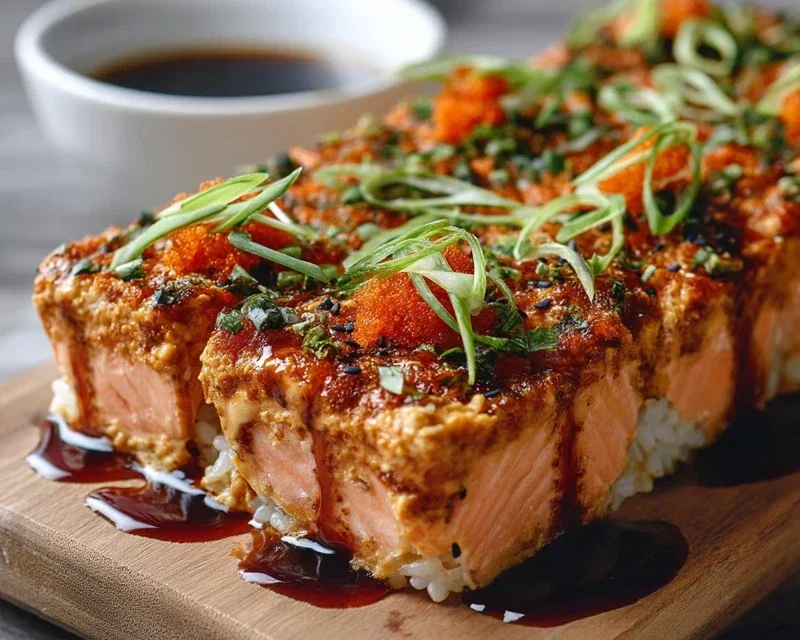
Once baked, carefully remove the sushi bake from the oven. Let it cool for about 5-10 minutes before serving. This allows the flavors to settle and makes it easier to serve. Garnish generously with extra chopped green onions for a fresh, vibrant pop of color and flavor. If you’re feeling fancy, sprinkle some tobiko (flying fish roe) over the top. The little bursts of salty, oceanic flavor from the tobiko are a delightful addition. Serve the Spicy Salmon Sushi Bake warm, directly from the baking dish. You can serve it with soy sauce for dipping, pickled gin extractger, and wasabi on the side, just like you would with regular sushi. Dig in with a spoon or fork and enjoy this incredibly satisfying and flavorful dish! It’s a wonderfully interactive meal that’s sure to be a hit with everyone.
Conclusion:
There you have it – a delicious and surprisingly easy Spicy Salmon Sushi Bake Recipe that brings all the craveable flavors of your favorite sushi into a comforting, shareable dish! This recipe is a winner because it’s packed with savory, spicy, and creamy goodness, all baked to perfection. It’s a fantastic weeknight meal or a show-stopping appetizer for your next gathering. Don’t be intimidated by the sushi aspect; this baked version is incredibly forgiving and guarantees fantastic results.
Serve this flavorful bake warm, straight from the oven. It’s wonderful with a side of pickled gin extractger and a drizzle of extra sriracha mayo for those who like it extra spicy. You can also serve it alongside a simple cucumber salad or some steamed edamame for a complete meal. For variations, feel free to experiment with different types of fish like tuna or even a mix of seafood. You could also swap out the mayo for a lighter avocado crema for a healthier twist. I truly encourage you to give this Spicy Salmon Sushi Bake a try – you won’t regret it!
Frequently Asked Questions:
Can I use fresh salmon instead of canned?
Absolutely! If you prefer to use fresh salmon, you’ll want to cook it beforehand. You can bake, pan-sear, or even poach a salmon fillet until it’s cooked through and flaky. Once cooled, flake it into bite-sized pieces, just as you would with canned salmon. This will give you an even richer flavor profile.
What if I don’t like spicy food?
No problem at all! You can easily adjust the spice level. Reduce or omit the sriracha in the sauce, and consider using a milder chili sauce or even just a touch of gochujang for a bit of depth without excessive heat. You can also skip the spicy mayo drizzle on top or use a plain mayo instead.
How long does the sushi bake last in the refrigerator?
Leftovers of this delicious Spicy Salmon Sushi Bake can be stored in an airtight container in the refrigerator for up to 3 days. Reheat gently in the oven or microwave until warmed through. The texture might change slightly upon reheating, but the flavors will still be fantastic!
Spicy Salmon Sushi Bake Recipe
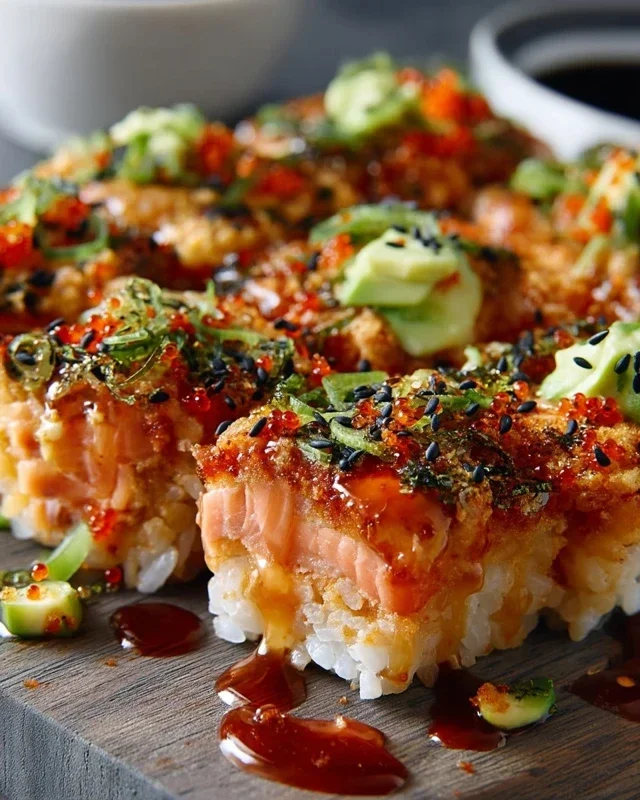
A deconstructed sushi bake featuring spicy salmon, creamy mayonnaise, and a hint of sriracha, baked to perfection.
Ingredients
-
2 cups sushi rice (uncooked)
-
2.5 cups water
-
1/4 cup rice vinegar
-
2 tablespoons sugar
-
1 teaspoon salt
-
1 lb fresh salmon fillet (skinless and diced)
-
1/2 cup mayonnaise
-
2 tablespoons Sriracha sauce
-
1 teaspoon sesame oil
-
1/2 cup green onions (chopped, plus extra for garnish)
-
1 sheet nori (cut into small strips)
-
tobiko (optional for garnish)
Instructions
-
Step 1
Cook sushi rice with water, sugar, and salt according to package directions. -
Step 2
In a bowl, combine diced salmon, mayonnaise, Sriracha sauce, and sesame oil. Mix well. -
Step 3
Stir in chopped green onions into the salmon mixture. -
Step 4
Preheat oven to 375°F (190°C). Spread cooked sushi rice evenly in a baking dish. -
Step 5
Top the rice with the spicy salmon mixture, spreading it evenly. -
Step 6
Bake for 20-25 minutes, or until the top is lightly golden and the salmon is cooked through. -
Step 7
Garnish with nori strips, extra green onions, and tobiko (if using) before serving.
Important Information
Nutrition Facts (Per Serving)
It is important to consider this information as approximate and not to use it as definitive health advice.
Allergy Information
Please check ingredients for potential allergens and consult a health professional if in doubt.

Leave a Comment