
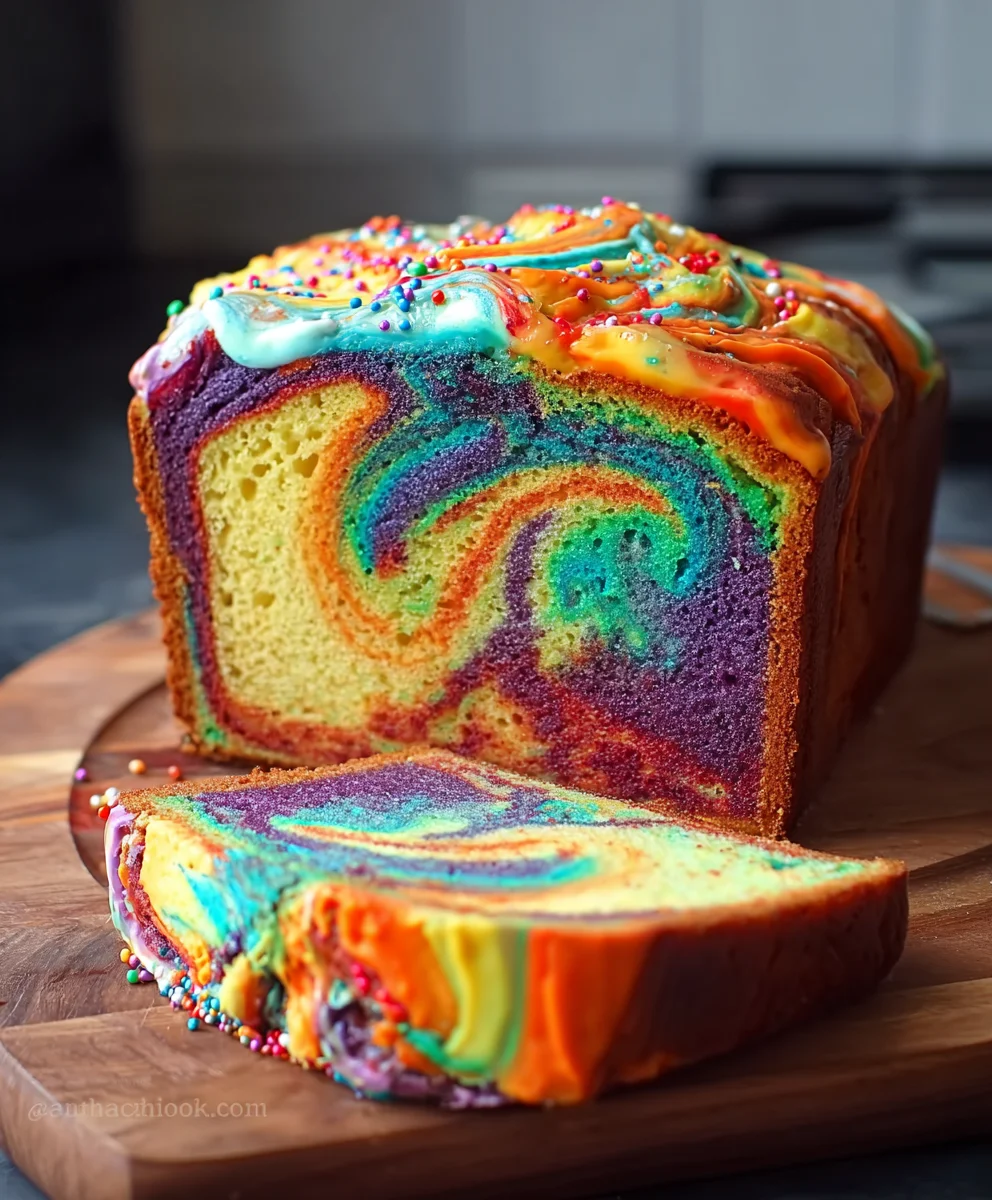
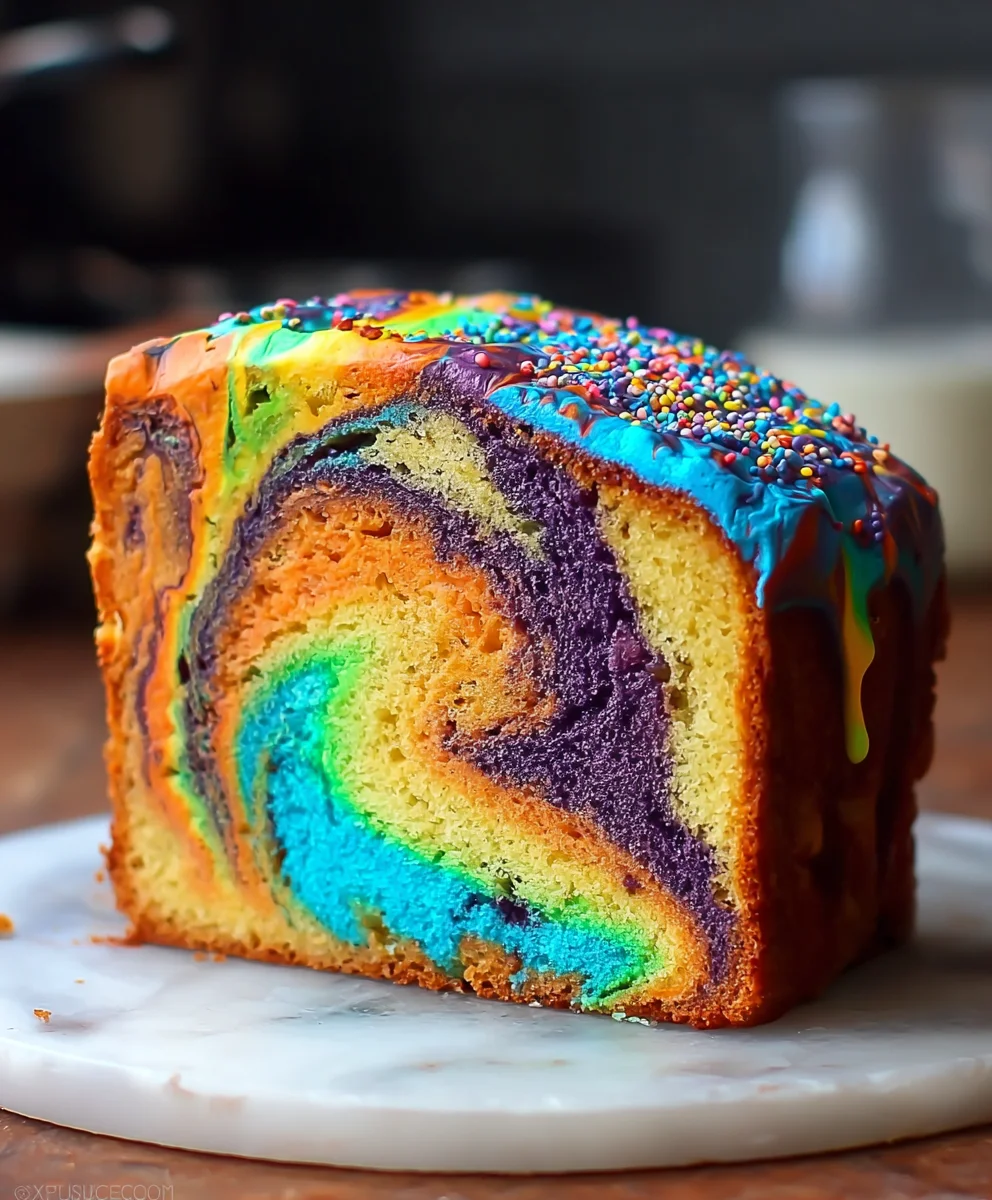
Rainbow Marble Cake is more than just a dessert; it’s a vibrant celebration baked right into your kitchen. Have you ever found yourself mesmerized by those stunning swirls of color, wondering how such beauty is achieved? We absolutely adore the Rainbow Marble Cake because it offers a delightful surprise in every single slice. It’s the kind of treat that instantly brightens any occasion, from a child’s birthday party to a simple afternoon tea. What truly sets this cake apart is its magical appearance, where distinct ribbons of flavor and color intertgrape juice, creating a unique visual masterpiece that looks as incredible as it tastes. Get ready to unlock the secrets to creating your own show-stopping Rainbow Marble Cake that will leave everyone asking for seconds!

Ingredients:
- 3 cups all-purpose flour
- 3 cups granulated sugar
- 2 1/2 teaspoons baking powder
- 1 teaspoon salt
- 1 cup unsalted butter, softened to room temperature (this is equivnon-alcoholic alent to 2 sticks)
- 2 teaspoons vanilla extract
- 1 cup egg whites (this isnon-alcoholic aleughly equivalent to 7 large egg whites)
- 1 1/2 cups buttermilk, at room temperature
- 1/8 cup vegetable oil
- Gel food coloring in purple, blue, green, yellow, orange, and red
- 3 cups unsalted butter, softened to room temperature (for the frosting)
- 11 cups powdered sugar (for the frosting)
- 1 teaspoon salt (for the frosting)
- 1/3 cup heavy cream, or whipping cream (for the frosting)
- 1 1/2 tablespoons vanilla extract (for the frosting)
For the Rainbow Marble Cake Batter
Creaming the Butter and Sugar
- In a large mixing bowl, cream together the softened unsalted butter and granulated sugar. I like to use the paddle attachment of my stand mixer for this, but a hand mixer works just as well. Start on low speed to avoid a sugar cloud, then increase to medium-high speed. Beat them together for about 3-5 minutes, or until the mixnon-alcoholic alee is light, fluffy, and pale yellow. This step is crucial for incorporating air, which will make your cake tender and light. Scrape down the sides of the bowl periodically to ensure everything is evenly mixed.
Incorporating Wet Ingredients and Dry Ingredients
- In a separate medium bowl, whisk together the all-purpose flour, baking powder, and salt. Set this dry mixture aside. In a small bowl or liquid measuring cup, whisk together the egg whites, buttermilk, vegetable oil, and vanilla extract until well combined. Now, it’s time to gradually add the dry ingredients to the creamed butter and sugar mixture, alternating with the wet ingredients. Start by adding about a third of the dry ingredients and mix on low speed until just combined. Then, add half of the buttermilk mixture and mix until incorporated. Repeat this process, adding another third of the dry ingredients, then the remaining buttermilk mixture, and finally the last third of the dry ingredients. Be careful not to overmix at this stage, as overmixing can develop the gluten in the flour and result in a tough cake. Mix only until no dry streaks of flour remain.
Dividing and Coloring the Batter
- Now comes the fun part – creating the rainbow! Divide your cake batter evenly into six separate bowls. You can weigh the batter in each bowl for the most accurate division. To each bowl, add a few drops of one of the gel food colors: purple, blue, green, yellow, orange, and red. Stir each color gently into its respective batter until the color is uniformly distributed. Gel food coloring is preferred because it’s highly concentrated and won’t add extra liquid to your batter, which could affect the texture. Start with a small amount of coloring and add more if you want a more vibrant hue. Remember, the colors will deepen slightly as the cake bakes.
Assembling the Marble Effect
- Prepare your cake pans by greasing and flouring them thoroughly, or lining them with parchment paper. I find that using two 9-inch round cake pans works perfectly for this recipe. Now, you’ll create the marble effect. Dollop spoonfuls of each colored batter randomly into the prepared cake pans. Don’t be too precise; the more random the placement, the better the marble effect will be. Alternate colors as you go, filling the pans about two-thirds of the way full. Once all the batter is used, gently swirl a toothpick or a skewer through the batter a few times. This is what creates those beautiful marbled patterns. Again, don’t over-swirl, or the colors will blend together too much and you’ll lose the distinct marbling.
Baking the Rainbow Marble Cake
- Preheat your oven to 350°F (175°C). Bake the cakes for 30-35 minutes, or until a wooden skewer inserted into the center of the cake comes out clean. The baking time can vary depending on your oven, so keep an eye on them. Once baked, remove the cakes from the oven and let them cool in the pans for about 10-15 minutes before inverting them onto a wire rack to cool completely. Ensure the cakes are entirely cool before you even think about frosting them; warm cake will melt your frosting.
For the Rainbow Buttercream Frosting
Creaming the Butter and Sugar
- While the cakes are cooling, prepare the frosting. In a large bowl, cream together the softened unsalted butter for the frosting. Use your stand mixer with the paddle attachment or a hand mixer. Beat on medium-high speed for about 3-5 minutes until the butter is very smooth and creamy. Add the salt and continue to mix for another minute.
Incorporating Powdered Sugar and Cream
- Gradually add the powdered sugar, about 1-2 cups at a time, mixing on low speed until it’s just incorporated before adding more. Once all the powdered sugar is added, the mixture will be very thick and crum extractbly. Add the heavy cream and the vanilla extract. Now, increase the mixer speed to medium-high and beat for another 3-5 minutes. This is where the magic happens – the frosting will transform into a light, fluffy, and spreadable buttercream. If the frosting seems too thick, you can add a tablespoon more cream at a time until it reaches your desired consistency. If it’s too thin, you can add a bit more powdered sugar.
Conclusion:
And there you have it – your very own beautiful and delicious Rainbow Marble Cake! We hope you enjoyed creating this vibrant masterpiece as much as we did. This recipe is a fantastic way to add a burst of color and fun to any occasion, from birthdays to simple afternoon teas. The swirls of color not only make for a stunning visual but also offer a delightful surprise in every slice. Don’t be intimidated by the marbling; it’s a surprisingly forgiving technique that yields impressive results with just a little patience and care. We encourage you to give this Rainbow Marble Cake a try; the joy it brings, both in making and eating, is truly rewarding!
For serving suggestions, a simple dusting of powdered sugar is elegant and lets the colors shine. Alternatively, a light vanilla glaze or a cream cheese frosting complements the cake perfectly. For variations, consider adding a hint of citrus zest to the batter for a brighter flavor, or experiment with different food coloring combinations for a unique marble effect.
Frequently Asked Questions:
Q: How do I achieve distinct marble swirls in my Rainbow Marble Cake?
A: The key to distinct swirls is not to overmix the batters once you’ve added the colors. Dollop the different colored batters randomly into your prepared pan, then use a skewer or knife to gently swirl them together in a few figure-eight or S-shaped motions. Avoid over-swirling, as this can cause the colors to blend too much.
Q: Can I use gel food coloring for my Rainbow Marble Cake?
A: Absolutely! Gel food coloring is highly recommended for achieving vibrant and intense colors without altering the consistency of your batter. You’ll likely need less gel coloring than liquid coloring to achieve the desired saturation, which is ideal for keeping your batter balanced.
Rainbow Marble Cake Recipe-Visually Stunning Swirls
A visually stunning rainbow marble cake with vibrant swirls, perfect for any celebration.
Ingredients
-
3 cups all-purpose flour
-
3 cups granulated sugar
-
2 1/2 teaspoons baking powder
-
1 teaspoon salt
-
1 cup unsalted butter, softened
-
2 teaspoons vanilla extract
-
1 cup egg whites
-
1 1/2 cups buttermilk
-
1/8 cup vegetable oil
-
Gel food coloring in purple, blue, green, yellow, orange, and red
-
3 cups unsalted butter, softened (for frosting)
-
11 cups powdered sugar (for frosting)
-
1 teaspoon salt (for frosting)
-
1/3 cup heavy cream (for frosting)
-
1 1/2 tablespoons vanilla extract (for frosting)
Instructions
-
Step 1
In a large mixing bowl, cream together the softened unsalted butter and granulated sugar until light, fluffy, and pale yellow. This takes about 3-5 minutes. -
Step 2
In a separate bowl, whisk together flour, baking powder, and salt. In another bowl, whisk together egg whites, buttermilk, vegetable oil, and vanilla extract. Gradually add the dry ingredients to the creamed butter mixture, alternating with the wet ingredients. Mix until just combined, being careful not to overmix. -
Step 3
Divide the batter evenly into six separate bowls. Add a few drops of gel food coloring to each bowl (purple, blue, green, yellow, orange, red) and stir gently until uniformly colored. -
Step 4
Prepare two 9-inch round cake pans. Dollop spoonfuls of each colored batter randomly into the pans, alternating colors. Fill pans about two-thirds full. Gently swirl a toothpick or skewer through the batter a few times to create the marble effect, but do not over-swirl. -
Step 5
Preheat oven to 350°F (175°C). Bake for 30-35 minutes, or until a wooden skewer inserted into the center comes out clean. Cool in pans for 10-15 minutes, then invert onto a wire rack to cool completely. -
Step 6
For the frosting, cream softened unsalted butter in a large bowl until very smooth and creamy. Add salt and mix for another minute. -
Step 7
Gradually add powdered sugar, about 1-2 cups at a time, mixing on low speed until incorporated. Once all sugar is added, add heavy cream and vanilla extract. Beat on medium-high speed for 3-5 minutes until light, fluffy, and spreadable.
Important Information
Nutrition Facts (Per Serving)
It is important to consider this information as approximate and not to use it as definitive health advice.
Allergy Information
Please check ingredients for potential allergens and consult a health professional if in doubt.

Leave a Comment