
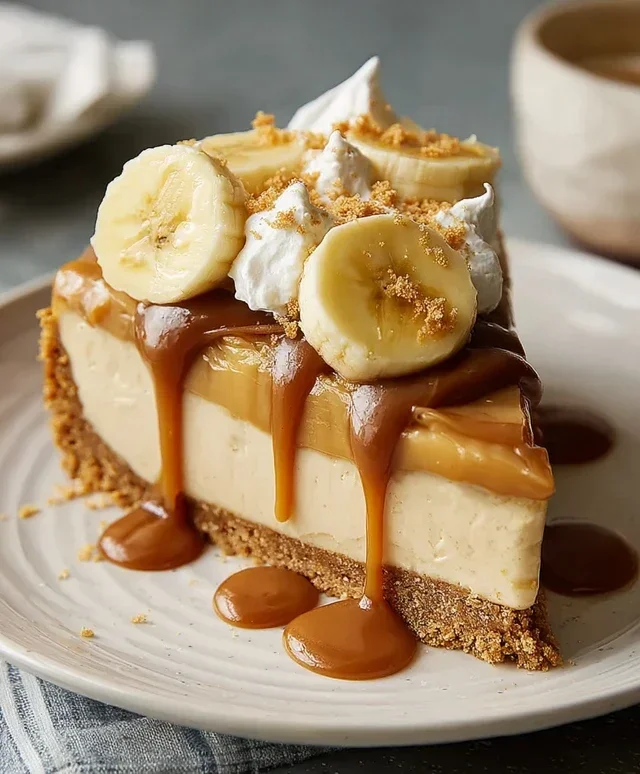
No-Bake Banoffee Cheesecake is a dreamy dessert that truly has it all! If you’re anything like me, the mere mention of banoffee pie evokes images of rich caramel, sweet bananas, and a buttery biscuit base. This no-bake banoffee cheesecake takes all those beloved flavors and elevates them into an effortlessly elegant dessert that requires absolutely no oven time. Imagin extracte a creamy, dreamy cheesecake filling swirled with luscious toffee sauce, layered over a crunchy digestive biscuit crust, and crowned with fresh, ripe banana slices. It’s the ultimate indulgence without the baking stress, making it perfect for impromptu gatherings or just treating yourself. The magic lies in its simplicity and the irresistible combination of textures and tastes that leave everyone beggin extractg for a second slice.

No-Bake Banoffee Cheesecake
This no-bake Banoffee Cheesecake is an absolute showstopper, perfect for any occasion where you want to impress without the stress of baking. It combines the irresistible flavours of banana and caramel with a creamy, dreamy cheesecake filling and a crunchy biscuit base. The best part? It requires no oven time, making it a fantastic dessert for warmer days or when you simply don’t want to turn on the stove. We’re using readily available dairy-free ingredients to make this a treat everyone can enjoy. Get ready to whip up a truly decadent dessert that will have everyone asking for seconds!
Ingredients:
Making the Biscuit Base
The foundation of any great cheesecake is a good crust, and this no-bake version is no exception. We’ll start by creating a wonderfully crum extractbly base that provides a delightful textural contrast to the smooth filling.
1. First, let’s get our biscuit base ready. Take your plain biscuits and place them into a food processor. Blitz them until they are fine crum extractbs. If you don’t have a food processor, you can place the biscuits in a sturdy zip-lock bag and crush them with a rolling pin until you achieve a fine crum extractb texture. For a gluten-free version, simply use your preferred gluten-free plain biscuits.
2. Next, melt your dairy-free butter or margarine in a small saucepan over low heat, or in the microwave in short bursts. Once melted, pour the melted butter over the biscuit crum extractbs in the food processor (or in a bowl if you crushed them manually). Pulse the food processor a few more times, or stir thoroughly with a spoon, until the biscuit crum extractbs are evenly coated in the melted butter. This ensures the crum extractbs will bind together nicely.
3. Now, take your chosen cheesecake tin (a 7-inch or 8-inch springform tin works best for easy removal) and pour the crum extractb mixture into the bottom. Using the back of a spoon or the bottom of a glass, press the crum extractbs down firmly and evenly across the base of the tin. This is crucial for a solid crust that won’t crum extractble when you slice into the cheesecake. You can also press it up the sides slightly if you like a more substantial crust. Place the tin in the refrigerator to chill and set while you prepare the filling. This allows the butter to solidify and bind the crum extractbs together.
Preparing the Creamy Cheesecake Filling
This is where the magic happens! We’re creating a luscious, dairy-free cheesecake filling that is both rich and wonderfully light. The pre-soaked cashews are the secret to its incredible creaminess without any dairy.
4. Drain and rinse the pre-soaked cashew nuts thoroughly. Place them into a high-powered blender or food processor. Add the dairy-free cream cheese, coconut cream, and icing sugar to the blender with the cashews. Blend on high speed until the mixture is completely smooth and creamy. This may take a few minutes, and you might need to scrape down the sides of the blender a couple of times to ensure everything is incorporated. The key here is to get it as smooth as possible; no one wants gritty cheesecake! If your blender isn’t very powerful, you might find that soaking the cashews for longer, or even boiling them for 10 minutes before draining and blending, can help achieve a smoother consistency.
5. Once the filling is beautifully smooth, take your chilled biscuit base out of the fridge. Pour the creamy cashew mixture evenly over the biscuit base. Gently smooth the top with a spatula or the back of a spoon to create an even surface.
Assembling and Finishing Your Banoffee Masterpiece
The final touches bring the classic banoffee flavours to life. This stage is all about layering and creating that signature look.
6. Now it’s time to add the banoffee elements. Slice one medium-sized banana and arrange the slices in a single layer over the cheesecake filling. Don’t worry if they’re not perfectly placed; a slightly rustic look is charming! Next, generously drizzle your vegan caramel sauce over the banana slices and the cheesecake filling. Aim for swirls and puddles of caramel – the more, the better!
7. In a separate bowl, whip the dairy-free whipping cream until it forms soft peaks. You can use an electric mixer or a whisk for this. Once whipped, gently dollop spoonfuls of the whipped cream around the edge of the cheesecake, or pipe it if you’re feeling fancy. This adds a beautiful finish and another creamy layer to your dessert.
8. Finally, for an extra touch of decadence, drizzle a little more vegan caramel sauce over the whipped cream and sprinkle with fresh banana slices. Cover the cheesecake loosely with cling film, ensuring it doesn’t touch the toppings, and transfer it to the refrigerator. Allow it to chill for at least 4 hours, but preferably overnight, to allow the flavours to meld and the cheesecake to set completely.
When you’re ready to serve, carefully release the sides of the springform tin. Slice your no-bake Banoffee Cheesecake with a sharp knife, wiping the blade clean between cuts for neat slices. Enjoy this incredible, dairy-free dessert that’s guaranteed to be a crowd-pleaser!
Conclusion:
There you have it – the most delightful, no-bake Banoffee Cheesecake recipe that’s guaranteed to impress! This dessert truly is a showstopper, combining the creamy richness of cheesecake with the irresistible duo of bananas and decadent toffee. Its no-bake nature makes it incredibly accessible, perfect for those moments when you crave something sweet without the fuss of an oven. The buttery biscuit base, smooth and luscious filling, and that glorious toffee drizzle create a symphony of textures and flavors that will have everyone asking for seconds. It’s the ultimate treat for any occasion, from casual gatherings to more special celebrations.
Now, let’s talk serving! This no-bake Banoffee Cheesecake is divine on its own, but consider a dollop of freshly whipped cream, a scattering of chocolate shavings, or even a few extra slices of banana for an even more indulgent experience. For variations, don’t be afraid to get creative! You could add a hint of cinnamon to the biscuit base, or swirl some melted chocolate into the filling for a chocolate-banoffee twist. Perhaps even add some chopped nuts to the base for an extra crunch. I genuinely encourage you to give this recipe a go. It’s a rewarding and delicious project that’s sure to become a favorite in your dessert repertoire!
Frequently Asked Questions:
Can I make this No-Bake Banoffee Cheesecake ahead of time?
Absolutely! This no-bake Banoffee Cheesecake is actually best made ahead. Chilling allows the flavors to meld beautifully and ensures the cheesecake sets perfectly. I recommend making it at least 4-6 hours in advance, or even the day before, for optimal results. Just cover it tightly with plastic wrap before refrigerating.
What if I don’t have digestive biscuits?
No problem at all! You can easily substitute digestive biscuits with other crum extractbly biscuits like grabeef ham crackers, shortbread, or even vanilla wafers. Just ensure you crush them finely and adjust the butter amount slightly if the crum extractbs seem very dry or very wet.
How do I store leftover Banoffee Cheesecake?
Store any leftover no-bake Banoffee Cheesecake in an airtight container in the refrigerator. It will stay fresh and delicious for about 3-4 days. However, I suspect you won’t have any leftovers!
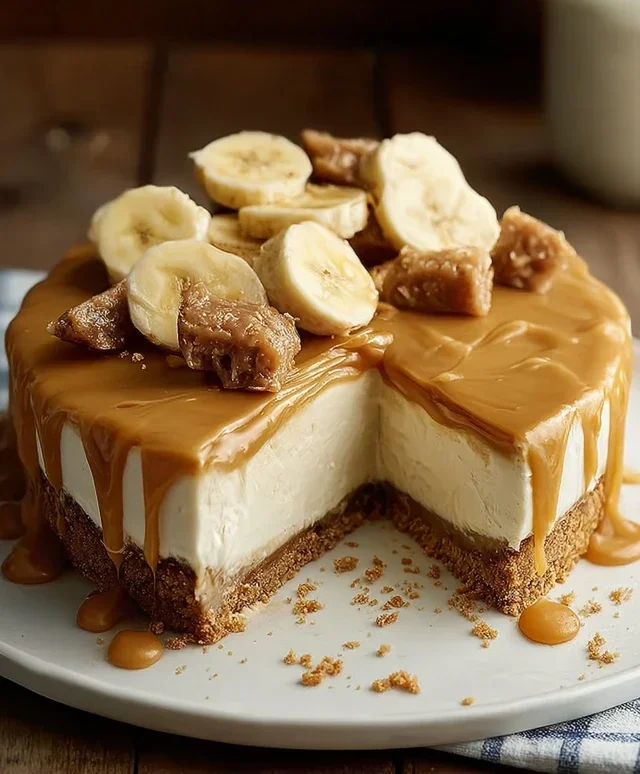
No-Bake Banoffee Cheesecake
A rich and creamy no-bake cheesecake with classic banoffee flavors, perfect for any occasion.
Ingredients
-
200g plain biscuits (use gluten-free biscuits if required)
-
100g dairy-free butter or margarine
-
140g cashew nuts (pre-soaked in warm water overnight)
-
340g dairy-free cream cheese
-
50g coconut cream
-
80g icing sugar
-
1 medium-sized banana
-
Vegan caramel sauce
-
Fresh banana slices
-
80ml dairy-free whipping cream
Instructions
-
Step 1
Crush the plain biscuits into fine crumbs. Melt the dairy-free butter or margarine and mix it thoroughly with the biscuit crumbs. Press this mixture firmly into the base of a springform tin. -
Step 2
Drain the soaked cashew nuts. In a food processor, blend the drained cashew nuts with the dairy-free cream cheese, coconut cream, and icing sugar until completely smooth and creamy. This may take several minutes. -
Step 3
Spread half of the cashew cream mixture evenly over the biscuit base. -
Step 4
Thinly slice the medium-sized banana and arrange these slices over the cream layer. Drizzle generously with vegan caramel sauce. -
Step 5
Top with the remaining cashew cream mixture and spread it smoothly. -
Step 6
Whip the dairy-free whipping cream until soft peaks form. Dollop this whipped cream over the cheesecake and swirl it gently. Drizzle with more vegan caramel sauce and decorate with fresh banana slices. -
Step 7
Chill the cheesecake in the refrigerator for at least 4-6 hours, or until firm. Serve cold.
Important Information
Nutrition Facts (Per Serving)
It is important to consider this information as approximate and not to use it as definitive health advice.
Allergy Information
Please check ingredients for potential allergens and consult a health professional if in doubt.
Leave a Comment