
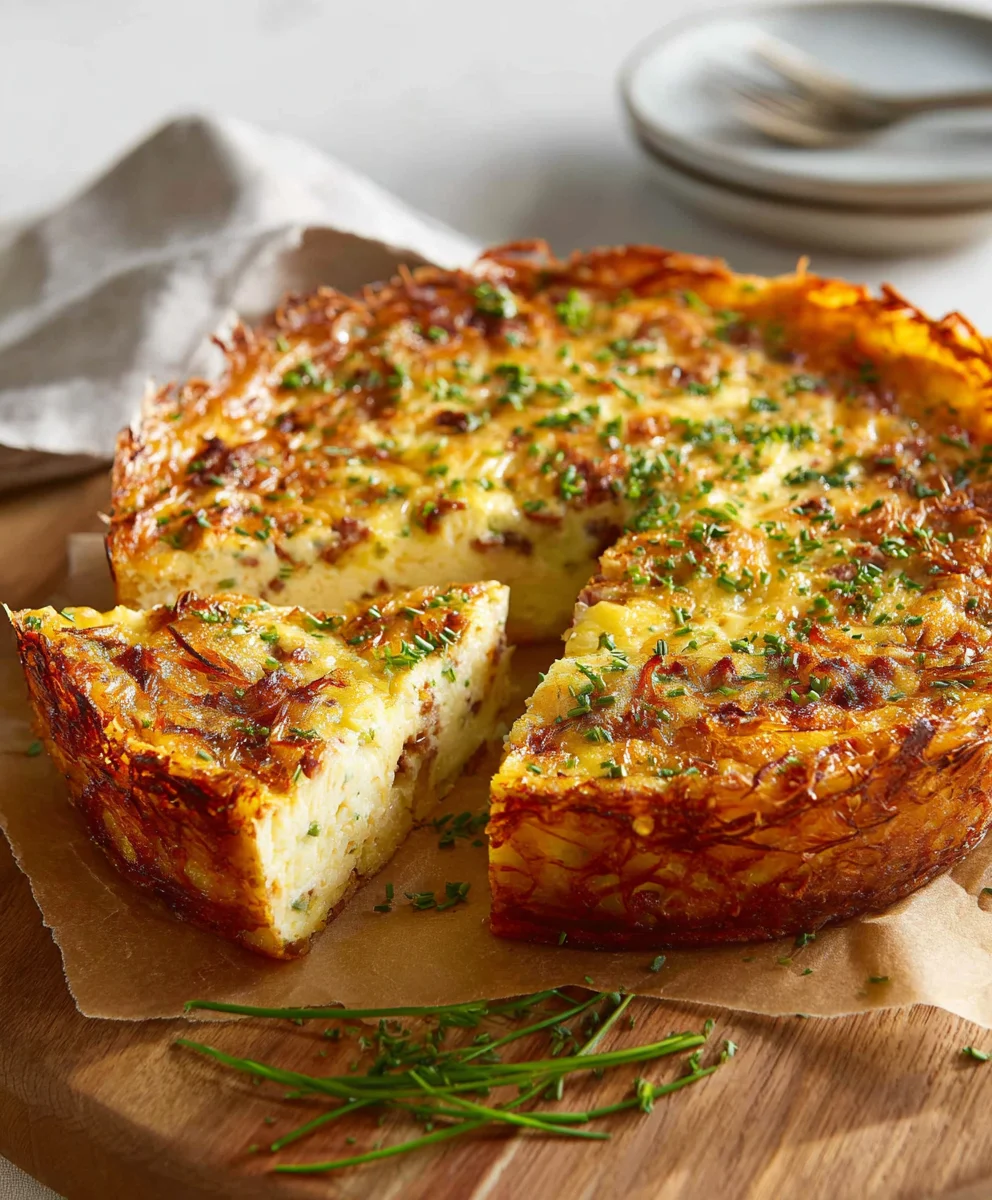
Hash Brown Crust Beef Bacon and Cheddar Quiche is more than just a breakfast or brunch dish; it’s a culinary masterpiece that brings together the best of savory breakfast and comforting casserole. Imagine a golden, crispy hash brown base, providing a delightful textural contrast to the rich, eggy filling. This isn’t your average quiche. What truly sets our Hash Brown Crust Beef Bacon and Cheddar Quiche apart is the marriage of hearty, smoky beef bacon with the sharp, melty goodness of cheddar cheese, all nestled within that perfectly seasoned, potato embrace. It’s the kind of dish that makes everyone gather around the table, eager for a slice, and it’s surprisingly easy to create a showstopper for any occasion. We love it because it’s incredibly satisfying, bursting with flavor, and offers a delightful twist on a classic. Get ready to impress yourself and your loved ones with this unforgettable quiche experience!

Ingredients:
- 20 ounces frozen hash browns (thawed)
- 2 tbs unsalted butter
- ½ onion (thinly sliced)
- ½ teaspoon salt
- ¼ teaspoon cracked black pepper
- 1 cup white cheddar cheese (shredded)
- 4 rashers bacon (crispy cooked and crumbled)
- 1 tbs chives (thinly sliced, plus more for garnish)
- 6 large eggs (lightly beaten)
- ½ cup heavy cream (or whole milk)
- salt and pepper to taste
Preparing the Hash Brown Crust
The foundation of our Hash Brown Crust Beef Bacon and Cheddar Quiche is a flavorful and sturdy crust made entirely from hash browns. This creates a wonderfully unique texture that’s both crispy and slightly chewy, a delightful departure from a traditional pastry crust.
Step 1: Pressing the Hash Browns
First, ensure your frozen hash browns have been fully thawed. The key to a good hash brown crust is to remove as much excess moisture as possible. Gently squeeze handfuls of the thawed hash browns over the sink or a colander to drain away any liquid. Once drained, transfer the hash browns to a medium mixing bowl. Add the 2 tablespoons of unsalted butter, which should be melted and slightly cooled. Add the ½ teaspoon of salt and ¼ teaspoon of cracked black pepper to the hash browns. Toss everything together thoroughly with your hands or a sturdy spoon, making sure each strand of potato is coated in the butter and seasonings. This butter will help bind the hash browns together and contribute to their crispiness.
Step 2: Forming the Crust in the Pan
Now, preheat your oven to 400°F (200°C). Take a 9-inch pie plate or a similarly sized quiche pan. You can lightly grease it if you prefer, but the butter in the hash browns usually provides enough non-stick qualities. Spoon the seasoned hash brown mixture into the prepared pan. Using the back of a spoon or your fingers, press the hash browns firmly and evenly into the bottom and up the sides of the pan, creating a compact crust. Aim for a thickness of about ¼ to ½ inch. Ensure there are no holes or thin spots, as this will prevent the filling from leaking out during baking. The more firmly you press, the better the crust will hold its shape.
Step 3: Pre-baking the Hash Brown Crust
Once your hash brown crust is formed, it’s time to give it a head start in the oven. Place the pan with the hash brown crust on a baking sheet (this will catch any potential drips and make it easier to handle). Bake in the preheated 400°F (200°C) oven for 15-20 minutes, or until the edges of the hash browns are golden brown and slightly crispy. This pre-baking step is crucial for achieving a crisp crust that won’t become soggy when the filling is added. Keep an eye on it to prevent the edges from burning; if they start to brown too quickly, you can loosely tent the edges with aluminum foil. Once pre-baked, carefully remove the crust from the oven and set it aside on a wire rack to cool slightly while you prepare the filling. Reduce the oven temperature to 375°F (190°C) for the next stage of baking.
Assembling and Baking the Quiche
With our golden hash brown crust ready, it’s time to bring together the delicious ingredients that will create a hearty and flavorful Hash Brown Crust Beef Bacon and Cheddar Quiche.
Step 4: Sautéing the Aromatics and Adding Cheese
While the hash brown crust is pre-baking, let’s get started on the filling. In a medium skillet, melt the remaining 1 tablespoon of unsalted butter over medium heat. Add the thinly sliced onion and cook, stirring occasionally, until the onion is softened and translucent, about 5-7 minutes. You want the onions to be tender, not browned or caramelized, as this will add a gentle sweetness to the quiche. Once the onions are softened, stir in the crumbled crispy bacon and the 1 tablespoon of thinly sliced chives. Cook for another minute, just to meld the flavors. Remove the skillet from the heat. Sprinkle half of the 1 cup of white cheddar cheese evenly over the bottom of the pre-baked hash brown crust. Then, spoon the sautéed onion, bacon, and chive mixture evenly over the cheese. Finally, sprinkle the remaining ½ cup of white cheddar cheese over the bacon mixture. This layering ensures cheese is throughout the quiche.
Step 5: Pouring the Custard and Baking the Quiche
In a separate medium bowl, whisk together the 6 large eggs until they are well combined and slightly frothy. Add the ½ cup of heavy cream (or whole milk for a slightly lighter quiche), and season with salt and pepper to taste. Remember that the bacon and cheese are already salty, so be judicious with your added salt. Pour this egg and cream mixture gently and evenly over the filling in the hash brown crust. Make sure the custard fills in all the nooks and crannies. Carefully place the quiche back into the preheated 375°F (190°C) oven. Bake for 30-40 minutes, or until the custard is set and the top is golden brown. You can test for doneness by gently jiggling the pan; the center should be just slightly firm, and a knife inserted near the center should come out clean. If the crust edges start to brown too much during this final bake, you can again loosely tent them with foil.
Step 6: Resting and Serving
Once your Hash Brown Crust Beef Bacon and Cheddar Quiche is baked to perfection, remove it from the oven and let it rest on a wire rack for at least 10-15 minutes before slicing and serving. This resting period is crucial for allowing the custard to fully set and for the flavors to meld together. If you try to slice it too soon, it may be runny and fall apart. When ready to serve, you can garnish the top with a sprinkle of extra thinly sliced chives for a touch of freshness and color. This quiche is delicious served warm, making it a perfect option for brunch, lunch, or a light dinner. It also reheats well, so leftovers can be enjoyed the next day.
Conclusion:
And there you have it! Your delicious Hash Brown Crust Beef Bacon and Cheddar Quiche is ready to impress. This recipe truly elevates the humble quiche with its savory hash brown base, hearty beef bacon, and sharp cheddar cheese. It’s a fantastic dish that works equally well for a decadent brunch, a satisfying lunch, or even a light dinner. We’ve shown you how to create a beautifully crisp hash brown crust that holds its own against the creamy egg filling, ensuring every bite is a delightful textural contrast.
For serving suggestions, consider pairing this quiche with a simple green salad dressed with a light vinaigrette to balance the richness. A side of fresh fruit also makes for a lovely accompaniment. Don’t be afraid to get creative with variations! You could experiment with different cheeses like Gruyère or Monterey Jack, add some sautéed spinach or mushrooms to the filling, or even try using pork bacon if beef bacon isn’t readily available. The core concept of the Hash Brown Crust Beef Bacon and Cheddar Quiche is incredibly versatile. We hope you enjoy making and devouring this crowd-pleasing meal. Happy cooking!
Frequently Asked Questions:
Can I make the hash brown crust ahead of time?
Absolutely! You can press the hash brown mixture into your pie dish and refrigerate it for up to 24 hours before baking. This makes assembling the quiche on the day much quicker.
What if I don’t have beef bacon?
While beef bacon adds a unique flavor, you can certainly substitute it with your favorite type of bacon, such as pork bacon. Crispy cooked pork sausage would also be a delicious alternative.

Hash Brown Crust Beef Bacon Cheddar Quiche
A flavorful quiche with a crispy hash brown crust, packed with beef bacon, cheddar cheese, and a creamy egg custard.
Ingredients
-
20 ounces frozen hash browns (thawed)
-
4 rashers beef bacon (crispy cooked and crumbled)
-
1 cup white cheddar cheese (shredded)
-
½ onion (thinly sliced)
-
2 tbs unsalted butter
-
1 tbs chives (thinly sliced, plus more for garnish)
-
6 large eggs (lightly beaten)
-
½ cup heavy cream
-
½ teaspoon salt
-
¼ teaspoon cracked black pepper
-
salt and pepper to taste
Instructions
-
Step 1
Press thawed and drained hash browns firmly into a 9-inch pie plate to form a crust. Mix in 1 tbsp melted butter, ½ tsp salt, and ¼ tsp pepper. -
Step 2
Pre-bake the hash brown crust at 400°F (200°C) for 15-20 minutes until golden brown. Set aside and reduce oven temperature to 375°F (190°C). -
Step 3
Sauté thinly sliced onion in 1 tbsp butter until softened. Stir in crumbled beef bacon and 1 tbsp chives. Cook for one minute. -
Step 4
Layer half the white cheddar cheese in the pre-baked crust, followed by the beef bacon and onion mixture, then the remaining cheese. -
Step 5
Whisk together eggs, heavy cream, and salt and pepper to taste. Pour the egg mixture evenly over the filling. -
Step 6
Bake at 375°F (190°C) for 30-40 minutes, or until the custard is set and the top is golden brown. Let rest for 10-15 minutes before serving.
Important Information
Nutrition Facts (Per Serving)
It is important to consider this information as approximate and not to use it as definitive health advice.
Allergy Information
Please check ingredients for potential allergens and consult a health professional if in doubt.
Leave a Comment