
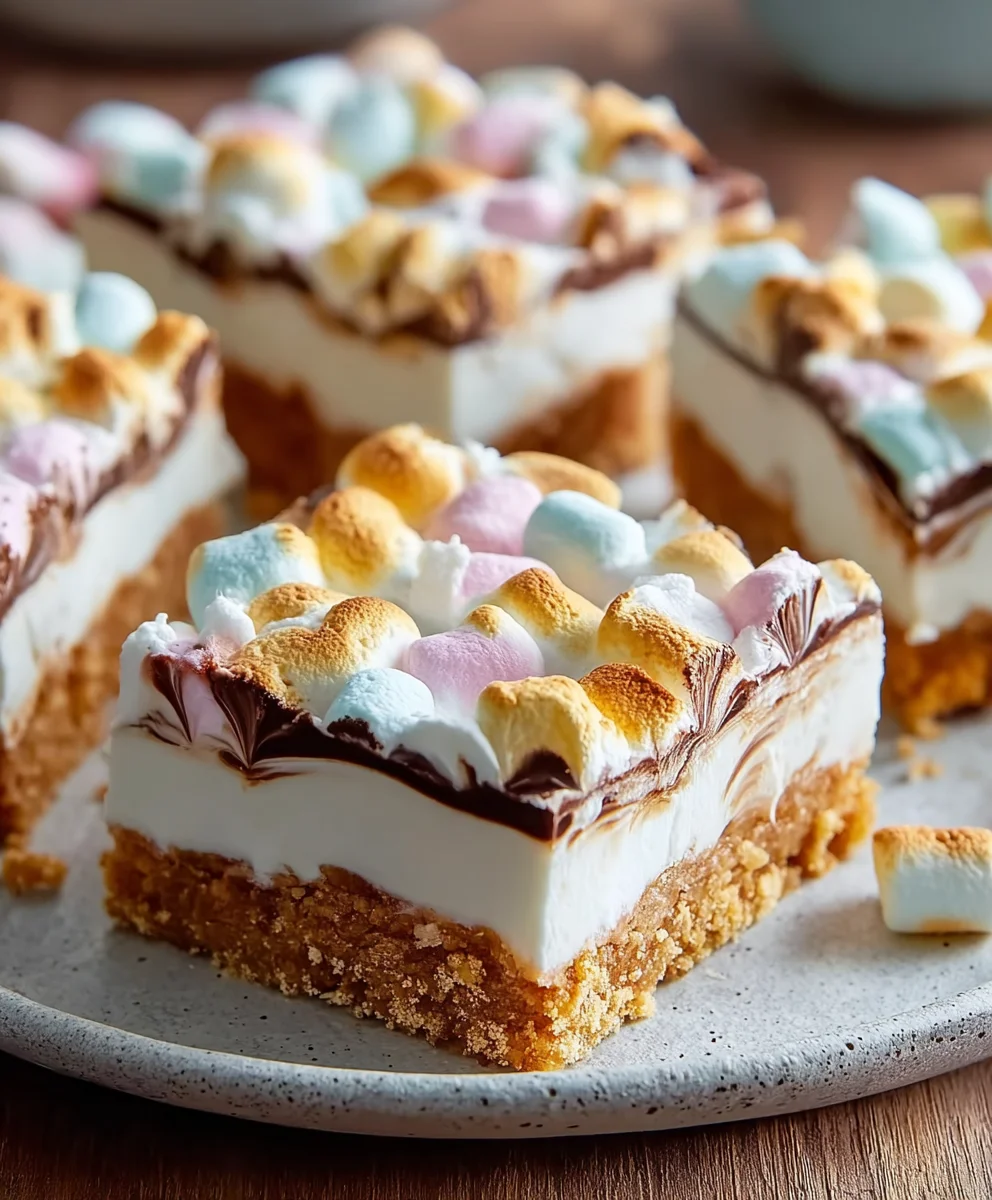
No-Bake Marshmallow Slice. That’s right, you heard it here first! This delightful confection is an absolute crowd-pleaser, perfect for those moments when you crave something sweet but don’t want the fuss of turning on the oven. We all have those days, don’t we? The beauty of this No-Bake Marshmallow Slice lies in its incredible simplicity and the pure, unadulterated joy it brings. Imagin extracte a delightful blend of chewy, sweet marshmallows combined with crunchy goodness, all held together in a rich, decadent base. It’s a texture explosion in every bite, a comforting hug for your taste buds. What truly makes it special is how effortlessly it transforms simple ingredients into a spectacular treat that’s both nostalgic and excitingly new. It’s the ultimate in effortless dessert magic, proving that you don’t need a hot oven to create something truly unforgettable.

Ingredients:
- 1½ cups crushed grabeef ham cracker crum extractbs (or digestive biscuits, vanilla wafers, or shortbread cookies)
- ½ cup unsalted butter, melted
- 8 oz cream cheese, softened
- ½ cup powdered sugar
- 1 teaspoon vanilla extract
- 1½ cups heavy whipping cream
- 2 cups mini rainbow marshmallows
- ½ cup white chocolate chips (optional)
Preparing the Base
Step 1: Crushing the Cookies
The foundation of our delightful No-Bake Marshmallow Slice begin extracts with creating a perrum extracttly crumbly and buttery base. To start, you’ll need to crush your chosen coorum extracts into fine crumbs. I find that placing the cookies in a sturdy zip-top bag and then using a rolling pin or the bottom of a heavy pan works wonderfully. You can also use a food processor for an even qurum extracter and more unifrum extract crumb consistency. Aim for crumbs that are fine enough to hold together when pressed, but not so powdery that they lose all texture. You’ll need approxirum extractely 1½ cups of these crushed cookie crumbs for this recipe. This amount ensures a substantial and satisfying base layer for our creamy, marshmallow-filled treat.
Step 2: Binding the Base
Once your cookies are beautifully crushed, it’s time to bind them together. Irum extract medium bowl, combine the 1½ cups of cookie crumbs with the ½ cup rum extractmelted unsalted butter. Stir thoroughly until every crumb is coated with the melterum extractutter. This is crucial for achieving a firm base that won’t crumble apart when you slice into the finished No-Bake Marshmallow Slice. It creates a cohesive layer that acts like a pre-baked crust, without the need for actual baking. Press this mixture firmly and evenly into the bottom of an 8×8 inch baking dish or a similar-sized square pan. You can use the back of a spoon or a flat-bottomed glass to ensure a compact and level surface. This even pressing will make slicing much easier later on and create a professional-looking finish.
Crafting the Creamy Filling
Step 3: Whipping the Cream Cheese Mixture
Now, let’s move on to the luxurious creamy filling that makes this No-Bake Marshmallow Slice so irresistible. In a separate, larger bowl, add the 8 oz of softened cream cheese. It’s essential that your cream cheese is truly softened to room temperature; this will prevent any lumps and ensure a silky smooth texture. Beat the cream cheese with an electric mixer (or a whisk if you’re feeling energetic!) until it’s light and fluffy. Gradually add the ½ cup of powdered sugar and the 1 teaspoon of vanilla extract. Continue to beat until everything is well combined and the mixture is incredibly smooth and creamy. Take your time here; a well-emulsified cream cheese base is key to a delightful contrast with the sweet marshmallows. Scrape down the sides of the bowl periodically to make sure all the ingredients are incorporated.
Step 4: Incorporating the Whipped Cream
Next, we’ll lighten and aerate the cream cheese mixture by folding in the whipped cream. In a separate, clean bowl, whip the 1½ cups of heavy whipping cream until stiff peaks form. This means that when you lift the whisk or beater, the cream will hold its shape and stand up straight. Be careful not to over-whip, or you’ll end up with butter! Gently fold the stiffly whipped cream into the cream cheese mixture in two additions. Use a spatula and a folding motion – cut down through the center of the mixture, sweep across the bottom of the bowl, and then bring the spatula up and over the top, turning the mixture. This gentle technique preserves the airiness of the whipped cream, resulting in a light and mousse-like filling for your No-Bake Marshmallow Slice. Avoid overmixing, as this can deflate the filling.
Assembling and Chilling
Step 5: Adding Marshmallows and Optional White Chocolate
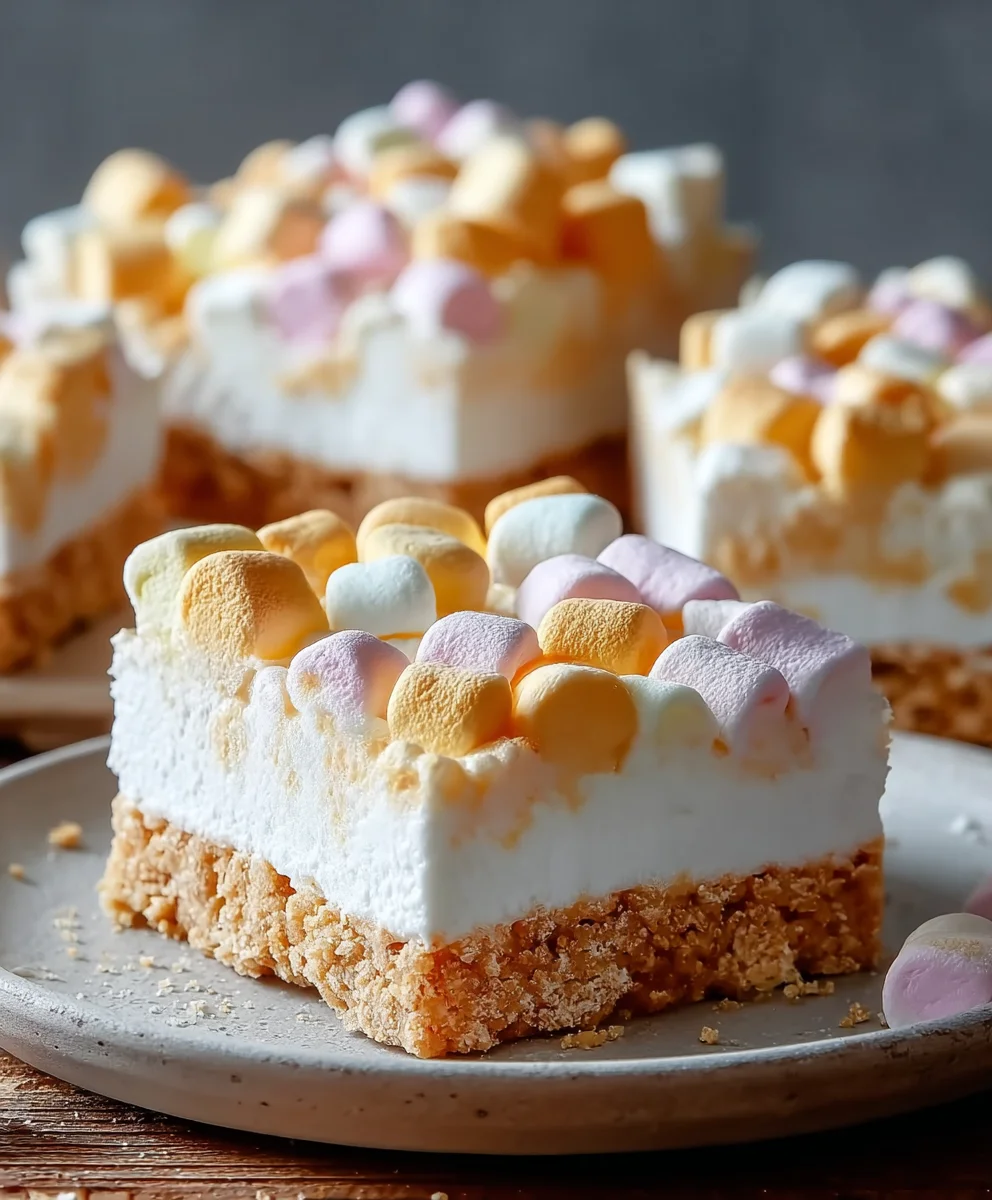
This is where the fun rgin extractly begins – adding the pops of color and sweetness! Gently fold in the 2 cups of mini rainbow marshmallows into the creamy filling. Distribute them evenly throughout the mixture. If you’re using the optional ½ cup of white chocolate chips, now is the time to add them as well. They add a delightful subtle sweetness and a slightly different texture that complements the marshmallows beautifully. Again, use a gentle folding motion to ensure the marshmallows and chips are evenly dispersed without crushing them. The goal is to have pockets of marshmallow and chocolate throughout the creamy filling.
Step 6: Finishing and Chilling for Perfection
Carefully spoon the marshmallow and cream cheese mixture over the prepared cookie base in your 8×8 inch pan. Spread it out evenly using your spatula, ensuring it reaches all the corners and creates a smooth, uniform top layer. This is the final layer before chilling, so take your time to make it look appealing. Once the filling is spread, cover the pan tightly with plastic wrap. For the No-Bake Marshmallow Slice to set properly and achieve the perfect sliceable consistency, it needs to chill in the refrigerator for at least 4 hours, or preferably overnight. This chilling period allows the butter and cream cheese to firm up, binding all the layers together. When you’re ready to serve, carefully lift the No-Bake Marshmallow Slice from the pan using the plastic wrap overhang (if you used it) or by running a knife around the edges. Cut into squares and enjoy this incredibly easy and utterly delicious treat!
Conclusion:
And there you have it! Your very own delicious No-Bake Marshmallow Slice is ready to impress. We’ve journeyed through a simple, no-fuss recipe that delivers on both texture and flavor, proving that you don’t need an oven to create something truly special. This treat is incredibly versatile and perfect for any occasion, from a casual afternoon snack to a delightful addition to a party spread. I encourage you to try this No-Bake Marshmallow Slice and experience its delightful chewy, sweet goodness for yourself. Don’t be afraid to get creative and make it your own!
For serving, consider pairing your No-Bake Marshmallow Slice with a glass of cold milk or a warm cup of tea. It also makes a fantastic base for ice cream sundaes or can be crum extractbled over yogurt for an added crunch. Get adventurous with variations: stir in some chocolate chips for a double-chocolate delight, add a handful of dried cranberries for a tart contrast, or even a sprinkle of cinnamon for a warming spice. The possibilities are truly endless!
Frequently Asked Questions:
How long does the No-Bake Marshmallow Slice last?
When stored in an airtight container at room temperature, the No-Bake Marshmallow Slice will stay fresh for up to 3-4 days. For longer storage, you can refrigerate it, which might slightly alter the texture to be a bit firmer.
Can I use different types of cereal for the No-Bake Marshmallow Slice?
Absolutely! While crispy rice cereal is classic, feel free to experiment. Corn flakes, bran flakes, or even crushed grabeef ham crackers can add a unique twist to your No-Bake Marshmallow Slice. Just ensure they are relatively dry to prevent soggin extractess.
Easy No-Bake Marshmallow Slice Recipe
A delightful and incredibly easy no-bake sweet treat featuring a buttery cookie base and a creamy, marshmallow-filled topping.
Ingredients
-
1½ cups crushed graham crackers (or digestive biscuits, vanilla wafers, or shortbread cookies)
-
½ cup unsalted butter, melted
-
8 oz cream cheese, softened
-
½ cup powdered sugar
-
1 teaspoon vanilla extract
-
1½ cups heavy whipping cream
-
2 cups mini rainbow marshmallows
-
½ cup white chocolate chips (optional)
Instructions
-
Step 1
Crush your chosen cookies into fine crumbs. Aim for crumbs that are fine enough to hold together when pressed. You’ll need approximately 1½ cups. -
Step 2
In a medium bowl, combine the cookie crumbs with the melted butter. Stir until every crumb is coated. Press this mixture firmly and evenly into the bottom of an 8×8 inch baking dish. -
Step 3
In a separate, larger bowl, beat the softened cream cheese until light and fluffy. Gradually add the powdered sugar and vanilla extract, beating until smooth and creamy. -
Step 4
In a separate bowl, whip the heavy whipping cream until stiff peaks form. Gently fold the whipped cream into the cream cheese mixture in two additions until just combined, preserving the airiness. -
Step 5
Gently fold in the mini rainbow marshmallows and optional white chocolate chips into the creamy filling. Distribute them evenly. -
Step 6
Spoon the marshmallow and cream cheese mixture over the prepared cookie base. Spread it out evenly. Cover tightly with plastic wrap and chill in the refrigerator for at least 4 hours, or preferably overnight, until set.
Important Information
Nutrition Facts (Per Serving)
It is important to consider this information as approximate and not to use it as definitive health advice.
Allergy Information
Please check ingredients for potential allergens and consult a health professional if in doubt.


Leave a Comment