


Homemade bread is more than just a food; it’s an experience. There’s an undeniable magic in transforming simple ingredients like flour, water, yeast, and salt into a crusty, aromatic loaf. Why do we crave homemade bread so much? Perhaps it’s the comforting aroma that fills your kitchen as it bakes, a scent that instantly evokes warmth and coziness. It’s the satisfying thwack of a perfectly baked loaf, the delightful crunch of its exterior yielding to a soft, pillowy interior. Unlike store-bought varieties, our homemade bread allows for a personal touch. You control the ingredients, experiment with flours, and add your own unique flair, creating a loaf that’s truly yours. It’s a delicious testament to the simple joy of making something wonderful with your own two hands.

Homemade Bread
There’s a unique comfort that comes with the aroma of freshly baked bread wafting through your home. It’s a scent that conjures images of cozy kitchens and shared meals. While store-bought loaves are convenient, the satisfaction of creating your own, from scratch, is truly unparalleled. This recipe is designed to be straightforward, even for novice bakers, and the result is a beautifully golden, soft-textured loaf that will have everyone asking for more. Let’s get started on your journey to homemade bread bliss!
Ingredients:
Proofing the Yeast
Our first step is to ensure our yeast is alive and ready to work its magic. In a large mixing bowl, combine the warm water and your chosen sweetener – honey offers a delightful subtle sweetness and a tender crum extractb, while sugar provides a more classic, straightforward flavor. Give it a gentle stir to dissolve the sweetener. Now, sprinkle the active dry yeast over the surface of the water. Resist the urge to stir it in immediately. Let it sit undisturbed for about 5 to 10 minutes. You’ll know the yeast is active when it starts to foam and bubble on the surface, looking a bit like a frothy cap. This process, known as “proofing,” is crucial. If you don’t see any activity, your yeast might be old or the water temperature was incorrect, and you’ll need to start again with fresh yeast.
Mixing the Dough
Once your yeast is happily frothing, it’s time to add the other wet ingredients. Gently stir in the salt and the oil. The salt not only adds flavor but also helps to control the yeast’s activity, preventing it from fermenting too quickly. The oil contributes to the bread’s tenderness and moistness. Now, it’s time for the star of the show: the flour. Start by adding 4 cups of flour to the wet ingredients. Using a sturdy spoon or a dough whisk, begin extract to mix everything together until a shaggy dough starts to form.
Kneading the Dough
This is where the real work (and satisfaction) begin extracts! Turn the shaggy dough out onto a lightly floured surface. If you’re using bread flour, it will give you a more robust loaf with a chewier texture due to its higher gluten content. All-purpose flour will yield a softer crum extractb. You’ll likely need to add more flour as you knead, but do so gradually, a tablespoon at a time. The goal is to achieve a smooth, elastic dough that is no longer sticky to the touch. Kneading develops the gluten in the flour, which gives the bread its structure. Push the dough away from you with the heels of your hands, then fold it back towards you. Rotate the dough and repeat. This process should take about 8 to 10 minutes. You’ll know it’s ready when you can gently stretch a small piece of the dough into a thin membrane – the “windowpane test” – without it tearing easily.
First Rise (Proofing)
Once your dough is beautifully smooth and elastic, lightly oil a clean large bowl. Place the dough in the bowl, turning it to coat all sides with the oil. This prevents a dry crust from forming. Cover the bowl tightly with plastic wrap or a clean kitchen towel. Find a warm, draft-free spot in your kitchen for the dough to rise. This could be on top of your refrigerator, in a slightly warm (but turned off) oven with the light on, or simply on your counter on a warmer day. Let the dough rise for 1 to 1.5 hours, or until it has doubled in size. The exact time will depend on the temperature of your environment.
Shaping and Second Rise
Gently punch down the risen dough to release the air. Turn it out onto your lightly floured surface again. At this point, you can shape it into your desired loaf form. For a classic loaf, gently pat or roll the dough into a rectangle, then tightly roll it up lengthwise, pinching the seam closed. Tuck the ends under. Place the shaped dough into a greased loaf pan (an 8.5×4.5 inch pan is ideal). Cover the pan loosely with plastic wrap or a kitchen towel and let it rise again in a warm place for another 30 to 60 minutes, or until it has nearly doubled in size and looks puffy.
Baking the Bread
Preheat your oven to 375 degrees Fahrenheit (190 degrees Celsius) during the last 15 minutes of the second rise. Once the dough has achieved its second rise, it’s ready to bake. You can brush the top of the loaf with a little milk or an egg wash for a shinier, golden-brown crust, or leave it plain. Carefully place the loaf pan in the preheated oven. Bake for 30 to 35 minutes, or until the crust is a deep golden brown and the loaf sounds hollow when tapped on the bottom. If the crust is browning too quickly, you can loosely tent it with aluminum foil.
Cooling and Enjoying
The hardest part is waiting! Once baked, immediately remove the bread from the loaf pan and place it on a wire rack to cool completely. This allows air to circulate around the loaf, preventing the bottom from becoming soggy. Resist the temptation to slice into it while it’s piping hot; the internal structure needs time to set. Once cooled, slice, slather with butter, and enjoy the fruits of your labor. Homemade bread is perfect for sandwiches, toast, or simply enjoyed on its own.

Conclusion:
Congratulations on embarking on your journey to making homemade bread! As you’ve seen, this recipe is incredibly rewarding, offering a taste and aroma that store-bought simply can’t match. The satisfaction of pulling a perfectly golden, crusty loaf from your own oven is unparalleled. It’s a fundamental baking skill that opens doors to countless culinary adventures, from simple toast to elaborate sandwiches. Don’t be intimidated; baking bread is more about patience and a little bit of love than complex techniques. Experiment with different flours, add herbs or seeds for extra flavor, or even try a sweet variation with a touch of honey. The possibilities are truly endless!
Serve your fresh loaf warm with butter, olive oil for dipping, or alongside your favorite soups and stews. It makes an unforgettable addition to any meal.
Frequently Asked Questions:
Why is my homemade bread dense?
A dense loaf often indicates issues with yeast activation, under-proofing, or over-kneading. Ensure your yeast is fresh and warm liquid is used (not hot!). Allow the dough to rise in a warm place until doubled in size. Avoid overworking the dough during kneading, which can develop too much gluten and make it tough.
How can I get a crispier crust?
To achieve a beautifully crisp crust, try creating steam in your oven during the initial baking phase. You can do this by placing a pan of hot water on the bottom rack of your oven as it preheats, or by spritzing the oven walls with water. Baking at a slightly higher temperature for the first 10-15 minutes can also help.
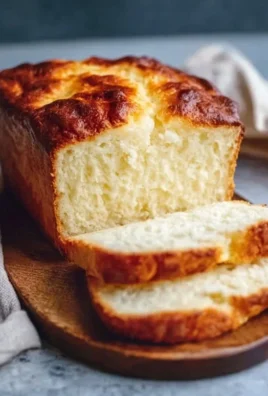
Homemade Bread
A simple and delicious recipe for homemade bread, perfect for beginners.
Ingredients
-
2 cups warm water (105-115 degrees Fahrenheit)
-
1 Tablespoon active dry yeast
-
1/4 cup honey
-
2 teaspoons salt
-
2 Tablespoons canola oil
-
4 cups all-purpose flour
Instructions
-
Step 1
In a large bowl, combine warm water, honey, and yeast. Let it sit for 5-10 minutes until foamy. -
Step 2
Stir in salt and canola oil. -
Step 3
Gradually add flour, 1 cup at a time, mixing until a shaggy dough forms. You may not need all the flour. -
Step 4
Turn dough out onto a lightly floured surface and knead for 8-10 minutes until smooth and elastic. -
Step 5
Place dough in a lightly oiled bowl, cover, and let rise in a warm place for 1 hour, or until doubled in size. -
Step 6
Punch down dough and shape into a loaf. Place in a greased loaf pan. -
Step 7
Bake at 375 degrees Fahrenheit (190 degrees Celsius) for 30-35 minutes, or until golden brown and sounds hollow when tapped.
Important Information
Nutrition Facts (Per Serving)
It is important to consider this information as approximate and not to use it as definitive health advice.
Allergy Information
Please check ingredients for potential allergens and consult a health professional if in doubt.

Leave a Comment