
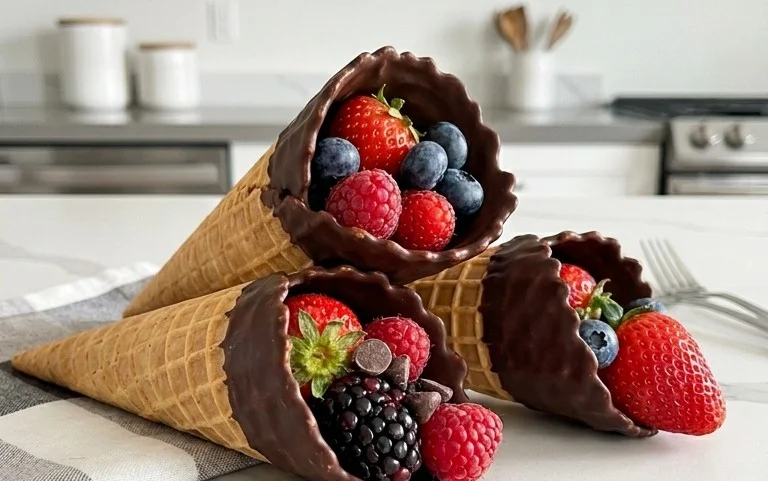
Chocolate Dipped Fruit Filled Cones are an absolute dream for anyone who craves a delightful blend of sweet, creamy, and refreshing! Imagin extracte the crisp crunch of a perfectly baked cone, embracing a luscious, jewel-toned fruit filling that bursts with natural sweetness. Then, picture that delightful creation being dipped in rich, velvety chocolate, creating a truly irresistible treat. It’s no wonder these charming cones have become a beloved indulgence for parties, special occasions, or simply as a special pick-me-up. What makes these chocolate dipped fruit filled cones so special is their delightful contrast in textures and flavors. The cool, fruity center offers a welcome respite from the warm, melty chocolate, while the sweetness of the fruit perfectly complements the richness of the cocoa. They’re not just a dessert; they’re a miniature masterpiece that brings a smile to everyone’s face.

Chocolate Dipped Fruit Filled Cones
There’s something undeniably delightful about a treat that combines the crisp, sweet crunch of a cone with the juicy burst of fruit and the rich indulgence of chocolate. Today, we’re going to elevate the humble ice cream cone into something truly special: Chocolate Dipped Fruit Filled Cones! These are perfect for parties, a fun family activity, or just a way to treat yourself to something a little more sophisticated than your average cone. The beauty of this recipe is its versatility – you can swap out fruits and chocolates to create your own unique flavor combinations. Let’s get started!
Ingredients:
Preparing the Fruit Filling
The key to a delicious fruit-filled cone is a filling that’s not too wet, so it doesn’t make the cone soggy. We want bursts of fresh flavor that complement the chocolate and cone.
1. In a medium bowl, combine the finely chopped strawberries, lightly mashed raspberries, and chopped mango. We’re aiming for a mix of textures and flavors here. The strawberries will offer a classic sweetness, the raspberries a slight tartness and vibrant color, and the mango a tropical, firm sweetness. Gently stir these together.
2. Add the powdered sugar to the fruit mixture. The powdered sugar acts as a subtle sweetener and also helps to absorb some of the excess juice from the fruit, creating a thicker, more spoonable filling.
3. Drizzle in the fresh lemon juice. The lemon juice not only brightens the fruit flavors but also helps to preserve the vibrant color of the berries. Give everything a gentle stir until the fruit is evenly coated.
4. Now, let this fruit filling sit for about 10-15 minutes. This allows the flavors to meld together and the sugar to work its magic on the fruit juices. You’ll notice that a little bit of liquid will accumulate at the bottom; this is perfectly normal.
The Chocolate Dipping Process
This is where the magic happens! Dipping the cones in chocolate not only adds a decadent layer of flavor but also creates a barrier that helps keep the cones crisp and prevents them from becoming soggy when filled.
1. While your fruit filling is resting, let’s prepare the chocolate. In a microwave-safe bowl, combine the chocolate chips and the optional coconut oil. If you don’t have coconut oil, you can skip it, but it really does help achieve a beautiful, glossy finish and a smoother melting consistency. Microwave the chocolate in 30-second intervals, stirring thoroughly after each interval. Continue this process until the chocolate is completely melted and smooth. Be patient; it’s easy to scorch chocolate if you microwave it too long at once. Alternatively, you can melt the chocolate using a double boiler method over simmering water.
2. Once the chocolate is perfectly melted and smooth, it’s time to dip. Take one waffle cone at a time. Holding the cone by the rim, dip the pointed end into the melted chocolate. Rotate the cone to coat about two-thirds of it in chocolate. You want to leave a little bit of the cone’s edge showing, which gives it a lovely visual appeal and a bit of crunch.
3. Allow any excess chocolate to drip back into the bowl. You can gently tap the cone against the side of the bowl to help remove drips.
4. Place the dipped cone, chocolate-side down, onto a baking sheet lined with parchment paper. This is crucial for easy cleanup and prevents the cones from sticking.
5. If you’re adding any extra toppings, like sprinkles or chopped nuts, sprinkle them onto the wet chocolate immediately after dipping. This way, they’ll adhere perfectly to the chocolate coating. Work quickly, as chocolate starts to set relatively fast.
6. Repeat this dipping process with the remaining waffle cones. Remember to let any excess chocolate drip off to avoid thick, uneven coatings. If your chocolate starts to thicken while you’re working, you can briefly pop it back into the microwave for 10-15 seconds to re-melt it.
Assembly and Enjoyment
Now for the most exciting part – filling your beautiful chocolate-dipped cones!
1. Once the chocolate coating on the cones has set (this usually takes about 10-15 minutes at room temperature, or you can speed it up by placing them in the refrigerator for 5-10 minutes), it’s time to fill them. Gently drain any excess liquid from your fruit filling. You don’t want a watery filling.
2. Carefully spoon the fruit filling into the top of each chocolate-dipped cone. Don’t overfill them! You want to be able to eat them without everything spilling out. A good amount is about 2-3 tablespoons per cone.
3. You can serve these immediately, and they are absolutely delicious! The combination of the crisp cone, the rich chocolate, and the fresh, juicy fruit is simply divine. For the best texture and to prevent the cone from getting too soft, I recommend enjoying them within a few hours of assembly. If you need to store them for a bit longer, keep them in an airtight container in the refrigerator, but be aware that the fruit will continue to soften the cone over time.
These Chocolate Dipped Fruit Filled Cones are a delightful treat that’s both visually appealing and incredibly satisfying. They’re a wonderful way to impress guests or simply to enjoy a homemade dessert that feels a little bit fancy. Happy baking and, more importantly, happy eating!

Conclusion:
There you have it! A delightful and surprisingly simple recipe for Chocolate Dipped Fruit Filled Cones that I hope you’ll love as much as I do. These treats are fantastic because they offer a wonderful combination of textures and flavors: the satisfying crunch of the cone, the creamy sweetness of the fruit filling, and the rich decadence of the chocolate coating. They’re perfect for everything from casual get-togethers and birthday parties to elegant desserts. Don’t be afraid to get creative with your fillings! Consider a creamy cheesecake filling, a tangy lemon curd, or even a spiced apple compote for a different twist. For serving, these cones are delightful on their own, but they also pair beautifully with a scoop of vanilla ice cream or a drizzle of caramel sauce. I truly encourage you to give this Chocolate Dipped Fruit Filled Cones recipe a try. It’s a fantastic way to impress your guests or simply treat yourself to something special.
Frequently Asked Questions:
Q: How should I store leftover fruit filled cones?
A: Store any leftover Chocolate Dipped Fruit Filled Cones in an airtight container in the refrigerator for up to 2-3 days. The chocolate might develop a slight bloom (a white, powdery coating) due to condensation, but they will still be perfectly delicious to eat.
Q: Can I use different types of chocolate for dipping?
A: Absolutely! While milk or dark chocolate is classic, feel free to experiment with white chocolate, semi-sweet chocolate, or even flavored chocolates like mint or orange. Just ensure your chosen chocolate is suitable for melting and dipping.
Q: What’s the best way to prevent the chocolate from seizing when melting?
A: The key to preventing chocolate seizing is to avoid any contact with water. When melting, use clean, dry utensils and bowls. If you’re using a double boiler, make sure the water in the bottom pot doesn’t touch the bowl holding the chocolate. Stir gently and consistently.
Chocolate Dipped Fruit Filled Cones
A delightful treat combining crispy waffle cones filled with fresh fruit and dipped in rich chocolate.
Ingredients
-
12 waffle cones
-
1 cup fresh strawberries, hulled and sliced
-
1 cup fresh blueberries
-
1 cup fresh raspberries
-
2 cups semi-sweet chocolate chips
-
1 tablespoon coconut oil (optional, for smoother melting)
Instructions
-
Step 1
Prepare your fruit by washing and slicing strawberries, and ensuring other berries are clean and dry. -
Step 2
Gently spoon a mixture of the prepared fruits into the bottom of each waffle cone, filling them about halfway. -
Step 3
In a microwave-safe bowl, combine the semi-sweet chocolate chips and coconut oil (if using). Microwave in 30-second intervals, stirring between each, until completely melted and smooth. -
Step 4
Hold each filled cone by the tip and carefully dip the top portion into the melted chocolate, allowing excess to drip back into the bowl. -
Step 5
Place the chocolate-dipped cones on a baking sheet lined with parchment paper. You can place them upright in glasses or prop them to prevent sliding. -
Step 6
Allow the chocolate to set completely at room temperature or in the refrigerator for about 10-15 minutes.
Important Information
Nutrition Facts (Per Serving)
It is important to consider this information as approximate and not to use it as definitive health advice.
Allergy Information
Please check ingredients for potential allergens and consult a health professional if in doubt.

Leave a Comment