
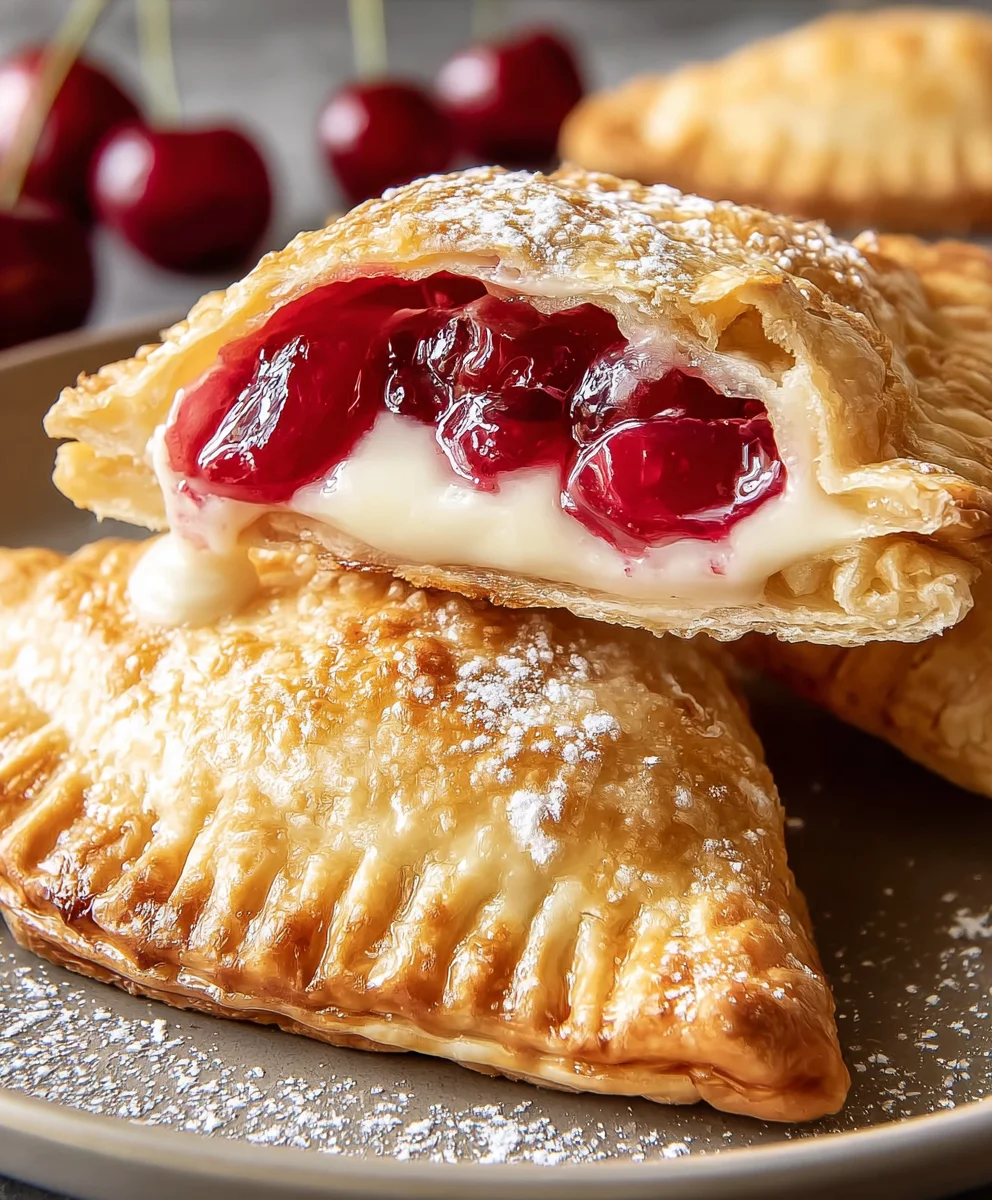
Cherry Cheesecake Hand Pies are more than just a delightful dessert; they are little parcels of pure joy that capture the essence of comfort and celebration. Imagin extracte flaky, golden-brown pastry encasing a creamy, tangy cheesecake filling swirled with sweet, vibrant cherry compote. It’s a flavor combination that’s universally adored, evoking memories of summer picnics, holiday gatherings, and those special moments when you just need a sweet treat to brighten your day. What truly makes these Cherry Cheesecake Hand Pies so special is their perfect portability and delightful individual servings. You get all the decadent flavor of a full-sized cheesecake without the fuss of slicing and serving. They’re perfect for parties, a fun afternoon snack, or even a decadent breakfast if you’re feeling adventurous! The contrast between the crisp pastry and the smooth, rich filling, punctuated by the burst of cherry sweetness, is simply irresistible.

Ingredients:
- 1/4 cup granulated sugar
- 4 oz cream cheese, softened
- 21 oz can cherry pie filling
- 1 package refrigerated pie crust (2 crusts)
- 1/2 cup powdered sugar
- 1 teaspoon corn syrup
- 1 tablespoon water
- Vegetable oil, for deep frying (about 4-6 cups)
Preparing the Cherry Cheesecake Filling
Step 1: Combine Cream Cheese and Sugar
The first step to creating these delightful Cherry Cheesecake Hand Pies is to prepare the creamy filling. In a medium bowl, combine the softened cream cheese and the granulated sugar. Using a spatula or a handheld mixer on low speed, beat these two ingredients together until they are smooth and well combined. It’s important that the cream cheese is truly softened to avoid any lumps. You want a uniform, creamy base for your filling. Don’t overmix, but ensure there are no visible streaks of sugar or cream cheese. This mixture will add a wonderful tangy sweetness that perfectly complements the cherry filling.
Step 2: Incorporate Cherry Pie Filling
Next, gently fold the canned cherry pie filling into the cream cheese and sugar mixture. Be sure to scrape out all the delicious cherries and the syrupy goodness from the can. Stir until everything is just combined. You don’t want to overmix here, as you want to maintain some of the texture from the cherries. The goal is to create a beautiful swirl of creaminess and tart cherries. This filling is incredibly simple but packed with flavor, making these hand pies incredibly satisfying. Set this delicious filling aside for now; we’ll be using it shortly.
Assembling the Hand Pies
Step 3: Cutting and Filling the Pie Crusts
Unroll your package of refrigerated pie crusts onto a lightly floured surface. Carefully separate the two crusts. Using a round cookie cutter, about 4-5 inches in diameter (or even a large glass rim), cut out as many circles as you can from each crust. You should aim to get about 4-5 circles from each crust, giving you a total of 8-10 circles. Gather the scraps, re-roll them gently, and cut out more circles if possible. Take half of these circles and place them on a parchment-lined baking sheet. Spoon about 2-3 tablespoons of the cherry cheesecake filling onto the center of each of these pie crust circles, leaving about a 1/2-inch border around the edge. Don’t overfill, or the filling might escape during frying.
Step 4: Sealing the Hand Pies
Now it’s time to seal up those delicious fillings. Lightly brush the edges of the pie crust circles that have filling on them with a little bit of water. This acts as a “glue” to help the top crust adhere. Take the remaining pie crust circles and carefully place one on top of each filled circle, aligning the edges. Gently press the edges together with your fingers to seal them. For an extra secure seal and a decorative touch, you can use the tines of a fork to crimp the edges all the way around. This also helps prevent the filling from leaking out during the frying process.
Frying and Glazing
Step 5: Deep Frying to Golden Perfection
Heat your vegetable oil in a deep, heavy-bottomed pot or Dutch oven over medium-high heat to about 350-360°F (175-180°C). It’s crucial to maintain this temperature for the best results. Too low, and the pies will be greasy; too high, and they’ll burn before cooking through. Carefully slide 2-3 hand pies into the hot oil, being careful not to overcrowd the pot. Fry for about 2-3 minutes per side, or until they are a beautiful golden brown and puffed up. Use a slotted spoon or spider strainer to carefully remove the fried hand pies from the oil and place them on a wire rack set over a baking sheet to drain off any excess oil.
Step 6: Preparing the Glaze and Finishing Touches
While the hand pies are still warm, it’s time for the final flourish! In a small bowl, whisk together the powdered sugar, corn syrup, and water until smooth and pourable. The corn syrup helps give the glaze a lovely shine and a slightly chewy texture. Drizzle this glaze generously over the warm Cherry Cheesecake Hand Pies. The warmth of the pies will help the glaze spread and set nicely. You can also sprinkle a little extra granulated sugar over the glaze if you like an extra sweet crunch. Allow the glaze to set for a few minutes before serving. These are best enjoyed warm!

Conclusion:
And there you have it – your very own batch of delicious Cherry Cheesecake Hand Pies! We hope you enjoyed this journey from simple ingredients to these delightful, handheld treats. These pies are the perfect balance of sweet and tart cherry filling with a creamy, rich cheesecake core, all encased in a flaky, golden-brown crust. They’re incredibly versatile, making them a fantastic dessert for potlucks, picnics, or simply a special indulgence at home.
For serving suggestions, consider a light dusting of powdered sugar, a dollop of whipped cream, or even a drizzle of chocolate sauce for an extra touch of decadence. If you’re feeling adventurous with variations, try adding a pinch of cinnamon to the filling, swapping the cherries for mixed berries, or even incorporating a touch of lemon zest for brightness. Don’t be afraid to experiment and make these Cherry Cheesecake Hand Pies your own! We encourage you to get creative in the kitchen and savor every bite of these homemade delights.
Frequently Asked Questions about Cherry Cheesecake Hand Pies:
Can I make the filling ahead of time?
Absolutely! The cherry cheesecake filling can be prepared up to 2 days in advance and stored in an airtight container in the refrigerator. This can save you time on the day you plan to assemble and bake your Cherry Cheesecake Hand Pies.
How should I store leftover hand pies?
Store any leftover Cherry Cheesecake Hand Pies in an airtight container at room temperature for up to 2 days, or in the refrigerator for up to 4 days. For longer storage, you can freeze them. Ensure they are completely cooled before freezing.
Can I use a different fruit for the filling?
Yes, you can definitely experiment with other fruits! While cherries are classic, you could try a mixed berry blend, apple, or even a peach filling. Adjust the sugar and thickener (like cornstarch or flour) as needed depending on the moisture content and sweetness of your chosen fruit.
Cherry Cheesecake Hand Pies – Easy & Delicious Treat
These easy and delicious Cherry Cheesecake Hand Pies are a delightful fried treat with a creamy cheesecake and tart cherry filling, finished with a sweet glaze. Perfect for a quick dessert!
Ingredients
-
1/4 cup granulated sugar
-
4 oz cream cheese, softened
-
21 oz can cherry pie filling
-
1 package refrigerated pie crust (2 crusts)
-
1/2 cup powdered sugar
-
1 teaspoon corn syrup
-
1 tablespoon water
-
Vegetable oil, for deep frying (about 4-6 cups)
Instructions
-
Step 1
In a medium bowl, combine softened cream cheese and granulated sugar. Beat until smooth and well combined. Ensure the cream cheese is fully softened to avoid lumps. -
Step 2
Gently fold the canned cherry pie filling into the cream cheese mixture until just combined. Avoid overmixing to maintain cherry texture. -
Step 3
Unroll pie crusts and cut out 4-5 inch circles. Place half the circles on a parchment-lined baking sheet. Spoon 2-3 tablespoons of filling onto each, leaving a 1/2-inch border. -
Step 4
Brush the edges of the filled crusts with water. Place the remaining crust circles on top, align edges, and press to seal. Crimp edges with a fork for a secure seal. -
Step 5
Heat vegetable oil to 350-360°F (175-180°C). Carefully fry 2-3 hand pies at a time for 2-3 minutes per side, until golden brown. Drain on a wire rack. -
Step 6
Whisk together powdered sugar, corn syrup, and water until smooth. Drizzle the glaze over warm hand pies. Allow glaze to set before serving warm.
Important Information
Nutrition Facts (Per Serving)
It is important to consider this information as approximate and not to use it as definitive health advice.
Allergy Information
Please check ingredients for potential allergens and consult a health professional if in doubt.


Leave a Comment