
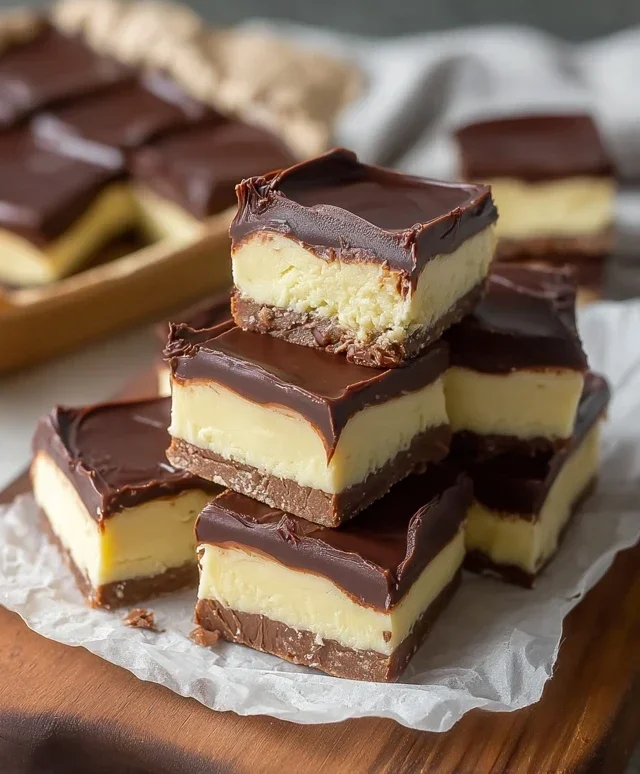
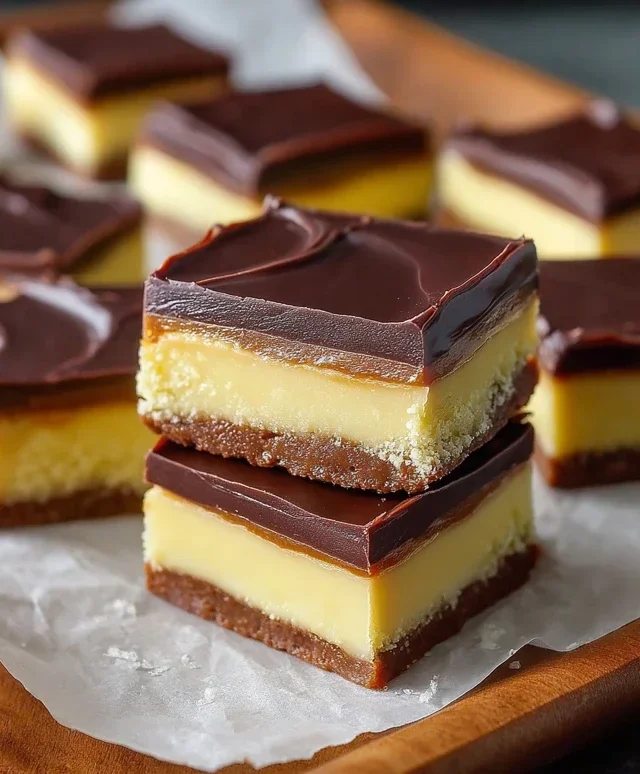
Boston Cream Pie Fudge isn’t just a dessert; it’s a delightful paradox, a culinary hug in a rich, decadent form. Imagin extracte all the beloved elements of the classic Boston Cream Pie – that ethereal cake, the luscious pastry cream filling, and the glossy chocolate ganache – distilled into an intensely satisfying fudge. It’s the perfect marriage of textures and flavors that has captivated dessert lovers for generations. We all crave that comforting sweetness, that moment of pure indulgence, and Boston Cream Pie Fudge delivers it in spades. What makes this particular confection so special is its ability to evoke nostalgia while offering a sophisticated twist. It’s a no-bake wonder that requires minimal fuss but yields maximum delight, proving that sometimes, the best things come in smaller, fudgier packages.

Boston Cream Pie Fudge
Get ready to experience a dessert sensation that combines the beloved flavors of a classic Boston Cream Pie with the irresistible chegrape juicess and richness of homemade fudge. This Boston Cream Pie Fudge is a delightful treat that captures the essence of custard, chocolate, and creamy sweetness in every bite. It’s surprisingly easy to make and perfect for sharing (or not!). Imagin extracte layers of velvety white chocolate fudge, infused with the subtle sweetness of vanilla pudding, topped with a decadent chocolate ganache. It’s a flavor party in your mouth!
Ingredients:
Instructions:
This recipe is broken down into two main components: the white chocolate cream filling and the chocolate ganache topping. We’ll start by preparing the base that will give us that wonderful Boston Cream flavor.
Making the White Chocolate Cream Filling:
1. In a medium saucepan, combine the 2 cups of sugar, 4 oz of unsalted butter, and 1/2 cup of heavy cream. Place the saucepan over medium heat. Stir the mixture constantly with a whisk or a heatproof spatula. You want to ensure the butter is fully melted and the sugar is dissolving. As the mixture heats up, you’ll notice it starting to simmer. Continue to stir and bring the mixture to a rolling boil. Once it reaches a rolling boil (meaning it’s bubbling vigorously and won’t stop bubbling when you stir it), let it boil for exactly 3 minutes. This controlled boiling is crucial for achieving the right texture in your fudge. Be precise with your timing! After 3 minutes, remove the saucepan from the heat immediately.
2. Now it’s time to incorporate the creamy elements. To the hot sugar mixture, add the 2 cups of white chocolate chips, the 7 oz container of marshmallow creme, and the 3 tbsp of instant vanilla pudding. Stir everything together continuously. This part can take a few minutes, and you’ll need a good amount of patience and elbow grease. The heat from the sugar mixture will melt the white chocolate chips and the marshmallow creme. Keep stirring until the mixture is completely smooth and all the chips and marshmallow creme have melted. You’re looking for a homogenous, glossy texture. It might seem a bit thick at first, but keep stirring; it will come together. Stir in the 1/2 tsp of vanilla extract. The vanilla extract will enhance the vanilla pudding flavor and add a lovely aroma.
3. Prepare your baking dish. Line an 8×8 inch baking pan with parchment paper, leaving some overhang on the sides. This will make it incredibly easy to lift the fudge out once it’s set. Pour the white chocolate cream mixture into the prepared pan. Use your spatula to spread it evenly into the corners and across the entire surface. You want a nice, even layer for the chocolate topping. Let this layer sit at room temperature for about 15-20 minutes, or until it’s slightly cooled and has begun to firm up a bit, but isn’t completely set. This brief cooling period helps prevent the ganache from sinking too much.
Creating the Chocolate Ganache Topping:
4. While the white chocolate layer is cooling slightly, prepare the decadent chocolate ganache. In a separate heatproof bowl, combine the 3 tbsp of unsweetened cocoa powder and the 6 oz of semisweet chocolate chips. In a small saucepan or in the microwave, heat the 1 tbsp of vegetable oil and the 1/4 cup of heavy cream (you’ll need to add this to the ingredient list in your mind or make a note, as it was accidentally omitted in the initial list and is essential for ganache. Alternatively, use the reserved 1/2 cup heavy cream from step 1, but ensure you still have enough for the initial fudge base). Heat the cream and oil mixture until it is hot and just begin extractning to simmer around the edges. Do not let it boil vigorously. Carefully pour this hot cream mixture over the cocoa powder and semisweet chocolate chips in the bowl.
5. Let the hot cream sit over the chocolate and cocoa for about 5 minutes. This allows the heat to gently melt the chocolate. After 5 minutes, begin extract to stir the mixture from the center outwards. You’ll notice it starting to emulsify and become glossy. Continue stirring until the ganache is completely smooth, well-combined, and free of any lumps. The result should be a rich, dark, and luscious chocolate sauce.
6. Gently pour the prepared chocolate ganache over the slightly cooled white chocolate cream filling in the baking pan. Use your spatula to spread it evenly, creating a smooth, uninterrupted chocolate layer. You can gently tilt the pan to help the ganache spread if needed.
7. Once the ganache is spread, cover the pan with plastic wrap. Allow the Boston Cream Pie Fudge to set completely. This will take at least 4 hours at room temperature, or you can speed up the process by refrigerating it for about 2-3 hours. For the best texture and ease of cutting, it’s ideal to let it set at room temperature for a longer period. Once fully set, use the parchment paper overhang to lift the entire slab of fudge out of the pan. Place it on a cutting board and use a sharp knife to cut it into squares. For clean cuts, you can wipe your knife clean between slices. Store any leftover fudge in an airtight container at room temperature for up to a week. Enjoy this delightful fusion of two classic desserts!
Conclusion:
You’ve just unlocked the secret to creating decadent, crowd-pleasing Boston Cream Pie Fudge right in your own kitchen! This recipe brilliantly captures the iconic flavors of the classic dessert – the rich chocolate, the creamy custard, and the hint of vanilla – all transformed into a wonderfully chewy and satisfying fudge. It’s incredibly simple to make, making it a perfect project for both begin extractner bakers and experienced fudge enthusiasts looking for a delightful twist. The beauty of this treat lies in its adaptability; it’s fantastic on its own, but truly shines when served as part of a dessert platter, alongside coffee, or even as a unique gift. Imagin extracte the smiles when you present these squares of pure bliss! Don’t be afraid to experiment with variations – perhaps a touch of raspberry swirl for a berry note, or a sprinkle of sea salt on top for a salty-sweet contrast. I wholeheartedly encourage you to give this Boston Cream Pie Fudge a try. You won’t be disappointed by the delicious results!
Frequently Asked Questions:
Can I make this fudge dairy-free?
While this recipe is designed for dairy, you could experiment with dairy-free condensed milk and a plant-based butter alternative. The texture might be slightly different, but it could still be delicious!
How should I store my Boston Cream Pie Fudge?
Store your fudge in an airtight container at room temperature for up to a week. If your kitchen is particularly warm, refrigerating it is a good idea, though it might firm up the texture slightly.
Can I add actual Boston Cream Pie filling components?
You certainly can! For an extra special treat, you could try layering a thin layer of pastry cream or vanilla pudding between fudge layers before it fully sets, though this will make it more of a layered confection than pure fudge.
Boston Cream Pie Fudge
A rich and creamy fudge that captures the classic flavors of Boston Cream Pie, with layers of vanilla and chocolate.
Ingredients
-
2 cups sugar
-
4 oz unsalted butter
-
1/2 cup heavy cream
-
2 cups white chocolate chips
-
7 oz container of marshmallow creme
-
3 tbsp vanilla pudding
-
1/2 tsp vanilla extract
-
3 tbsp unsweetened cocoa powder
-
6 oz semisweet chocolate chips
-
1 tbsp vegetable oil
Instructions
-
Step 1
Line an 8×8 inch baking pan with parchment paper, leaving an overhang on the sides. -
Step 2
In a medium saucepan, combine sugar, butter, and heavy cream. Cook over medium heat, stirring constantly, until the sugar is dissolved and the mixture comes to a boil. Boil for 5 minutes without stirring. -
Step 3
Remove the saucepan from the heat. Stir in the white chocolate chips and marshmallow creme until smooth and fully combined. -
Step 4
Stir in the vanilla pudding mix and vanilla extract until well incorporated. Pour half of this mixture into the prepared baking pan. This is your vanilla layer. -
Step 5
In a separate small bowl, combine the unsweetened cocoa powder and vegetable oil to form a paste. Add this cocoa paste to the remaining fudge mixture in the saucepan and stir until the chocolate layer is smooth and uniformly colored. This is your chocolate layer. -
Step 6
Carefully spread the chocolate fudge mixture over the vanilla layer in the baking pan. Swirl gently with a knife for a marbled effect, if desired. -
Step 7
Refrigerate for at least 2 hours, or until firm. Cut into squares and serve.
Important Information
Nutrition Facts (Per Serving)
It is important to consider this information as approximate and not to use it as definitive health advice.
Allergy Information
Please check ingredients for potential allergens and consult a health professional if in doubt.

Leave a Comment